How to Get Rid of Sand in Your Yard: The Ultimate Transformation Guide
You envision a lush, green carpet of grass where your kids can play and you can host summer barbecues. Instead, you have a patchy, brownish yard that feels more like a beach than a backyard. This frustrating reality is the challenge for homeowners battling sandy soil.
Sandy soil’s large particles create a coarse texture that allows water and essential nutrients to drain away far too quickly. This leaves your grass thirsty, hungry, and unable to establish strong roots. But don’t despair; transforming your sandy yard into a thriving oasis is entirely achievable with the right strategy.
You'll Learn About
Why Is a Sandy Yard Such a Nightmare for Homeowners?
Understanding the “why” behind your sandy soil problem is the first step toward a permanent solution. It’s not just about the gritty feel; the structure of sand itself creates several fundamental issues for most plants, especially traditional lawn grasses.
The Core Problem: Poor Water and Nutrient Retention
The primary issue with sandy soil is its inability to hold onto water and nutrients. The large, irregular particles of sand create significant air pockets between them. When you water your lawn, the water rushes straight through these gaps, quickly passing beyond the reach of your grass’s roots.
Worse yet, this rapid drainage carries away vital nutrients—a process called leaching. Any fertilizer you apply is essentially washed away before your plants have a chance to absorb it. This leaves your lawn in a constant state of dehydration and malnutrition.
A Weak Foundation for Healthy Grass
Grass needs a stable medium to anchor its roots and build a strong foundation. The loose, shifting nature of sandy soil makes it difficult for grass roots to take a firm hold. This leads to a shallow root system, making the turf susceptible to being pulled up easily and highly vulnerable to drought and heat stress.
Without a deep root system to search for moisture, the grass quickly becomes stressed and turns brown during dry spells. This results in the patchy, unhealthy-looking lawn that is all too common with sandy yards.
An Open Invitation for Unwanted Pests and Weeds
Certain pests and weeds are uniquely adapted to thrive in the dry, low-nutrient conditions of sandy soil. You might notice an increase in specific insects that prefer burrowing in sand. Some types of wasps, for instance, are drawn to sandy banks for nesting, which can be a nuisance; understanding why wasps are flying around your property is key to managing them.
Additionally, many hardy weeds with deep taproots outcompete struggling grass for the scarce water and nutrients available. This means you spend more time dealing with unwanted guests than enjoying a beautiful lawn.
Your 5-Step Battle Plan to Transform Sand into Rich Soil
Fixing a sandy yard is a process of fundamentally changing the soil’s composition. It’s not a quick fix, but a long-term investment in the health of your property. Follow these five steps diligently to build a rich, fertile foundation for the lawn of your dreams.
Step 1: Know Your Enemy – How to Properly Test Your Soil
Before you can fix the problem, you need to understand its severity. A simple DIY soil test can give you a clear picture of what you’re working with. The “jar test” is an easy and effective way to determine the percentage of sand, silt, and clay in your soil.
To perform the test, fill a straight-sided glass jar about one-third full with your yard’s soil. Fill the rest of the jar with water, leaving a little space at the top, and shake it vigorously for a few minutes until all the particles are suspended. Let the jar sit undisturbed for 24-48 hours, and the soil will settle into distinct layers: sand on the bottom, silt in the middle, and clay on top. Measuring these layers will reveal your soil’s composition. For a more detailed analysis of pH and nutrient deficiencies, consider sending a sample to your local cooperative extension for professional testing.
Step 2: The Magic Ingredient – Amending with Organic Matter
This is the most critical step in transforming your sandy yard. Organic matter is the single most effective solution for improving sandy soil. It acts like a sponge, holding onto moisture and nutrients, and it helps bind the large sand particles together, improving the soil’s structure.
Excellent sources of organic matter include well-rotted compost, aged animal manure, peat moss, and leaf mold. These materials are teeming with beneficial microorganisms that bring “dead” sand back to life by cycling nutrients and improving overall soil health. You cannot add too much organic matter; be generous with your application.
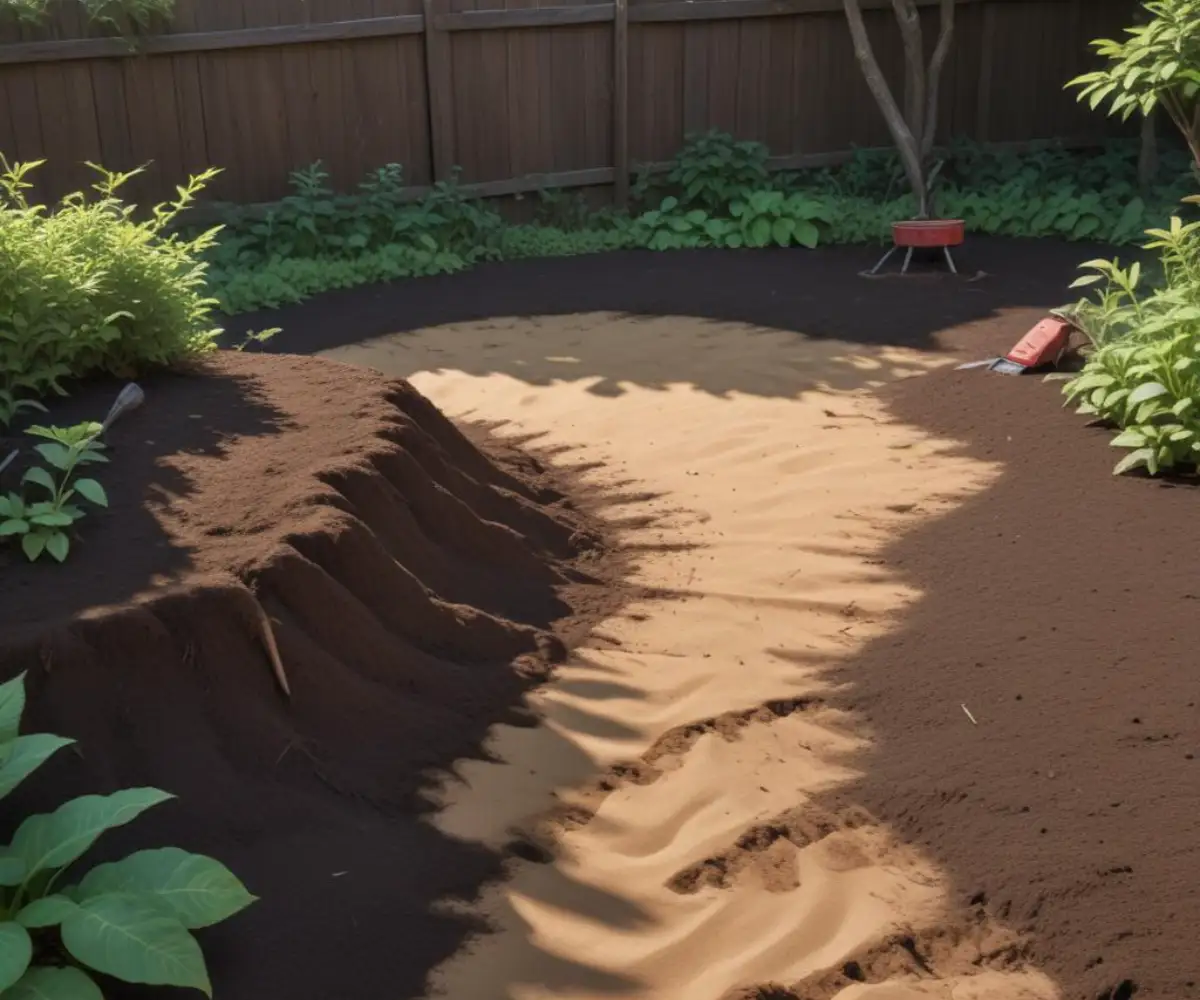
Step 3: The Hard Part That Pays Off – Tilling and Mixing
Simply spreading compost on top of your sandy lawn won’t work. To truly fix the problem, you must thoroughly incorporate the organic matter into the existing soil. Start by spreading a thick layer, ideally 3 to 4 inches, of your chosen organic amendments over the entire area.
Using a rototiller or a sturdy garden fork, work this new material into the top 6 to 8 inches of sand. This deep mixing is essential for creating a uniform, nutrient-rich root zone where your grass can thrive. While labor-intensive, this step is what separates a temporary fix from a permanent solution.
Step 4: Choose Your Champions – Selecting Sand-Tolerant Grass
Once your soil is amended, you need to choose a grass variety that is naturally suited to well-draining conditions. Some grasses are simply better equipped to handle the challenges of sandy soil, even after it has been improved. Look for drought-tolerant species with deep root systems.
Grasses like Bermuda grass, Zoysia grass, and Tall Fescue are excellent choices. These varieties are known for their resilience and ability to establish deep roots that can access moisture from further down in the soil profile. Choosing the right type of grass significantly increases your chances of long-term success.
| Grass Type | Drought Tolerance | Sunlight Needs | Foot Traffic Tolerance | Maintenance Level |
|---|---|---|---|---|
| Bermuda Grass | High | Full Sun | High | Medium |
| Zoysia Grass | High | Full Sun to Light Shade | High | Low to Medium |
| Tall Fescue | Medium-High | Full Sun to Partial Shade | High | Medium |
| Bahiagrass | High | Full Sun | Medium | Low |
Step 5: The Long Game – Maintenance for Lasting Success
Creating healthy soil is an ongoing process. To maintain your newly transformed lawn, you’ll need to adopt a few key maintenance habits. Water deeply but infrequently to encourage the grass to develop a deep, resilient root system.
Use slow-release fertilizers to prevent nutrients from washing away. Each year, consider “topdressing” your lawn by spreading a thin layer (about a quarter-inch) of compost over the surface. This continues to build the organic content of your soil over time, ensuring your lawn remains healthy and green for years to come.
Critical Mistakes to Avoid When Fixing Your Sandy Lawn
The path to a lush lawn is paved with good intentions, but a few common missteps can derail your progress. Avoid these critical mistakes to ensure your hard work pays off.
The Layering Fallacy: Why Simply Adding Topsoil Won’t Work
One of the most common mistakes is to buy a truckload of topsoil and simply spread it over the existing sand. This creates a distinct layer of good soil on top of a layer of poor soil. Grass roots will initially grow in the topsoil but will stop once they hit the sand, leading to a shallow, weak root system that is still vulnerable to drought.
The key is not to layer, but to amend and mix. You must blend the new organic material with the native sand to create a single, cohesive, and improved soil profile.
Using the Wrong Tools for the Job
Successfully transforming a yard is a significant undertaking that requires a clear plan. Just as you would carefully evaluate your options for a major home upgrade, like deciding between a 150 amp vs 200 amp service, you need the right approach for your soil. Avoid using amendments that are not fully decomposed, such as fresh manure, as they can “burn” new grass seedlings.
Similarly, resist the temptation to add clay to your sand without expert guidance. Incorrectly mixing clay and sand can create a concrete-like substance that is worse than the original problem. Stick with proven, high-quality organic matter like compost.
Impatience and Inconsistency: The Path Back to a Sandy Pit
Soil improvement is a marathon, not a sprint. It took a long time for your yard’s soil to become what it is, and it will take time to change it. Don’t get discouraged if you don’t see a perfect lawn in a matter of weeks.
Consistency is your greatest ally. Continue to top-dress with compost annually, water correctly, and mow at a higher setting to protect the soil. Over time, these consistent actions will build a resilient, self-sustaining ecosystem in your backyard.
Frequently Asked Questions About Sandy Soil Remediation
It’s natural to have questions when undertaking a big project. Here are answers to some of the most common queries about fixing sandy yards.
How much compost is enough?
A good rule of thumb is to apply a layer of compost that is 3 to 4 inches deep before tilling it into the top 6 to 8 inches of sand. For ongoing maintenance, an annual topdressing of a quarter-inch to a half-inch is sufficient to continue improving the soil structure and fertility.
Can I just embrace the sand with xeriscaping?
Absolutely. If the idea of building a traditional lawn seems too daunting, working with your sandy soil instead of against it is a fantastic, low-maintenance alternative. Xeriscaping involves using drought-tolerant native plants, succulents, and decorative stones that thrive in sandy conditions. This can create a beautiful, water-wise landscape that is both eco-friendly and stylish.
What’s the fastest way to see results?
The fastest way to see a dramatic improvement is by focusing on the two most impactful steps: deeply incorporating a large volume of high-quality compost and selecting a grass variety that is well-suited for sandy conditions. While some home projects can feel tedious, like learning how to remove carpet staples from stairs, the satisfaction of a job well done is immense. The same applies here; thorough soil preparation will yield the most immediate and lasting results.
Conclusion: From Barren Sandpit to Backyard Oasis
Getting rid of the problems caused by a sandy yard doesn’t mean physically removing the sand. It means transforming the soil from the ground up by building a rich, living ecosystem. The solution, time and again, is the consistent and generous application of organic matter.
By amending your soil, choosing the right plants, and adopting smart maintenance practices, you can solve the core issues of poor water and nutrient retention. The reward for your efforts will be more than just a beautiful lawn; it will be a healthier environment, lower water bills, and a valuable addition to your home that you can enjoy for many years.