Purple Shampoo Stains in Your Shower? Here’s How to Fix It FAST!
You bought purple shampoo to keep your blonde, silver, or highlighted hair looking vibrant and brass-free. You love the results on your hair, but you’re horrified to discover that your shower now has unsightly, stubborn purple stains. It’s a frustratingly common problem that can make a pristine bathroom look grimy and neglected.
Those vibrant violet pigments that work wonders on your hair can cling tenaciously to shower surfaces, especially if they are porous or have existing soap scum buildup. The good news is you are not alone in this battle, and removing these stains is entirely possible without resorting to extreme measures. This guide will walk you through everything you need to know to eradicate those pesky purple marks and restore your shower to its former glory.
You'll Learn About
Understanding the Enemy: Why Does Purple Shampoo Stain?
Before we dive into the solutions, it’s crucial to understand why these stains happen in the first place. Knowledge is power, and understanding the cause will not only help you remove the current stains but also prevent them from ever coming back. It’s less about the shampoo being “bad” and more about a chemical reaction with your shower’s surfaces.
The Power of Violet Pigment
Purple shampoo works based on the principles of color theory. Purple and yellow are opposite each other on the color wheel, which means they cancel each other out. The shampoo deposits a small amount of violet pigment onto your hair shaft to neutralize any unwanted yellow or brassy tones, leaving you with a cooler, more neutral shade.
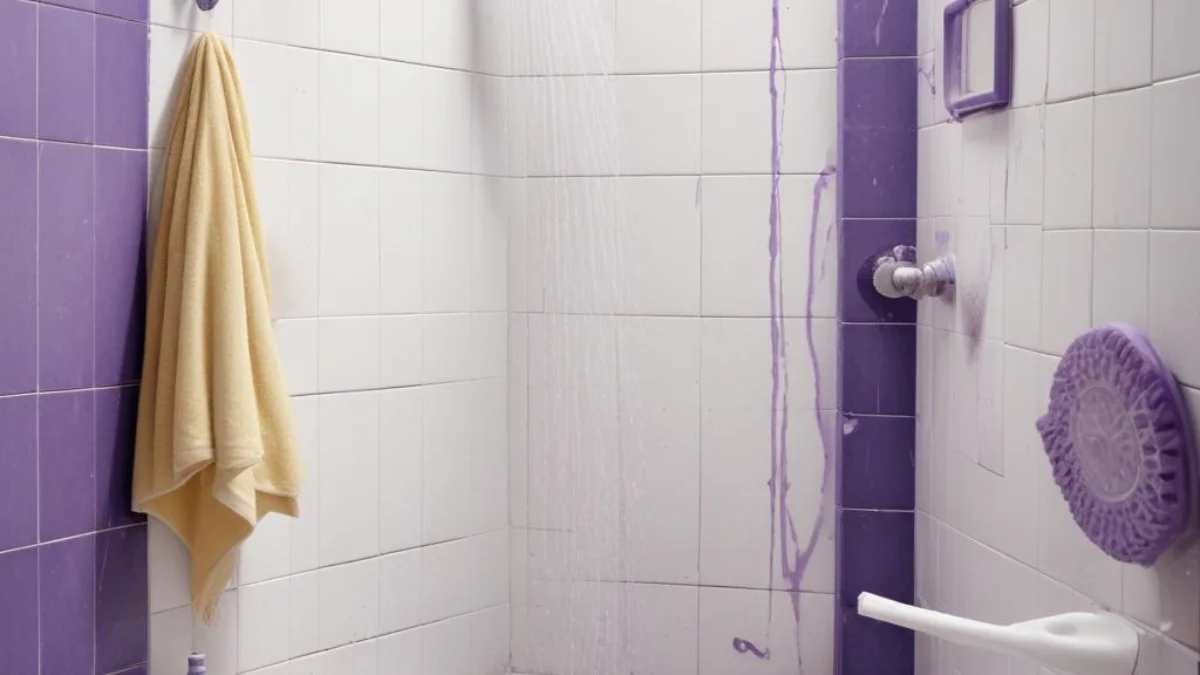
The very thing that makes it effective for your hair—intense, high-quality pigment—is what makes it a nightmare for your bathroom. These pigments are designed to stain, and they will readily latch onto any surface that gives them a foothold, from grout lines to the nearly invisible pores in your shower floor.
Commonly Stained Shower Surfaces
Not all shower materials are created equal when it comes to stain resistance. The porosity of the surface is the single biggest factor. The more porous a material is, the more tiny holes it has for the purple pigment to seep into and set.
The most susceptible materials include grout, unsealed natural stone like marble or travertine, and older or worn acrylic and fiberglass tubs. Grout is notoriously porous, acting like a sponge for any liquid it comes into contact with. Similarly, if the protective gel coat on your fiberglass or acrylic shower is worn down from years of use and harsh cleaners, it becomes much more vulnerable to staining.
Preparation is Key: Before You Begin a Stain Removal Mission
Jumping straight into scrubbing might seem like the best idea, but a little prep work will ensure you get the best results safely and effectively. Taking a few moments to prepare can be the difference between a sparkling clean shower and a frustrating, ineffective cleaning session. This is your pre-flight checklist for stain removal.
Safety First: Protect Yourself and Your Bathroom
Even when using gentle, household cleaners, it’s wise to take precautions. Ensure your bathroom is well-ventilated by opening a window or turning on the exhaust fan. This is especially important if you decide to use stronger, chemical-based cleaners.
Wearing rubber gloves is also a great idea to protect your skin from irritation. Some cleaning agents can be drying or cause reactions, so it’s better to be safe than sorry. Keep your cleaning supplies organized and out of reach of children and pets.
The All-Important Patch Test
This is the most critical step before you apply any cleaning solution to a large area. Always perform a patch test on a small, inconspicuous spot of your shower. This could be a low corner or behind the shampoo bottle rack.
Apply a small amount of your chosen cleaner, let it sit for the recommended time, and then rinse it off. Check for any discoloration, damage, or adverse reactions on the surface. This simple test can save you from causing irreversible damage to your shower tiles, grout, or tub.
Your Stain-Fighting Arsenal: Methods for Every Type of Stain
With preparation complete, it’s time to choose your weapon. There are several effective methods for removing purple shampoo stains, ranging from gentle DIY solutions to powerful commercial cleaners. The best choice depends on the severity of the stain and the type of surface you are cleaning.
The Natural & Gentle Route: DIY Cleaning Solutions
For fresh stains or sensitive surfaces, starting with a homemade cleaner is often the best approach. These solutions use common household ingredients, are inexpensive, and are much safer for you and your plumbing system.
One of the most effective DIY stain removers is a baking soda paste. Simply mix baking soda with a small amount of water until you have a thick, spreadable paste. Baking soda is a mild abrasive that gently lifts stains without scratching most surfaces. For an extra boost, you can use hydrogen peroxide instead of water to create a powerful, oxygen-bleaching paste that is fantastic for stubborn grout stains.
Another popular option is a solution of white vinegar and water. Mix equal parts in a spray bottle. Vinegar is an excellent cleaning agent that can dissolve soap scum and mineral deposits, which often trap the purple pigment. Simply spray the solution, let it sit for 15-20 minutes, and then scrub.
Leveling Up: Potent Commercial Cleaners
If the DIY methods don’t quite cut it, you may need to turn to a commercial cleaner. Look for products specifically designed to combat soap scum and bathroom stains. An oxygen-based bleach cleaner (like OxiClean) is often a safe and highly effective option for a variety of surfaces.
For extremely stubborn stains, a magic eraser can work wonders. These are made of melamine foam, which acts as a superfine abrasive. Wet the eraser and gently rub the stain. Remember to be gentle, as excessive pressure can dull the finish on some acrylic or fiberglass surfaces.
When dealing with older homes, you might encounter issues beyond simple stains. Problems with drainage can sometimes be linked to the plumbing itself. If you’re house-hunting and notice persistent staining issues, it might be worth investigating the plumbing, as some homeowners wonder should I buy a house with cast iron pipes, which can have their own set of challenges.
Step-by-Step Guide: How to Get Purple Shampoo Stains Out of Your Shower
Now, let’s put these methods into action. Follow these detailed steps to systematically remove those stubborn purple stains from your shower surfaces for good.
Method 1: The Baking Soda Paste Power-Scrub
This is the best starting point for most stains on tile, grout, and fiberglass. It’s gentle yet surprisingly effective.
First, mix three parts baking soda with one part water to form a thick paste. Liberally apply the paste directly onto the purple stains, ensuring they are completely covered. Let the paste sit and work its magic for at least 15-20 minutes. For tougher stains, you can leave it on for up to an hour.
Next, take a soft-bristled brush or a non-scratch sponge and scrub the area in a circular motion. You should see the stain begin to lift. Rinse the area thoroughly with warm water and inspect the results. Repeat the process if necessary.
Method 2: The Vinegar Solution Soak
This method works well for shower doors, fixtures, and less-porous tile surfaces where soap scum might be trapping the color.
Mix equal parts white vinegar and warm water in a spray bottle. Generously spray the stained areas and let the solution sit for 20-30 minutes. The acidity of the vinegar will help break down the soap scum and the pigment.
After letting it soak, scrub the area with a sponge or cloth. For stubborn spots, reapply the spray and scrub again. Finally, rinse the entire area with clean water to remove any lingering vinegar scent and residue.
Method 3: Advanced Tactics for Grout and Tough Stains
Grout is the number one victim of purple shampoo stains. Its porous nature makes it a magnet for pigments. If the baking soda paste didn’t fully work, it’s time to bring out the big guns.
Create a paste using a powdered oxygen bleach cleaner (like OxiClean) and a small amount of water. Apply this paste specifically to the grout lines using an old toothbrush. Let it sit for at least an hour, but for deep-set stains, you can leave it on for several hours or even overnight.
After the waiting period, scrub the grout lines vigorously with the toothbrush and rinse completely. The oxygen bleach is excellent at lifting color out of porous materials without the harshness of chlorine bleach. This same method can be applied to very tough stains on tile or fiberglass, but always remember to patch test first.
Sometimes, tough cleaning jobs remind us of other stubborn messes around the house. If you’ve ever dealt with construction projects, you know how hard it can be to clean up. For instance, figuring out how to remove concrete splatter from Hardie board requires a similar patient and methodical approach to avoid damaging the surface.
Comparing Your Options: A Quick Guide to Cleaning Methods
To help you decide which approach is best for your situation, here is a handy table summarizing the different methods, their effectiveness, and the surfaces they are best suited for.
| Cleaning Method | Best For | Pros | Cons |
|---|---|---|---|
| Baking Soda & Water Paste | Tile, Grout, Fiberglass, Acrylic | Gentle, non-toxic, inexpensive, effective on fresh stains. | May require multiple applications for set-in stains. |
| White Vinegar & Water Spray | Shower Doors, Fixtures, Tile | Great for removing soap scum, readily available, eco-friendly. | Strong smell, should not be used on unsealed natural stone. |
| Hydrogen Peroxide | Stubborn Grout, White Tile | Excellent whitening power, disinfects as it cleans. | Can potentially lighten colored grout over time. |
| Magic Eraser | Fiberglass, Acrylic, Smooth Tiles | Very effective on set-in stains, requires minimal effort. | Can be abrasive and may dull shiny surfaces if used too aggressively. |
| Oxygen Bleach (e.g., OxiClean) | Deep-Stained Grout, Tough Tile Stains | Powerful stain remover, color-safe on most surfaces. | Requires longer dwell time, more expensive than DIY options. |
Prevention is Better Than Cure: Keeping Your Shower Stain-Free
Once you’ve successfully removed the stains, you’ll want to make sure they never return. A few small adjustments to your routine can keep your shower looking pristine. The best defense is a good offense.
Adjust Your Shampooing Technique
The easiest way to prevent stains is to control where the shampoo goes. Try to apply the shampoo and lather it in your hair while leaning away from the walls and floor as much as possible. This minimizes direct contact between the potent, undiluted product and your shower surfaces.
You can also try diluting the purple shampoo slightly with a bit of water in your palm before applying it to your hair. This can reduce the concentration of the pigment without significantly affecting its toning ability on your hair. Experiment to find a balance that works for you.
Rinse Immediately and Thoroughly
This is arguably the most effective preventative measure. Do not let the purple suds sit on your shower walls or floor. As soon as you are done toning your hair, immediately rinse down the entire shower with hot water. Use your shower head to spray down the walls, the floor, and the corners.
Pay special attention to grout lines and the corners where suds tend to accumulate. A quick, thorough rinse washes away the pigments before they have a chance to settle and stain. Making this a consistent habit will virtually eliminate the problem.
Maintain a Clean and Sealed Shower
Purple shampoo stains are much more likely to stick to surfaces that already have a layer of soap scum or grime. Regularly cleaning your shower—at least once a week—will prevent this buildup. A clean surface is a less “sticky” surface.
For those with tile and grout, ensuring your grout is properly sealed is a game-changer. Grout sealant creates an invisible barrier that repels water and, you guessed it, purple pigments. Sealer needs to be reapplied periodically (usually once a year), but it is one of the best investments you can make for a low-maintenance, stain-free shower.
A well-maintained home is less likely to have strange issues pop up. For example, keeping things clean and in good repair means you’re less likely to be surprised by strange sounds, like a refrigerator that sounds like mice, which can often be a sign of a simple maintenance need.
When All Else Fails: Calling in the Professionals
What if you’ve tried everything—baking soda, vinegar, commercial cleaners—and the purple stains just won’t budge? While rare, some stains on particularly porous or damaged surfaces can be incredibly difficult to remove with DIY methods alone. This is when it might be time to consider calling a professional.
Professional cleaning companies have access to industrial-strength cleaning products and equipment, like steam cleaners, that are not available to the general public. They have the expertise to assess the surface type and apply the most effective treatment without causing damage. For deeply stained grout, a professional tile and grout cleaning service can often restore it to a like-new condition.
While it comes at a cost, hiring a professional can save you time, frustration, and the potential expense of having to replace a stained shower component. If you’re at your wit’s end, getting a quote from a reputable local service is a worthwhile step.