How to Flush Mount a Frameless Mirror: The Pro Secret!
The frameless mirror is a cornerstone of modern interior design. Its clean lines and minimalist aesthetic can make any room feel larger, brighter, and more sophisticated.
Achieving that perfect, seamless “floating” look—a true flush mount—is the goal. However, this seemingly simple DIY project can quickly become a source of major frustration.
This comprehensive guide will walk you through the professional secrets. We’ll show you how to securely and perfectly flush mount a frameless mirror, avoiding the common pitfalls that trip up most homeowners.
You'll Learn About
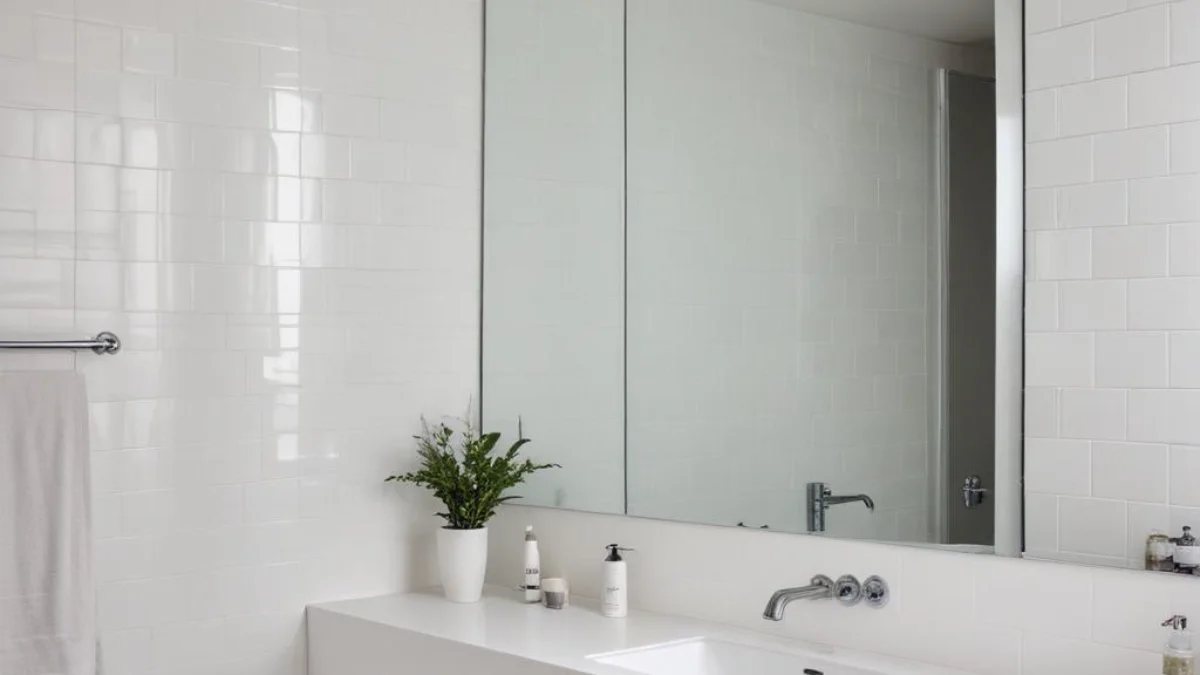
The Allure of the Floating Mirror: Why Go Frameless?
A flush-mounted frameless mirror offers unparalleled elegance. Unlike its framed counterparts, it doesn’t create a visual border, allowing it to blend seamlessly with your wall.
This design choice creates an illusion of expanded space, which is especially valuable in smaller rooms like bathrooms, entryways, or hallways. It reflects light more effectively, enhancing the room’s overall brightness.
The result is a sleek, high-end finish that elevates your home’s decor from standard to stunning. It’s a subtle change with a massive impact.
The Hidden Challenge: Why a Perfect Flush Mount Is So Tricky
The primary obstacle between you and a flawless installation is often the wall itself. Most walls are not perfectly flat. They have subtle bows, waves, and imperfections that become glaringly obvious when you try to press a perfectly flat mirror against them.
This can create unsightly gaps and, more dangerously, put uneven stress on the mirror, increasing the risk of cracking or distortion. The sheer weight of a large mirror adds another layer of complexity and risk.
Choosing the wrong mounting method or adhesive can lead to catastrophic failure. A falling mirror is not just a mess to clean up; it’s a significant safety hazard for your family and home.
Your Toolkit for Success: Gathering the Right Supplies
Before you begin, gathering the right tools is non-negotiable. Having everything on hand will make the process smoother and safer. Your needs will vary slightly based on your chosen mounting method.
For any installation, you will need a tape measure, a pencil, a quality 4-foot level, and a caulk gun. Painter’s tape is also essential for marking your layout on the wall without leaving permanent marks.
You’ll also need cleaning supplies like isopropyl alcohol and clean microfiber cloths. If using hardware, a stud finder, drill, and the appropriate drill bits are mandatory. For large mirrors, a pair of heavy-duty glass suction cups is a wise investment.
Choosing Your Weapon: Adhesive vs. Hardware Mounts
There are two primary methods for flush mounting a frameless mirror: a specialized adhesive (mastic) or mechanical hardware like J-clips or Z-clips. Each has distinct advantages and is suited for different situations.
The adhesive method provides the most seamless, truly “flush” appearance, as there is no visible hardware. However, it is a permanent solution and requires a very flat wall. Hardware mounts offer superior holding power for heavy mirrors and can accommodate slight wall imperfections, but the clips may be visible.
Understanding the pros and cons of each is the first critical decision you’ll make. This choice will dictate your entire installation process.
| Feature | Adhesive (Mirror Mastic) | Mechanical Hardware (J-Clips / Z-Clips) |
|---|---|---|
| Appearance | Completely invisible, true seamless look. | Clips may be visible at the edges (J-Clips) or create a small, uniform gap (Z-Clips). |
| Best For | Light to medium-weight mirrors on perfectly flat, smooth walls. Bathrooms (when using moisture-resistant mastic). | Heavy or oversized mirrors, slightly uneven walls, or situations where removal may be needed later. |
| Pros | Provides a flawless, professional finish. Distributes weight evenly across the entire surface. | Extremely strong and secure, especially when anchored to studs. Allows for air circulation behind the mirror. Removable. |
| Cons | Permanent and very difficult to remove without damaging the wall or mirror. Requires a perfectly flat surface and temporary support during curing. | Hardware can disrupt the seamless aesthetic. Requires precise measurements and drilling into walls. |
Method 1: The Adhesive Mount for a Truly Seamless Look
This method is favored by professionals for its flawless finish. It relies on a special glue called mirror mastic, which is formulated to adhere strongly to the mirror backing without damaging the reflective silver layer.
Never use standard construction adhesive or silicone. These products can contain chemicals that eat away at the mirror’s backing over time, creating unsightly black spots. Only use a product specifically labeled as “mirror mastic” or “mirror adhesive.”
Patience is key with this method. The mastic needs time to cure fully, which requires setting up temporary support to hold the mirror in place for at least 24-48 hours.
Step 1: Wall Preparation is Everything
Your wall surface must be pristine. Start by cleaning the designated area thoroughly with isopropyl alcohol to remove any dust, grease, or grime. This ensures a strong bond.
Next, patch any holes or significant imperfections with spackle. Once dry, sand the patches smooth so they are flush with the wall. A smooth surface is absolutely critical for this method.
Finally, it’s highly recommended to prime the area, especially if you have fresh drywall or patches. The primer seals the surface and prevents the wall from absorbing the moisture from the mastic, ensuring a stronger, more permanent bond.
Step 2: Precision Marking and Layout
This is where “measure twice, cut once” becomes “measure ten times, mount once.” Use your tape measure and level to determine the exact final position of your mirror. Mark the corners lightly with your pencil.
Use painter’s tape to create a clear outline on the wall where the mirror will sit. This gives you a clear visual guide and protects the surrounding wall during installation.
Double-check that your outline is perfectly level and plumb. A slightly crooked mirror will be a constant visual annoyance, so take your time on this step.
Step 3: Applying the Mirror Mastic
Load the tube of mirror mastic into your caulk gun. You will apply the adhesive directly to the back of the mirror. Clean the mirror back with isopropyl alcohol first.
Apply the mastic in vertical lines or large, golf-ball-sized globes, spaced about 6-8 inches apart. Do not apply it in a grid or circle around the edge. Vertical lines allow air to circulate, preventing moisture buildup that could damage the mirror backing.
Keep the mastic at least two inches away from the edge of the mirror. This prevents it from squeezing out the sides when you press the mirror to the wall.
Step 4: Setting Up Your Temporary Support
This is the most critical step for a successful adhesive installation. The mirror must be supported from below while the mastic cures. You can do this by screwing a temporary ledger board (a straight piece of 1×4 lumber) to the wall along your bottom guideline.
Ensure the ledger board is perfectly level, as the mirror will rest directly on it. Alternatively, for mirrors that sit on a vanity or countertop, you can use blocks of wood or shims to hold the bottom edge in place.
You should also use painter’s tape across the front of the mirror, securing it to the wall above. This prevents the mirror from tipping forward while the adhesive grabs hold.
Step 5: Placing the Mirror
With the help of a friend (and suction cups for a large mirror), carefully lift the mirror. Rest the bottom edge on your temporary ledger board and gently tilt it forward until it makes contact with the wall.
Press firmly and evenly across the entire surface of the mirror to spread the mastic and ensure solid contact with the wall. Do not wiggle or slide the mirror, as this will create weak spots in the bond.
Once in place, apply the painter’s tape braces across the top. Now, you must wait. Follow the mastic manufacturer’s instructions for cure time, which is typically 24 to 72 hours. Do not remove the support or braces until it is fully cured.
Method 2: The Mechanical Mount for Ultimate Security
For very large, heavy mirrors or on walls that aren’t perfectly flat, mechanical fasteners are the safest choice. The most common types are J-clips, which are simple brackets, and Z-clips, which are interlocking metal rails that provide a very secure mount.
This method requires precise drilling and anchoring. Whenever possible, you must anchor your clips directly into wall studs. A stud finder is an indispensable tool for this process.
If a stud is not available in the ideal location, you must use heavy-duty drywall anchors, like toggle bolts or screw-in anchors, rated to hold significantly more than the mirror’s weight.
Step 1: Masterful Measurements and Clip Placement
First, mark the outline of your mirror on the wall just as you would for the adhesive method. Use your stud finder to locate and mark any wall studs within that outline.
The bottom clips will bear the full weight of the mirror, so they must be anchored securely. Plan to place at least two bottom clips, spaced evenly and ideally screwed into studs.
The top and side clips are primarily to keep the mirror from tipping forward. They will be installed after the mirror is resting on the bottom clips.
Step 2: Installing the Bottom Clips
Using your level, draw a perfectly straight line where the bottom of the mirror will sit. This is your guide for the bottom clips. Position your J-clips along this line at your pre-marked locations.
Mark the screw holes for each clip. If you’re hitting a stud, pre-drill a small pilot hole to prevent the wood from splitting. If using a drywall anchor, drill the appropriate size hole and install the anchor securely.
Screw the bottom clips firmly into place. Double-check with your level that they are perfectly aligned with each other before proceeding.
Step 3: Placing the Mirror and Securing the Top/Side Clips
With a helper, carefully lift the mirror and lower it into the channel of the bottom clips. Let it rest gently against the wall.
While one person holds the mirror steady, the other person will install the top or side clips. These clips often have a rotating or sliding mechanism that allows you to lock the mirror in place.
Position the top clips so they apply gentle pressure to the mirror, holding it snugly against the wall. Mark, drill, and screw them into place. Your mirror is now securely mounted.
Pro Tips to Avoid Common DIY Disasters
Even with the best instructions, small details can make a big difference. These professional tips can help you navigate common issues and achieve a truly flawless result.
Remember that safety is paramount. Always wear safety glasses and gloves when handling glass, and never attempt to install a large or heavy mirror by yourself.
Thinking through the entire process before you start, including potential problems, is the hallmark of a successful project.
Dealing with Imperfect Walls
If you’re using clips on a bowed wall, you may find a gap behind the mirror. You can place small, thin shims behind the clips before screwing them in to make them plumb.
For a more elegant solution on uneven walls, Z-clips are superior. These interlocking metal rails attach to the wall and the mirror back, and their design can help average out minor wall imperfections, providing a very strong and secure mount.
Handling Large and Heavy Mirrors
For any mirror larger than a small medicine cabinet, always have a helper. Large panes of glass are awkward, heavy, and extremely fragile. Attempting a solo installation is a recipe for disaster.
Invest in or rent a pair of glass suction cup lifters. These tools provide a secure handle on a slippery surface, dramatically improving your control and safety during the lifting and placement process.
Working Around Outlets and Sconces
If your installation includes an electrical outlet or wall sconce, this must be planned from the start. You will need to have the mirror professionally cut to accommodate the electrical box.
This is not a DIY task. A professional glass cutter can create precise cutouts with polished edges. Ensure your measurements for the cutouts are exact before ordering the mirror.
Maintaining Your Home’s Systems
A home improvement project can often highlight other areas needing attention. Thinking about how systems work together is key to good homeownership. For instance, a wall project might reveal a need to better conceal pipes, a challenge similar to figuring out how to hide a sump pump discharge pipe in your landscape.
Improving one part of your home, like adding a beautiful mirror, can inspire other upgrades. You might consider ways to boost energy efficiency, such as exploring how to insulate glass block windows, to lower utility bills.
It’s also a reminder about overall home safety. Just as you ensure your mirror is secure, you should be aware of other potential hazards, such as the risks of a pellet stove overheating, and take preventative measures.
The Aftermath: Cleaning and Long-Term Care
Once your mirror is mounted and the area is clean, the final step is to give it a perfect shine. Use a quality, ammonia-free glass cleaner and a clean microfiber cloth.
When cleaning, spray the cleaner onto the cloth, not directly onto the mirror. This prevents the liquid from seeping down the glass and potentially getting behind it, which could damage the mirror backing over time.
Periodically check any visible hardware to ensure it remains tight and secure. A well-installed mirror should provide decades of beauty and function.
Your Flawless Flush Mount Awaits
Mounting a frameless mirror may seem daunting, but it is entirely achievable for a determined DIYer. The secret lies not in brute force, but in meticulous preparation, precise measurement, and choosing the right method for your specific situation.
By taking your time, using the correct materials like true mirror mastic, and prioritizing safety, you can achieve that stunning, professional-quality flush mount.
Now you have the knowledge and the strategy. Step back and enjoy the bright, open, and elegant space you’ve created.