That Annoying Gap Between Your Hearth and Fireplace? Fix It Now!
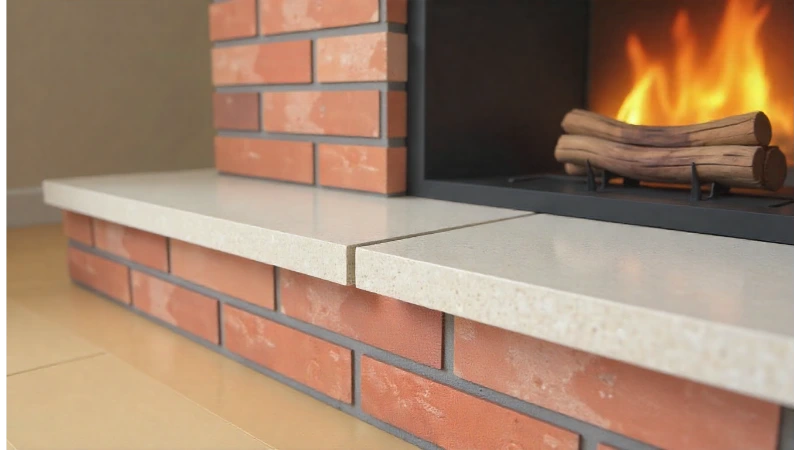
You love your fireplace. It’s the cozy heart of your home, the focal point of the room. But that small, persistent gap between the hearth and the fireplace surround? That’s more than just a cosmetic issue; it’s a problem you need to address.
This gap can be an eyesore, a trap for dust and debris, and in some cases, a genuine safety concern. The good news is that fixing it is often a straightforward DIY project that can restore the seamless, polished look of your fireplace and give you peace of mind.
You'll Learn About
Why You Can’t Ignore that Unsightly Gap
A gap between your hearth and fireplace might seem minor, but it can lead to several problems. Understanding these issues is the first step toward realizing why a repair is so important.
The Hidden Dangers: More Than Just an Eyesore
The most critical reason to seal this gap is safety. Embers can escape from the firebox and potentially fall into these cracks, creating a serious fire hazard, especially if they come into contact with the underlying wooden subfloor. One homeowner shared a scary story about embers falling through a cracked mortar joint and starting a small fire under their house.
Beyond the fire risk, these gaps can be a source of drafts, allowing cold air to seep into your home and heat to escape. This can lead to decreased energy efficiency and a chilly room. In some cases, if you notice a mysterious smell like your fireplace even when it’s not in use, it could be due to air currents through these gaps.
What Causes These Gaps to Form?
Several factors can cause a gap to appear between your hearth and fireplace. The most common is the natural settling of your home over time. As the house shifts, masonry can separate, creating these small fissures.
Another major cause is thermal expansion and contraction. The intense heat from the fire causes the materials of your fireplace and hearth to expand, and they contract as they cool. Over many cycles, this constant movement can degrade mortar and sealant, causing cracks and gaps to form.
Choosing Your Weapon: The Best Materials for the Job
Selecting the right material is crucial for a durable and, most importantly, safe repair. Using a product that is not rated for high temperatures is a major fire hazard. Standard caulk or adhesive will fail, melt, or even ignite when exposed to the heat of a fire.
Your choice will depend on the size of the gap, the materials of your fireplace (brick, stone, etc.), and your desired finish. The primary options are fireplace mortar (also called refractory caulk or cement) and high-temperature silicone sealants.
Fireplace Mortar: The Traditional, Rock-Solid Fix
Fireplace mortar, or refractory cement, is specifically designed to withstand the extreme temperatures inside a firebox and surrounding areas. It dries hard, creating a strong, permanent bond that looks like traditional mortar joints. This is an excellent choice for filling gaps in brick or stone fireplaces where you want the repair to blend in seamlessly.
High-Heat Sealant: The Flexible, Modern Solution
High-temperature silicone sealants offer more flexibility than mortar. This flexibility can be advantageous, as it accommodates the natural expansion and contraction of the fireplace materials, making future cracking less likely. These sealants are often easier to apply from a standard caulking gun and adhere well to various surfaces like metal, stone, and brick.
A Quick Comparison of Sealing Materials
To help you decide, here is a breakdown of the most common materials used to fill a gap between a hearth and fireplace.
| Material | Heat Resistance | Flexibility | Best For | Application |
|---|---|---|---|---|
| Fireplace Mortar / Refractory Cement | Very High (Up to 2000°F+) | Low (Dries Rigid) | Brick/stone joints, larger gaps, repairs inside the firebox. | Trowel or caulking gun. |
| High-Temperature Silicone Sealant | High (500°F – 650°F) | High (Remains Flexible) | Sealing joints between different materials, smaller gaps. | Standard caulking gun. |
| Grout (Non-sanded) | Low (Not for high-heat areas) | Low | Cosmetic gaps on tile hearths away from the firebox opening. | Grout float. |
Step-by-Step Guide: Sealing the Gap Like a Pro
With the right materials in hand, you’re ready to tackle the job. Following these steps will ensure a professional-looking and long-lasting repair.
Step 1: Safety and Preparation are Non-Negotiable
Before you begin, make sure the fireplace is completely cool and has not been used for at least 24-48 hours. Put on safety glasses and gloves. Lay down a drop cloth to protect your floor from dust and sealant.
Good ventilation is also important, so consider opening a window, especially when working with sealants that may have an odor as they cure.
Step 2: Cleaning the Gap for a Perfect Bond
This is the most critical step for a successful repair. Any dust, soot, ash, or crumbling old mortar must be completely removed. Use a stiff wire brush to scrub out the gap thoroughly.
Follow up with a shop vacuum to suck out all the loose debris. A clean surface is essential for the new material to adhere properly.
Step 3: Applying Your Chosen Material
For larger gaps (wider than 1/4 inch), you may need to insert a foam backer rod deep into the gap first. This provides a base for the sealant to sit on. Ensure you use a non-combustible backer rod if it’s near the firebox.
If using a caulking tube, cut the tip at a 45-degree angle to a size that matches the gap. Apply a steady, even bead of sealant deep into the joint. For mortar, use a small trowel or putty knife to press the material firmly into the gap.
Step 4: Tooling and Finishing for a Seamless Look
Immediately after applying the sealant or mortar, smooth the bead. You can use a caulk finishing tool or a gloved finger dipped in water to create a clean, concave joint. This “tooling” process ensures the material makes full contact with both sides of the gap and gives it a professional appearance.
Wipe away any excess material with a damp cloth before it starts to dry. Allow the repair to cure completely according to the manufacturer’s instructions, which can take 24 hours or more. Some refractory products require a small, low-heat fire to properly cure the material.
Common Mistakes to Avoid
Even a simple project can go wrong. Be mindful of these common pitfalls to ensure your repair is both effective and safe.
The biggest mistake is using the wrong material. Never use standard acrylic latex caulk or all-purpose silicone. These are not designed for high temperatures and will fail, creating a fire hazard.
Another frequent error is inadequate preparation. Failing to properly clean out the old, loose material will result in a weak bond, and your new sealant will quickly crack or pull away.
When to Call in a Professional
While sealing a small gap is a manageable DIY task, some situations require an expert. If the gap between your hearth and fireplace is large—more than half an inch wide—or if you see significant cracking in the bricks or foundation, this could indicate a structural problem.
If the hearth itself has separated from the fireplace and seems to be sinking or moving with the floor, this is a serious issue. It often means the hearth was improperly supported on the floor joists instead of being part of a monolithic concrete slab. In these cases, you should consult a certified chimney sweep or a structural engineer immediately.
Maintaining Your Repaired Hearth and Fireplace
Once your repair is complete and cured, proper maintenance will keep it looking great and functioning safely for years to come. Regularly inspect the repaired joint, especially before the start of the heating season.
Look for any new cracks or signs of separation. Keeping the area clean of soot and ash will also help preserve the integrity of the sealant. A well-maintained fireplace not only keeps you warm but also protects your home and family.
Frequently Asked Questions (FAQs)
Can I use regular caulk for a fireplace?
Absolutely not. You must use a product specifically rated for high temperatures, such as refractory caulk (fireplace mortar) or a high-heat silicone sealant. Regular caulk is a fire hazard when used near a heat source.
How big of a gap is too big to fix myself?
As a general rule, if the gap is wider than 1/2 inch or if you can see signs of structural shifting (like a sinking hearth or major cracks in the masonry), it’s best to call a professional. These could be signs of a more serious foundation issue that needs expert assessment.
What’s the difference between furnace cement and fireplace mortar?
While similar, furnace cement is often used to seal metal-to-metal joints, like flue pipes. Fireplace mortar is designed for masonry-to-masonry joints and is better suited for repairing cracks between bricks and stone. Both are high-temperature products, but fireplace mortar will give you a finish that looks more like a traditional mortar joint.
Sometimes, drafty conditions can be mistaken for a gap issue. If you have a gas fireplace and are feeling a chill, you might need to investigate a cold air gas fireplace problem, which can have different causes and solutions.