Cut Coolaroo Roller Shades That Are Too Wide? A DIY Guide
There’s a unique frustration that comes with a home improvement project hitting an early snag. You’ve found the perfect Coolaroo roller shades to block the sun and enhance your decor, but there’s a problem. After unboxing, you realize they are just a little too wide for your window frame.
This common issue can feel like a major setback, but it doesn’t have to be. Returning the shades is an option, but you can achieve a perfect, custom fit with a bit of DIY know-how. This guide provides a comprehensive walkthrough on how to trim your Coolaroo roller shades for a professional-looking installation.
You'll Learn About
Why a Perfect Fit is Crucial for Roller Shades
An improperly sized roller shade is more than just a minor aesthetic issue. Shades that are too wide will not fit within the window casing for an inside mount, rendering them unusable. If you attempt to force them, they can scrape the window frame, bunch up, and operate poorly.
Functionally, a correct fit ensures maximum light-blocking capabilities and thermal performance. Gaps at the sides can let in unwanted light and reduce the shade’s ability to insulate the room, affecting your home’s energy efficiency.
The Foundation: Accurate Measurements
The success of this project hinges entirely on precise measurements. Before you make a single cut, you must measure your window with care. Always follow the “measure twice, cut once” rule.
For an inside mount, measure the width of the window frame at the top, middle, and bottom. Use the narrowest of these three measurements as your starting point. From this narrowest width, you must subtract a small amount, typically 1/8 to 1/4 of an inch total, to allow clearance for the mounting brackets and ensure the shade operates smoothly without rubbing against the frame.
Gathering Your Tools for a Clean Cut
Having the right equipment is essential for a clean, professional result. Makeshift tools will lead to frayed edges and crooked lines. Prepare your workspace and gather these items before you begin.
You will need a large, flat, and clean surface to work on, such as a workbench or a protected floor. A cutting mat is highly recommended to protect the surface and provide a better grip for your cutting tool. Ensure the area is well-lit so you can clearly see your measurement and cut lines.
| Tool | Purpose | Pro-Tip |
|---|---|---|
| Tape Measure | For accurate window and shade measurements. | Use a metal tape measure for rigidity and precision. |
| Metal Straightedge or T-Square | To guide your cutting tool for a perfectly straight line. | A heavy ruler or square is less likely to slip during the cut. |
| Sharp Utility Knife or Craft Knife | For trimming the fabric portion of the shade. | Start with a brand new blade. A dull blade will tear the fabric. |
| Hacksaw or Pipe Cutter | For cutting the metal or cardboard roller tube. | A fine-toothed hacksaw blade provides a cleaner cut on metal tubes. |
| Pencil or Fabric Marker | To mark your precise cut line on the shade. | Use a light-colored marker for dark fabrics and vice versa. |
Trimming Your Coolaroo Roller Shades: A Step-by-Step Guide
With your tools gathered and measurements confirmed, you are ready to begin the cutting process. Work slowly and methodically to avoid mistakes. The entire process involves trimming both the fabric and the internal hardware.
Step 1: Unroll and Mark the Shade Fabric
Carefully unroll the Coolaroo shade completely on your flat work surface, ensuring it is smooth and free of wrinkles. Use your tape measure and the final width measurement you calculated to make several small marks on the fabric. It is generally recommended to trim from the side opposite the operating mechanism to avoid interfering with it.
Place your metal straightedge on the fabric, aligning it with the marks you made. Use your pencil or fabric marker to draw a single, clear, and continuous line from the top to the bottom of the shade. This line is your definitive guide for cutting.
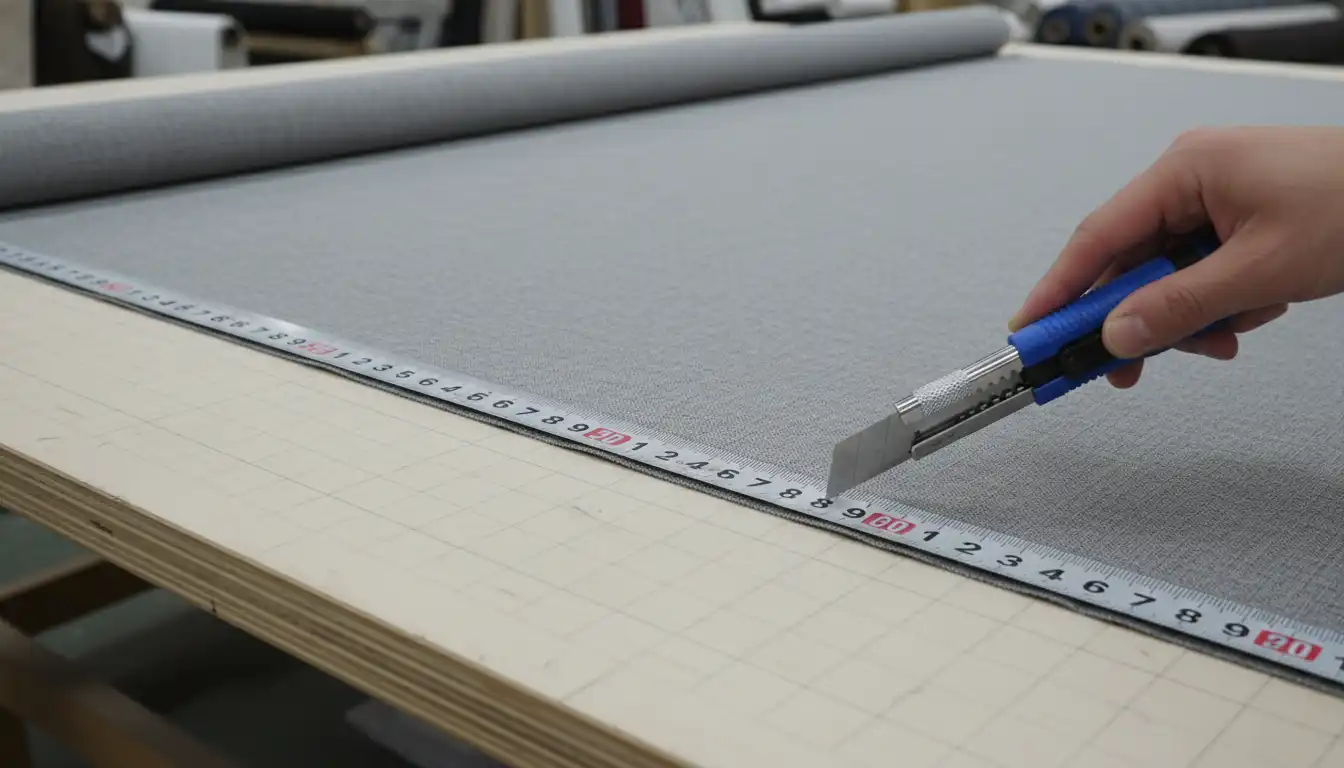
Step 2: Cutting the Shade Fabric
Align your metal straightedge precisely along the marked line. To prevent any movement, you can secure the straightedge and the fabric with painter’s tape or small weights. Take your sharp utility knife and hold it firmly.
Apply firm, even pressure and make one continuous cut from the top to the bottom of the fabric, using the straightedge as your guide. Resist the urge to saw back and forth; a single, decisive pass will yield the cleanest edge. A new blade is critical here for preventing snags and fraying.
Step 3: Trimming the Roller Tube and Bottom Rail
Once the fabric is trimmed, you need to shorten the hardware. First, gently remove the plastic end cap from the roller tube on the side you have cut. Measure and mark the roller tube to the same new width as the fabric.
Using your hacksaw or pipe cutter, carefully cut the roller tube at your mark. Ensure the cut is straight and as clean as possible. File down any sharp burrs or rough edges before reinserting the end cap. Repeat this exact same process for the bottom rail, which can also be trimmed with a hacksaw.
Achieving a Flawless, Factory-Quality Finish
A straight cut is good, but a durable, clean finish is even better. To prevent the cut edge of the fabric from fraying over time with use, you can apply a thin bead of a product like Fray Check or clear fabric glue. This creates an invisible seal along the edge, ensuring longevity.
When reassembling the shade, ensure the fabric rolls up straight and evenly onto the roller tube. If it seems misaligned, you may need to make small adjustments. Taking care with these final touches elevates your project from a simple fix to a professional-quality custom window treatment.
When DIY Becomes a Bigger Project
Sometimes a simple project can reveal other issues around the home. If you notice signs of water damage near your windows while installing your shades, it might be time to inspect your home’s exterior. The proper installation of features like a decorative brick skirt around the bottom of the house can help with water management.
While this project is manageable for most homeowners, it’s also important to know when to call a professional for other tasks. Understanding payment structures, such as whether you pay plumbers upfront, helps you manage larger home renovation budgets effectively.
Common Questions and Expert Answers
Even with a detailed guide, questions can arise. Addressing these common concerns can help build confidence and ensure a successful outcome.
Does Cutting a Roller Shade Void the Warranty?
In almost all cases, yes. Modifying a product from its original state, including cutting it, will typically void the manufacturer’s warranty. This is an important factor to consider before you decide to proceed with this DIY alteration.
You are trading the warranty for the ability to get a custom fit for your window. For many, the cost savings and perfect fit are well worth this trade-off.
Can I Use Scissors Instead of a Utility Knife?
While it may seem tempting, using scissors is not recommended for this task. It is incredibly difficult to achieve a perfectly straight line with scissors over the long length of a shade. A utility knife guided by a metal straightedge is the only way to guarantee a precise, factory-like cut.
Scissors are more likely to cause the fabric to bunch or shift, resulting in a wavy, unprofessional edge. Stick with the recommended tools for the best results.
What If I See an Issue With My Home’s Systems During Installation?
Home improvement projects often lead us to notice things we otherwise might miss. If you’re working near a wall heater and notice something unusual, such as an electric wall heater glowing red, it’s crucial to address it. Safety should always be the top priority in any home maintenance task.
With your freshly trimmed Coolaroo shades, you’ve not only solved a common problem but also added a custom touch to your home. This project proves that with careful preparation and the right technique, you can easily overcome a sizing mishap and achieve a perfect, professional finish for your windows.