How to Clean Unsealed Hardwood Floors Without Ruining Them
Unsealed hardwood floors possess a raw, natural beauty that many homeowners cherish. Unlike their sealed counterparts, they offer a direct connection to the authentic texture and grain of the wood. But this natural state comes with a significant challenge: vulnerability.
An unsealed wood floor is like a sponge. Lacking a protective topcoat like polyurethane, it is porous and highly susceptible to absorbing liquids, oils, and grime. This absorbency is the root of the problem and the primary reason why common cleaning methods can lead to disaster.
Using the wrong techniques can cause warping, swelling, permanent stains, and discoloration. Many homeowners unwittingly damage their beautiful floors simply by treating them like any other surface. Understanding the unique properties of unsealed wood is the first step toward preserving its integrity for years to come.
You'll Learn About
First, Confirm Your Floors Are Actually Unsealed
Before you begin any cleaning routine, it’s crucial to determine if your floors are truly unsealed. A mistake in this initial assessment can lead you to use methods that are either ineffective or damaging. Fortunately, there is a simple and reliable way to check.
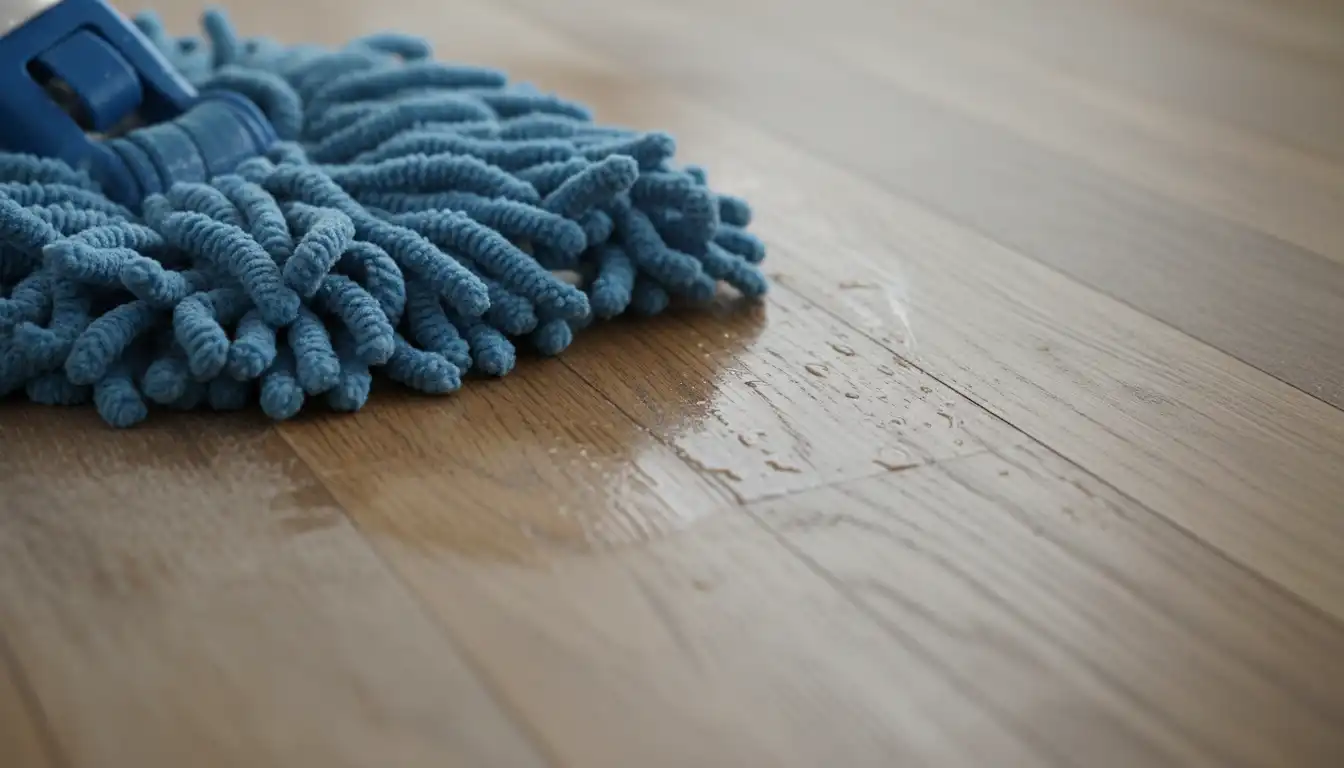
The Water Drop Test: A Simple Diagnostic
The definitive method for identifying unsealed wood is the water drop test. Select an inconspicuous area of your floor, perhaps in a corner or under a piece of furniture that you can easily move. Place a single drop of water onto the wood and observe it closely.
If the water droplet beads up on the surface, your floor has a sealant. If the water quickly soaks into the wood, causing the area to darken, your floor is unsealed and porous. This quick absorption is a clear sign that you must be extremely cautious with any form of liquid cleaner.
The Cardinal Sins: Cleaning Methods to Avoid at All Costs
When it comes to unsealed hardwood, what you don’t do is just as important as what you do. Using improper tools or cleaners can cause irreversible damage. These common mistakes are the fastest way to turn a cleaning day into a costly repair project.
Avoid these methods completely:
- Steam Mops: Never use a steam mop on unsealed wood. The combination of high heat and moisture forces water deep into the wood fibers, which can cause warping, swelling, and even encourage mold growth.
- Wet Mopping: Soaking or “slop” mopping is a major hazard. Any excess water left standing on the surface will be absorbed, leading to damage.
- Harsh Chemical Cleaners: Avoid ammonia, bleach, and abrasive cleaners. These substances can strip the natural oils from the wood, causing discoloration and leaving it brittle.
- Oil-Based Soaps and Waxes: While some sources suggest oils, products like Murphy Oil Soap can leave a residue that attracts dirt and makes future sealing or finishing difficult. Similarly, using the wrong wax can create a stubborn buildup. For a list of common products that can cause issues, consider reading about why using Pledge on wood floors can be problematic.
Understanding these restrictions is key. The goal is to clean the surface without allowing moisture or harmful chemicals to penetrate the raw wood.
The Safe and Effective Cleaning Protocol
Cleaning unsealed hardwood floors requires a gentle, moisture-averse approach. The process prioritizes dry cleaning methods first and uses liquid only when absolutely necessary and with extreme care. This step-by-step guide ensures a thorough clean without risking the health of your floors.
Step 1: Start with Dry Removal of Debris
Your first line of defense is always dry cleaning. The goal is to remove all abrasive particles like dust, dirt, and grit before introducing any moisture. If left on the floor, these particles can act like sandpaper during the cleaning process, causing micro-scratches.
Begin by using a broom with soft bristles or a microfiber dust mop. Microfiber is particularly effective as its electrostatic charge naturally attracts and holds onto dust particles. Move with the grain of the wood to dislodge debris from the tiny crevices.
Next, use a vacuum cleaner, but only with the right attachment and setting. Engage the “hard floor” setting, which retracts the beater bar or spinning brush. A rotating brush is designed for carpets and can scratch and damage the surface of raw wood. A vacuum cleaner with a soft brush attachment is ideal. Concerns about vacuums are valid; some models are known for scratching hardwood floors if used improperly.
Step 2: The “Barely Damp” Mopping Technique
For a deeper clean, you can proceed with a damp mop, but the emphasis is on “barely damp.” The mop should feel almost dry to the touch. This method removes grime that dry mopping leaves behind without saturating the wood.
First, prepare your cleaning solution. The safest choice is a pH-neutral cleaner specifically formulated for wood floors. Alternatively, you can mix a very mild solution of one to two capfuls of a gentle, pH-neutral dish soap into a gallon of warm water. Avoid using vinegar, as its acidity can sometimes cause discoloration on certain wood species.
Use a two-bucket system. Fill one bucket with your cleaning solution and the second with clean rinse water. Dip your microfiber mop into the cleaning solution, then wring it out as thoroughly as possible. You want absolutely no dripping water. Mop a small section of the floor, moving with the grain. After cleaning a small area, rinse the mop head in the clean water bucket, wring it out completely, and then dip it back into the cleaning solution for the next section.
Step 3: Immediate and Thorough Drying
This step is non-negotiable. As soon as you finish damp-mopping a small section, you must dry it immediately with a clean, dry microfiber cloth or towel. Do not let the floor air dry. Any lingering moisture creates an opportunity for absorption and potential damage.
Work in manageable sections (e.g., a 4×4 foot area) to ensure you can dry the floor completely before moving on. Good ventilation, such as an open window or a fan, can also aid in the drying process, ensuring no moisture remains.
How to Tackle Stains on Unsealed Hardwood
Stains are particularly challenging on unsealed floors because they penetrate deep into the wood fibers. Immediate action is always best, but some set-in stains can still be addressed with careful techniques.
Dealing with Common Spills and Stains
For liquid spills, blot the area immediately with a clean, dry cloth. Do not rub, as this can push the liquid deeper into the wood. For more stubborn spots, different approaches are needed.
- Minor Water Marks: For light water spots, you can sometimes gently buff the area with a piece of extra-fine #0000 steel wool, always rubbing in the direction of the wood grain.
- Oily or Grease Stains: Sprinkle a small amount of trisodium phosphate (TSP) or mineral spirits onto a clean cloth and gently dab the stained area. Be sure to work in a well-ventilated space and wear gloves. Test in an inconspicuous spot first.
- Dark or Pet Stains: These are the toughest. A solution of equal parts water and white vinegar can sometimes lighten these stains. Apply it sparingly with a cloth, let it sit for a few minutes, and then blot it dry. For very deep-set stains, sanding may be the only option.
When in doubt, it is always better to start with the gentlest method. Aggressive treatments can often create a larger, more noticeable problem.
| Cleaning Task | Recommended Action (Do) | Forbidden Action (Don’t) |
|---|---|---|
| Daily Maintenance | Sweep with a soft-bristle broom or use a microfiber dust mop. | Let grit and dirt build up, which can scratch the wood. |
| Vacuuming | Use a hard floor setting with no beater bar and a soft brush attachment. | Use a vacuum with a stiff, rotating brush designed for carpets. |
| General Cleaning | Use a “barely damp” mop with a pH-neutral wood cleaner. | Use a steam mop or a dripping wet mop. Let water stand on the floor. |
| Spills | Blot immediately with a dry, absorbent cloth. | Rub the spill, which pushes it deeper into the wood grain. |
| Tough Grime | Spot clean with a well-wrung cloth and a mild cleaning solution. | Use harsh chemicals like bleach, ammonia, or abrasive powders. |
| Stain Removal | Gently sand with fine-grit sandpaper for deep stains as a last resort. | Scrub aggressively with abrasive pads or brushes against the grain. |
The Best Long-Term Solution: Sealing Your Floors
While the cleaning methods described above are effective for maintenance, they highlight the inherent difficulty of caring for unsealed floors. The most effective, long-term strategy for protecting your investment and simplifying your cleaning routine is to have the floors properly sealed.
A high-quality sealant, such as a polyurethane or a penetrating oil finish, creates a durable barrier over the raw wood. This protective layer prevents moisture, dirt, and stains from penetrating the wood fibers. Once sealed, floors become dramatically easier to clean and are far more resistant to everyday wear and tear.
Sealed floors offer peace of mind. You no longer have to worry that a small spill will result in a permanent stain. This level of durability is why many high-quality flooring brands, as you might see in Casabella hardwood reviews, come with a robust factory finish. Applying a sealant is the ultimate solution to transform your high-maintenance raw wood into a durable, easy-care surface.