How to Caulk Gutter to Fascia Board? Stop Leaks Fast
The relentless drip… drip… drip of a leaking gutter is more than just an annoyance. It’s a warning sign of a hidden problem that can lead to catastrophic damage to your home. That small gap between your gutter and the fascia board is a direct pathway for water to invade your house’s structure.
Ignoring this seemingly minor issue can result in rotted wood, compromised foundations, and costly repairs. Sealing this gap is one of the most critical and cost-effective maintenance tasks a homeowner can perform. This guide will provide you with a step-by-step plan to create a permanent, waterproof seal.
You'll Learn About
Why You Absolutely Cannot Ignore the Gap Between Your Gutter and Fascia
To understand the danger, you first need to know the players. The fascia is the long, straight board that runs along the lower edge of your roof, and the gutters are mounted to it. Their job is to work together to manage rainwater, directing it away from your home’s foundation.
When a gap forms between them, this entire system fails. Water no longer flows harmlessly into the downspout; instead, it runs behind the gutter and soaks directly into the wooden fascia board.
Water Damage: The Silent Destroyer
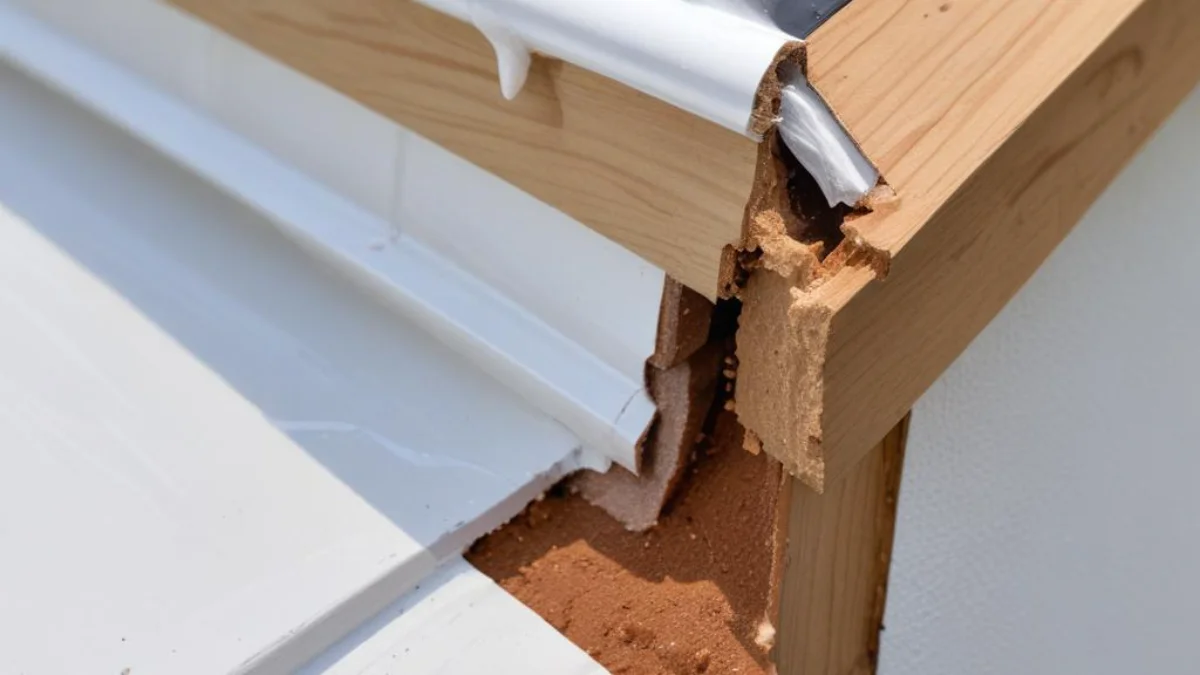
Water infiltration is a home’s worst enemy. Once the fascia board becomes saturated, it begins to rot and soften, losing its structural integrity. This rot can quickly spread to the rafter tails and the roof sheathing, leading to extensive and expensive structural repairs.
Furthermore, the persistent moisture creates a perfect breeding ground for mold and mildew. These fungi can grow undetected in your attic or wall cavities, posing a significant health risk to your family and reducing your home’s indoor air quality.
Pest Invasion Highway
That small gap is an open invitation for pests. Carpenter ants, termites, and other wood-boring insects are drawn to damp wood. They can establish colonies within your damaged fascia, further weakening your home’s structure.
This opening also provides easy access for larger pests. Stinging insects, in particular, love these sheltered, high-up crevices to build their nests. If you’ve ever wondered why wasps are flying around your roof, a gap behind the gutter is a likely culprit.
Ice Dams and Winter Woes
In colder climates, the gap between the gutter and fascia is a primary contributor to the formation of ice dams. As snow on the roof melts, water runs down and can refreeze at the roof’s edge, especially if the gutter is clogged or improperly sealed.
This creates a dam of ice that prevents further runoff. The trapped water then backs up under your shingles, causing severe leaks into your attic and home, damaging insulation, ceilings, and walls.
Choosing Your Weapon: Selecting the Right Caulk for the Job
Walking into a hardware store can be overwhelming, with an entire aisle dedicated to caulk and sealants. Using the wrong type of caulk is a guarantee for failure. You cannot use interior-grade painter’s caulk and expect it to survive the harsh outdoor elements.
For this specific application, you need a sealant with four key properties: extreme flexibility to handle temperature changes, 100% waterproofing, superior adhesion to materials like vinyl and wood, and UV resistance to prevent it from cracking under the sun.
The Caulk Showdown
To make the choice easier, here is a breakdown of the most common exterior sealant types. Your best choice will almost always be a high-quality Polyurethane or an Elastomeric Gutter Sealant.
| Sealant Type | Flexibility | Durability/Lifespan | Paintable | Best For |
|---|---|---|---|---|
| 100% Silicone | Excellent | Very High (20+ years) | No | Areas where color matching is not needed. |
| Polyurethane | Excellent | Very High (20+ years) | Yes | Sealing dissimilar materials; high-stress joints. |
| Elastomeric/Gutter Sealant | Superior | High (15-20 years) | Yes | Specifically formulated for gutters, fascia, and siding. |
| Acrylic Latex (Exterior) | Moderate | Low (5-10 years) | Yes | Small cracks with minimal movement; not ideal for this task. |
Your Step-by-Step Battle Plan: How to Caulk Gutter to Fascia Board
With the right sealant chosen, it’s time to execute the plan. Remember that with caulking, preparation is 90% of the victory. A clean, dry surface is non-negotiable for a lasting bond.
Step 1: Gather Your Tools and Materials
Having everything you need within arm’s reach will make the job safer and more efficient. Don’t try to improvise once you are up on the ladder.
Your checklist should include a sturdy extension ladder, a dripless caulk gun, your chosen tube of sealant, a utility knife, a 5-in-1 painter’s tool or putty knife, nitrile gloves, safety glasses, cleaning rags, and a suitable solvent like denatured alcohol for cleanup.
Step 2: Safety First – A Critical Reminder
Working on a ladder carries inherent risks. Always maintain three points of contact (two feet and one hand, or one foot and two hands) with the ladder. Ensure the ladder is placed on firm, level ground and the base is the correct distance from the house (about one-quarter of the ladder’s working height).
Always wear safety glasses to protect your eyes from falling debris or dripping caulk. Be aware of your surroundings, especially any overhead power lines, before setting up your ladder.
Step 3: Clean and Prepare the Area Thoroughly
This is the most crucial step. Use your putty knife or painter’s tool to completely remove any old, cracked, or failing caulk. Scrape away any loose or peeling paint from both the back of the gutter and the face of the fascia board.
After scraping, clean the surfaces with a rag and denatured alcohol or a dedicated surface prep cleaner to remove any dirt, dust, or oils. The area must be absolutely, completely dry before you even think about applying the new sealant. Applying caulk to a damp surface is the number one cause of failure.
Step 4: Prime if Necessary
If your scraping has exposed bare wood on the fascia board, it’s a good idea to apply a coat of high-quality exterior primer. This step seals the wood, preventing it from soaking up the moisture from the caulk and ensuring a much stronger bond.
Allow the primer to dry completely according to the manufacturer’s instructions before proceeding to the next step.
Step 5: Load the Caulk Gun and Cut the Tip
Cut the nozzle of the caulk tube at a 45-degree angle. Start with a smaller opening than you think you need; you can always make it bigger. The hole should be just large enough to bridge the gap between the gutter and fascia.
Puncture the inner foil seal using a stiff wire or the built-in poker on your caulk gun. Insert the tube into the gun and gently squeeze the trigger until you see the caulk at the tip.
Step 6: The Art of Application – Applying the Caulk
Position the tip of the nozzle directly into the gap. To achieve the best adhesion, you should push the caulk gun away from you, forcing the bead of sealant deep into the gap, rather than pulling it towards you. Apply steady, consistent pressure on the trigger as you move at a smooth, even pace.
Your goal is to apply one continuous bead of caulk along the entire length of the gap. Avoid starting and stopping if possible, as this can create unsightly and weak points in the seal.
Step 7: Tooling for a Perfect, Professional Seal
Do not skip this step. “Tooling” is the process of smoothing the bead of caulk immediately after application. This simple action forces the sealant into the joint for a stronger bond and creates a clean, concave surface that sheds water effectively.
You can tool the bead by running a wetted finger along it, or by using a dedicated caulk tooling tool. The pressure should be light but firm. Wipe away any excess caulk immediately with a clean, damp rag.
Step 8: Curing and Cleanup
The sealant needs time to cure and form a durable, waterproof skin. This can take anywhere from a few hours to a full day, depending on the type of caulk, temperature, and humidity. Check the product’s label for specific cure times and avoid exposing it to rain during this period.
Clean up any mistakes or drips immediately with the recommended solvent (water for latex, mineral spirits or denatured alcohol for silicone/polyurethane) before the caulk begins to skin over.
Common Mistakes to Avoid (And How to Fix Them)
Even with the best instructions, mistakes can happen. Being aware of the common pitfalls can save you from having to do the job all over again in a year.
The most common errors include applying sealant to dirty or wet surfaces, using the wrong type of caulk (like an interior acrylic), applying too much or too little material, and forgetting to tool the bead for a proper seal. Also, avoid caulking in extreme temperatures—either too hot or too cold—as this can affect adhesion and curing.
Beyond the Bead: Long-Term Gutter and Fascia Maintenance
Caulking this gap is not a one-and-done fix for life; it’s part of a larger home maintenance routine. Inspect your handiwork at least twice a year, in the spring and fall, to ensure the seal is still intact and flexible. Look for any signs of cracking or pulling away from the surface.
Keeping your gutters clean is paramount. Clogged gutters overflow, putting constant stress on the caulk joint and forcing water where it doesn’t belong. A properly sealed home envelope also improves energy efficiency; unsealed cracks and gaps contribute to drafts and energy loss, an issue similar to having a cold air return with no ductwork, which can disrupt your home’s thermal balance.
Finally, a well-sealed home is a quieter home. While it might not be as effective as a weighted blanket for soundproofing a room, eliminating gaps in your home’s exterior shell can help reduce the transmission of outside noise. Sealing the gap between your gutter and fascia is a crucial step in protecting your home from water, pests, and the elements.
By investing a little time and using the right materials and techniques, you can prevent thousands of dollars in future repairs. This manageable DIY project not only safeguards your home’s structural integrity but also provides invaluable peace of mind.