How Long Do Canna Seeds Last? The Surprising Truth
You’ve carefully harvested the glossy, black seeds from your most vibrant canna lilies, dreaming of replicating that stunning tropical display next year. You tuck them away safely, but as the months turn into a year, or even longer, a nagging question emerges: will these seeds still grow? This uncertainty is a common problem for gardeners, leading to wasted time, effort, and precious garden space on seeds that may have lost their vitality.
Many gardeners unknowingly compromise the lifespan of their canna seeds through improper storage, leading to disappointment when germination fails. The frustration of nurturing a seed that never sprouts is a shared experience. Understanding the science behind seed viability is the first step toward preserving the potential for beautiful blooms for years to come.
You'll Learn About
The Truth About Canna Seed Longevity: What Determines Viability?
Canna seeds are botanical marvels of preservation. Their secret to a long life lies in an incredibly hard, dense seed coat that acts as natural armor. This protective layer is exceptionally effective at locking moisture out and keeping the internal embryo dormant and safe from decay, allowing them to remain viable for many years under the right conditions.
The primary factors that degrade seed viability over time are exposure to heat, light, and humidity. When stored in a warm, bright, or damp environment, the seed’s internal processes can speed up, depleting its energy reserves, or worse, encouraging the growth of mold and fungus that will destroy the seed entirely. Conversely, providing a consistently cool, dark, and dry environment is the key to maximizing their shelf life.
The Impact of Storage Conditions on Canna Seed Lifespan
The difference in longevity between properly and improperly stored seeds is dramatic. Seeds left in a hot garage or a humid basement may only last a single season. In contrast, seeds stored under optimal conditions can remain viable for five, ten, or even more years, a testament to their natural durability.
Think of the seed as being in a state of suspended animation. The goal of proper storage is to slow its metabolic rate as much as possible, preserving the delicate life within. By controlling their environment, you essentially pause the aging process, ensuring they are ready to burst into life when you decide the time is right.
How to Store Canna Seeds for Maximum Shelf Life
Proper storage is not merely a suggestion; it is a critical practice for anyone serious about seed saving. Following a methodical approach from harvest to storage will ensure your canna seeds have the best possible chance of germinating, whether you plant them next spring or a decade from now.
Step 1: Harvesting and Cleaning the Seeds Correctly
The storage process begins the moment you harvest. Wait until the seed pods on the canna plant have turned brown and begun to dry and crack open on their own. This is nature’s signal that the seeds inside are fully mature and ready for collection.
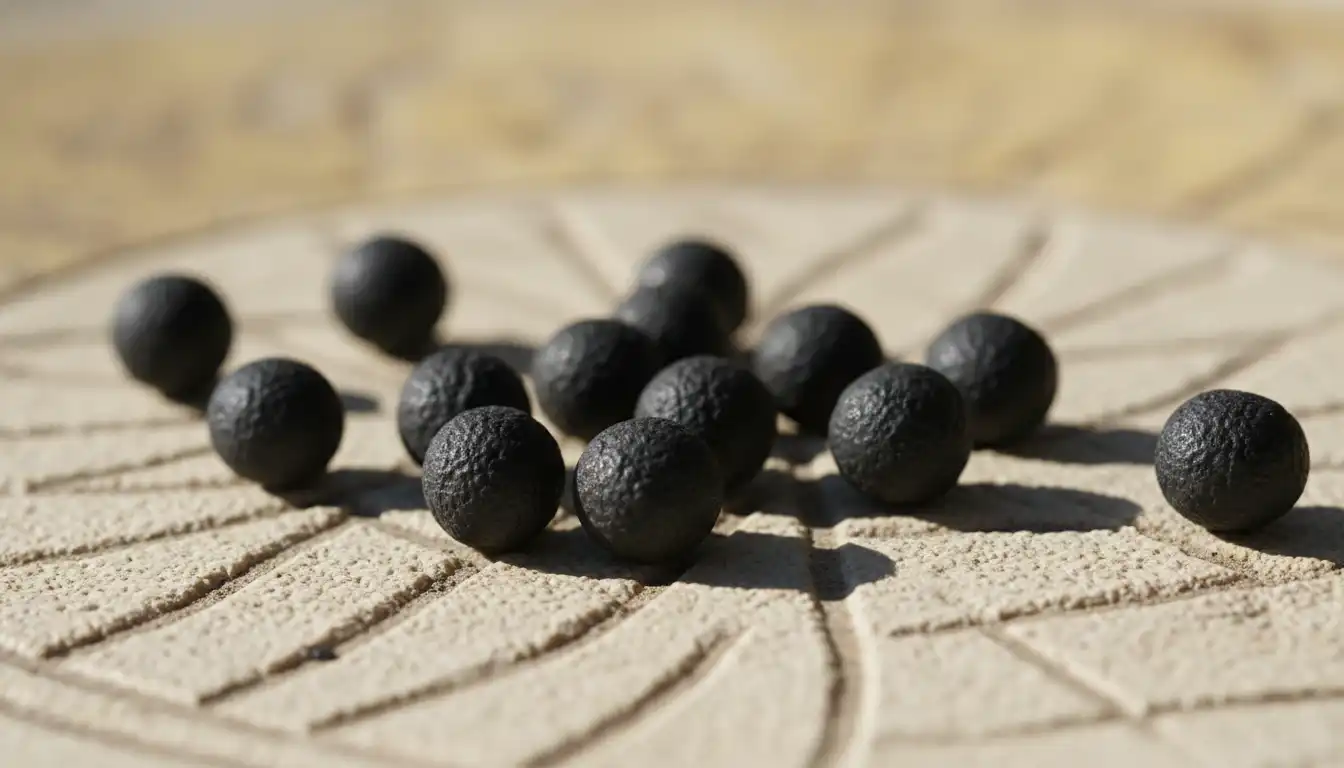
Carefully extract the hard, black seeds from the shriveled pods. It is essential to clean them by gently rubbing off any remaining plant debris or residue with a dry cloth. Do not wash the seeds at this stage, as introducing moisture before drying can lead to mold issues.
Step 2: The Critical Drying Process
Drying is arguably the most crucial step for long-term viability. Spread the cleaned seeds in a single layer on a screen or a paper towel in a well-ventilated area away from direct sunlight. Let them air-dry for at least one to two weeks, turning them occasionally to ensure they dry evenly.
A properly dried seed will feel hard and cool to the touch and will not yield to pressure. Any lingering moisture is an invitation for fungal growth, which will quickly render your seeds useless. This patient drying period is your best defense against storage failure.
Step 3: Choosing the Right Storage Container
Once your seeds are thoroughly dry, selecting the right container is paramount. You need an option that is both airtight and protects from light. Small glass jars with tight-fitting lids, metal tins, or Mylar bags are excellent choices.
For an added layer of protection against humidity, consider adding a desiccant packet, like silica gel (often found in shoe boxes or vitamin bottles), to the container. This will absorb any trace amounts of moisture that may remain, creating an ideal micro-environment for preservation.
Step 4: Finding the Perfect Storage Location
The final piece of the puzzle is the storage location. The mantra is cool, dark, and dry. A refrigerator is an excellent and widely accessible option for long-term storage, as it provides a consistent, low temperature.
Place your labeled, airtight container in the back of the refrigerator, where the temperature is most stable. A cool basement or a dark pantry can also work, provided the temperature and humidity levels remain consistent. Avoid locations with frequent temperature fluctuations, like a garage or shed.
The Gardener’s Dilemma: How to Know If Your Old Seeds Are Still Good
Even with the best storage practices, you might still wonder about the viability of seeds that are several years old. Before you dedicate soil, water, and time to planting, performing a simple viability test can save you a lot of guesswork and potential disappointment.
The “Float Test”: A Quick but Imperfect Indicator
A common and easy method to quickly gauge viability is the float test. Simply place your seeds in a container of lukewarm water. Let them sit for a couple of hours.
Generally, seeds that sink are considered viable, as they are dense with a healthy embryo inside. Seeds that continue to float may be non-viable, potentially because the internal tissue has dried out or decayed. However, this is not a foolproof method, as some viable seeds can trap air and float, so use it as a preliminary guide rather than a definitive answer.
The Definitive Germination Test: A Foolproof Method
The most reliable way to determine viability is to conduct a germination test on a small sample of your seeds. This involves creating conditions to sprout a few seeds to see what percentage are still alive.
To do this, place about 5-10 seeds on a damp paper towel. Fold the towel over the seeds, place it inside a sealable plastic bag, and store it in a warm place (around 70-75°F). Check the seeds every few days for sprouting. If a high percentage germinates within a couple of weeks, you can be confident the rest of the batch is also viable.
Waking the Giants: Secrets to Germinating Aged Canna Seeds
The very same hard coat that gives canna seeds their incredible longevity also presents the biggest challenge to germination. Over time, this coat can become even more impermeable. Getting older seeds to sprout requires breaking through this physical barrier to allow water to reach the dormant embryo within.
Essential Step 1: Scarification – The Key to Unlocking Germination
Scarification is the process of intentionally scratching, nicking, or weakening the seed coat. This is the single most important step for germinating canna seeds, especially older ones. Without it, a seed could sit in moist soil for months or even years without sprouting.
You can achieve this by gently rubbing the seed against a piece of sandpaper or a metal file. The goal is to wear away a small spot on the black outer coat until you see a sliver of the lighter, whitish interior. Be careful not to damage the internal embryo; you only need to create a small entry point for water.
Essential Step 2: The Long Soak – Rehydrating for Success
Once the seed coat has been breached through scarification, the next step is a long soak. Place the scarified seeds in a container of warm water for at least 24 to 48 hours. This allows water to penetrate the hard shell and begin the process of waking the embryo from dormancy.
You should notice the seeds swelling to nearly double their original size during this soak. This is a clear sign that they are absorbing water and that the germination process has been successfully initiated. After soaking, they are ready to be planted in soil.
Bonus Tip: The Power of Temperature Fluctuation
To further encourage stubborn, older seeds, you can mimic the natural temperature cycles of spring. After soaking, plant the seeds in moist soil. During the day, keep the pot in a warm location, and at night, move it to a slightly cooler spot.
This subtle shift in temperature can act as a powerful biological trigger, signaling to the seed that winter has passed and it is time to grow. This technique is often the secret weapon needed to coax the most deeply dormant seeds into life.
Common Canna Seed Storage Mistakes and How to Avoid Them
Avoiding common pitfalls is just as important as following the correct procedures. Many well-intentioned gardeners make simple mistakes that drastically reduce the lifespan of their seeds. Being aware of these errors is key to successful long-term storage.
The most frequent mistake is insufficient drying. Storing seeds that still contain internal moisture is a recipe for disaster, leading to mold and rot. Another common error is using containers that are not airtight, which exposes seeds to damaging ambient humidity. Finally, storing seeds in locations with fluctuating temperatures, such as a sunny windowsill or a non-insulated shed, will rapidly degrade their viability.
| Storage Method | Expected Viability | Pros | Cons |
|---|---|---|---|
| Paper Envelope in a Drawer | 1-2 Years | Easy and requires no special equipment. | Offers no protection from humidity; susceptible to temperature swings. |
| Airtight Jar in a Pantry | 3-5 Years | Protects from humidity and pests. | Pantry temperatures can fluctuate, affecting long-term viability. |
| Airtight Jar with Desiccant in Refrigerator | 5-10+ Years | Provides the ideal cool, dark, and dry environment for maximum longevity. | Requires refrigerator space; condensation can be an issue if opened while cold. |
Planning Your Garden: From Seed to Spectacular Bloom
Successfully storing and germinating canna seeds is a rewarding part of the gardening journey. As you plan your garden layout, think about how the bold, tropical foliage of cannas can create stunning focal points. The process of bringing a plant from a tiny, dormant seed to a magnificent flowering specimen connects you more deeply to the cycles of nature.
This connection to growth and home extends beyond the garden walls. A well-planned garden can feel like an extension of your living space. You might find that the principles of designing a garden bed echo the choices you make inside, like selecting a beautiful and functional L-shaped quartz countertop for your kitchen to create better flow and utility.
Maintaining a garden often highlights other areas of home upkeep. You might notice your energetic cat destroying weather stripping on the door leading out to the patio. Or, a bountiful harvest might inspire you to finally tackle that indoor project you’ve been considering, like figuring out how much to move a washer and dryer to create a more efficient mudroom for processing vegetables.
Conclusion: Your Canna Legacy Awaits
Canna seeds are built for endurance. With their tough, protective coats, they possess an incredible potential for long-term survival. By mastering the simple but critical techniques of proper harvesting, drying, and storage, you can preserve this potential for many years.
Don’t let uncertainty prevent you from saving the seeds of your favorite cannas. Armed with this knowledge, you can confidently store them, test their viability, and use proven techniques to wake them from their slumber. Your garden’s future is held within these small, powerful seeds, waiting for the right moment to unfold into spectacular beauty.