Stair Railing Replacement: Just How Hard Is This DIY Project?
You walk past it every day, but you’ve started to notice your staircase railing is looking more like a relic than a feature. It’s shaky, the finish is worn, and it completely dates your home’s interior. You’re facing a common homeowner problem: an outdated or unsafe stair railing that desperately needs an upgrade.
The core issue is that a failing railing isn’t just an eyesore; it’s a significant safety hazard. You’re wondering, “How hard is it to replace stair railings myself?” It’s a project that seems straightforward but holds hidden complexities that can challenge even a seasoned DIYer.
You'll Learn About
Factors That Determine Stair Railing Replacement Difficulty
Replacing a stair railing is not a one-size-fits-all task. The difficulty can range from a manageable weekend project to a job best left for professionals. Several key factors will dictate how hard this project will be for you.
Project Scope: Straight vs. Curved Staircases
The layout of your staircase is the first major factor. A straight run of stairs is significantly easier to work with. Measurements are simpler, cuts are more direct, and installation is more straightforward.
Curved or spiral staircases, on the other hand, introduce a high level of complexity. They require precise, curved cuts and specialized materials, making them exceptionally difficult for a DIY installation. Misaligned angles can create dangerous gaps and compromise the structure.
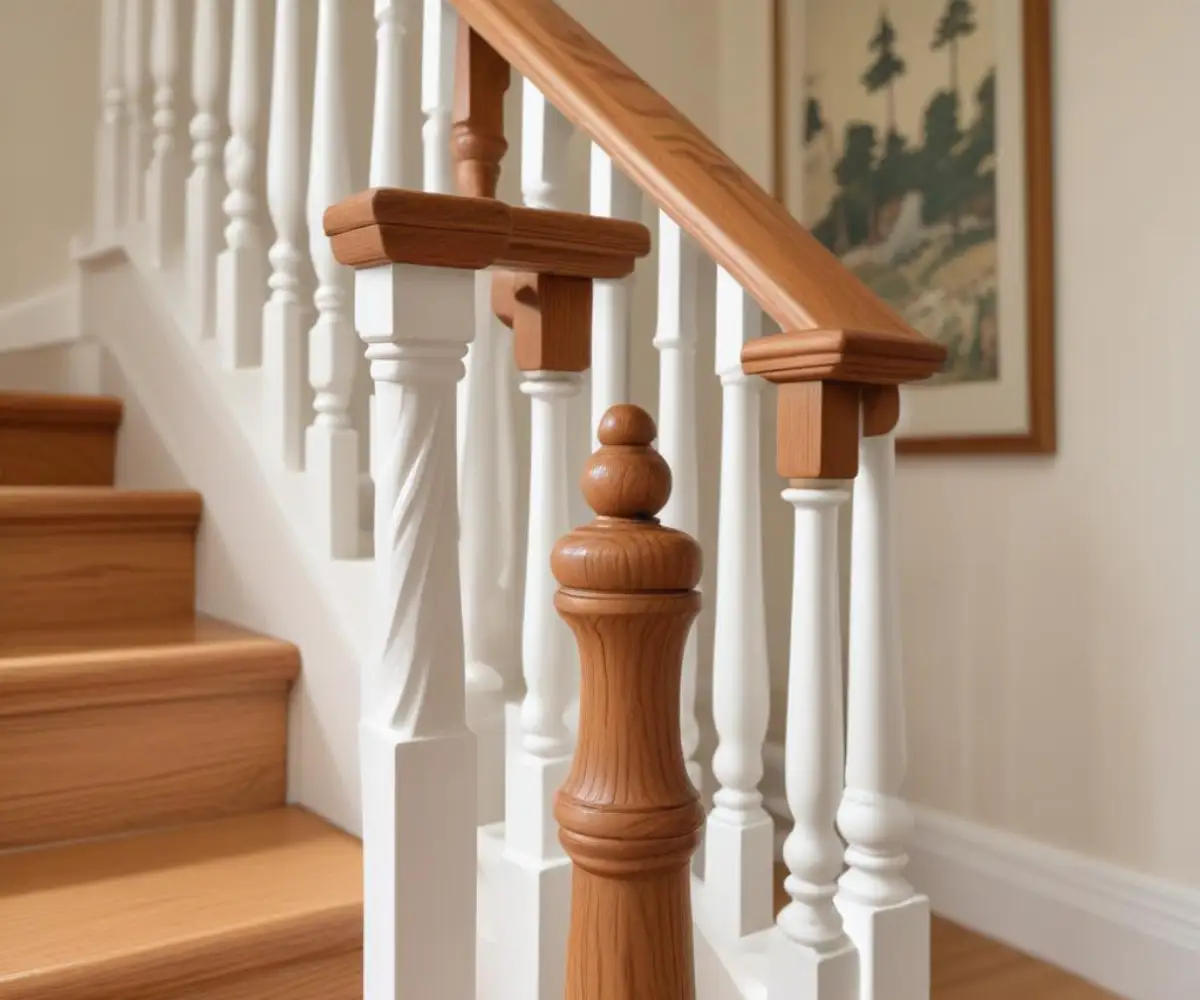
Material Matters: Wood, Metal, or Glass?
The material of your new railing system plays a huge role in the project’s difficulty. Wood railings are the most common for DIY projects because the material is traditional and relatively easy to cut and fasten with standard carpentry tools.
Metal systems, such as iron or stainless steel, require different tools and techniques, like cutting metal balusters with a reciprocating saw and using epoxy for installation. Glass panel railings are extremely heavy and fragile, often requiring professional installation to ensure safety and a proper fit.
Structural Integrity: Assessing Your Current Setup
Before you begin, you must assess the condition of your existing newel posts—the large posts at the top and bottom of the staircase. If these posts are sturdy and you’re simply replacing the handrail and balusters (spindles), the job is much easier.
However, if the newel posts themselves are loose or damaged, they will need to be replaced. Securing newel posts to the floor is a structural task that requires precision and strength to ensure the entire railing system is stable. A wobbly newel post means a wobbly, unsafe railing.
Your DIY Skill Level: An Honest Assessment
This project demands more than just basic handyman skills. You need a solid understanding of carpentry, precision in your measurements, and experience with power tools like a miter saw and drill. Replacing a stair railing is a manageable task for a DIY enthusiast with some existing carpentry skills.
Even a simple mistake in measurement can lead to wasted materials and a poor fit. If your confidence with precise angle cuts is low, it may be time to consider professional help. A project with this much impact on your home’s safety is not the place for learning on the fly.
DIY vs. Hiring a Pro: Making the Right Call
Deciding between a DIY approach and hiring a professional comes down to balancing cost, time, and the quality of the final result. A DIY project can save you a significant amount on labor costs, but mistakes can be expensive.
Professionals bring experience, specialized tools, and knowledge of local building codes to the table. This ensures the job is done safely, correctly, and efficiently. While you can expect to pay for their services, it provides peace of mind that your staircase is secure.
When You Can DIY It
A DIY replacement is most feasible if you have a straight staircase, are working with wood components, and the existing newel posts are structurally sound. If you are comfortable taking precise measurements and making accurate cuts with a miter saw, you can likely tackle this project. It is time-consuming, but not technically difficult for those with intermediate skills.
When to Call a Professional
You should hire a professional if your staircase is curved, you are installing heavy materials like glass, or the newel posts need to be replaced. A professional is also the best choice if you are unsure about meeting local building code requirements, which are strict regarding railing height and baluster spacing for safety reasons.
Concerns about structural integrity, like you might encounter when dealing with a problem like water running back under a metal roof, often require an expert eye to diagnose and fix correctly.
| Aspect | DIY Approach | Professional Installation |
|---|---|---|
| Cost | Lower upfront cost (materials only). Potential for costly mistakes. | Higher cost (labor + materials). Average labor cost is $70-$150 per hour. |
| Time | Can take several days to a week, depending on complexity and skill level. | Typically completed in 1-2 days. |
| Skill & Tools | Requires intermediate to advanced carpentry skills and specific tools (miter saw, level, drill). | Professionals have all necessary specialized tools and expertise. |
| Code Compliance | Homeowner is responsible for researching and meeting all local building codes. | Contractors are knowledgeable about local codes and ensure compliance. |
| Safety & Quality | Risk of improper installation leading to safety hazards. Quality depends on skill. | Ensures a structurally sound, safe, and high-quality finish. |
The Step-by-Step Guide to Replacing Your Stair Railing
If you’ve decided to proceed with a DIY replacement, following a clear, methodical process is key to success. This guide breaks down the project into manageable steps for a safe and professional-looking outcome.
Step 1: Planning and Measurement is Everything
Measure twice, cut once. This old saying is the golden rule of railing replacement. Inaccurate measurements are one of the most common and critical errors. Measure the length of the handrail needed from the top to the bottom of the stairs. You will also need to calculate the number of balusters required, keeping in mind that building codes often dictate that a 4-inch sphere cannot pass between them.
Step 2: Demolition – Removing the Old Railing Safely
Carefully disassemble the old railing. Use a drill or screwdriver to remove any screws holding the handrail and balusters in place. If components are nailed or glued, you may need a pry bar, but work carefully to avoid damaging the stair treads or walls. Label parts if you plan to reuse any hardware.
Step 3: Preparing the Foundation – Newel Post Installation
If you are replacing the newel posts, this is the most critical structural step. New posts must be securely anchored to the floor joists. This often involves cutting into the flooring and using heavy-duty bolts to create a solid foundation. If your existing posts are solid, clean the area and make any necessary repairs to the wood or surrounding drywall.
Step 4: Installing the Rails (Top and Bottom)
Cut your new handrail to the correct length and angle using a miter saw. For a wall-mounted rail, you’ll need to locate the wall studs to ensure the mounting brackets are secure. If the rail runs between newel posts, it must be attached firmly with railing bolts or other specialized hardware.
Step 5: The Baluster Balancing Act
Lay out the spacing for your balusters evenly along the bottom rail or stair treads. Adhering to code-compliant spacing is essential for safety. Drill holes for the balusters, applying wood glue before inserting each one. Secure the balusters to the underside of the handrail, ensuring each one is plumb and secure.
This process of methodical installation can be applied to other home projects, such as when you need to figure out how to attach LED strip lights to concrete for a modern aesthetic touch.
Step 6: Finishing Touches for a Professional Look
Once everything is installed and secure, fill any nail or screw holes with wood filler. Sand all surfaces smooth before applying your choice of paint or stain. Allowing adequate drying time is crucial for a durable, beautiful finish that will stand the test of time, much like the process needed to make tile countertops smooth and restore their beauty.
Essential Tools and Materials for the Job
Having the right tools is non-negotiable for this project. Attempting to make do with inadequate equipment will lead to frustration and poor results. Here is a list of what you will typically need:
- Power Miter Saw: For making precise angle cuts on the handrail.
- Drill/Driver: For drilling pilot holes and driving screws.
- Level and Tape Measure: For accurate layout and installation.
- Stud Finder: To locate wall studs for secure bracket mounting.
- Wrenches and Pry Bar: For demolition and assembly.
- Wood Glue and Filler: For strong joints and a clean finish.
- Sandpaper and Finishing Supplies: For staining or painting.
Common Pitfalls and How to Avoid Them
Even with careful planning, mistakes can happen. Being aware of common pitfalls can help you avoid them and ensure a successful project.
Ignoring Building Codes
Building codes for stairs are strict for a reason. Handrail height, typically between 34 and 38 inches, and baluster spacing are regulated for safety. Always check your local codes before you begin your project to avoid costly rework.
Botching the Measurements
Incorrect measurements are a frequent and costly mistake. This can result in balusters cut too short or handrails that don’t fit. Always double-check every measurement before making a cut.
Underestimating the Mess
Demolition and cutting create a lot of dust and debris. Take the time to properly seal off the work area with plastic sheeting to contain the mess and protect the rest of your home.
Conclusion: So, How Hard Is It Really?
Replacing a stair railing is a project of moderate difficulty that is achievable for a DIYer with the right skills, tools, and patience. The key to success lies in careful planning, precise measurements, and a thorough understanding of the structural components involved.
If you have a straightforward wooden staircase and a good foundation in carpentry, you can transform your home’s entryway and enhance its safety over a weekend or two. However, for complex layouts or materials, calling a professional is the wisest and safest choice.