How Hard Is It to Operate a Mini Excavator? Your Ultimate Guide
You’re staring at a project—maybe it’s digging trenches for plumbing, removing stubborn tree stumps, or grading your backyard. You know a shovel won’t cut it, and the powerful, compact frame of a mini excavator looks like the perfect solution. But then you see the cab, filled with joysticks, levers, and pedals, and one big question pops into your mind: how hard is it *really* to operate a mini excavator?
It’s a common fear. Many people assume operating heavy machinery requires years of training and a special license, leaving them feeling intimidated. They worry about damaging the machine, their property, or worse. The truth is, while mastery takes time, learning the basics of operating a mini excavator is far more achievable than you might think. With a little guidance and practice, even a complete beginner can get comfortable with the controls and start tackling projects in just a few hours.
You'll Learn About
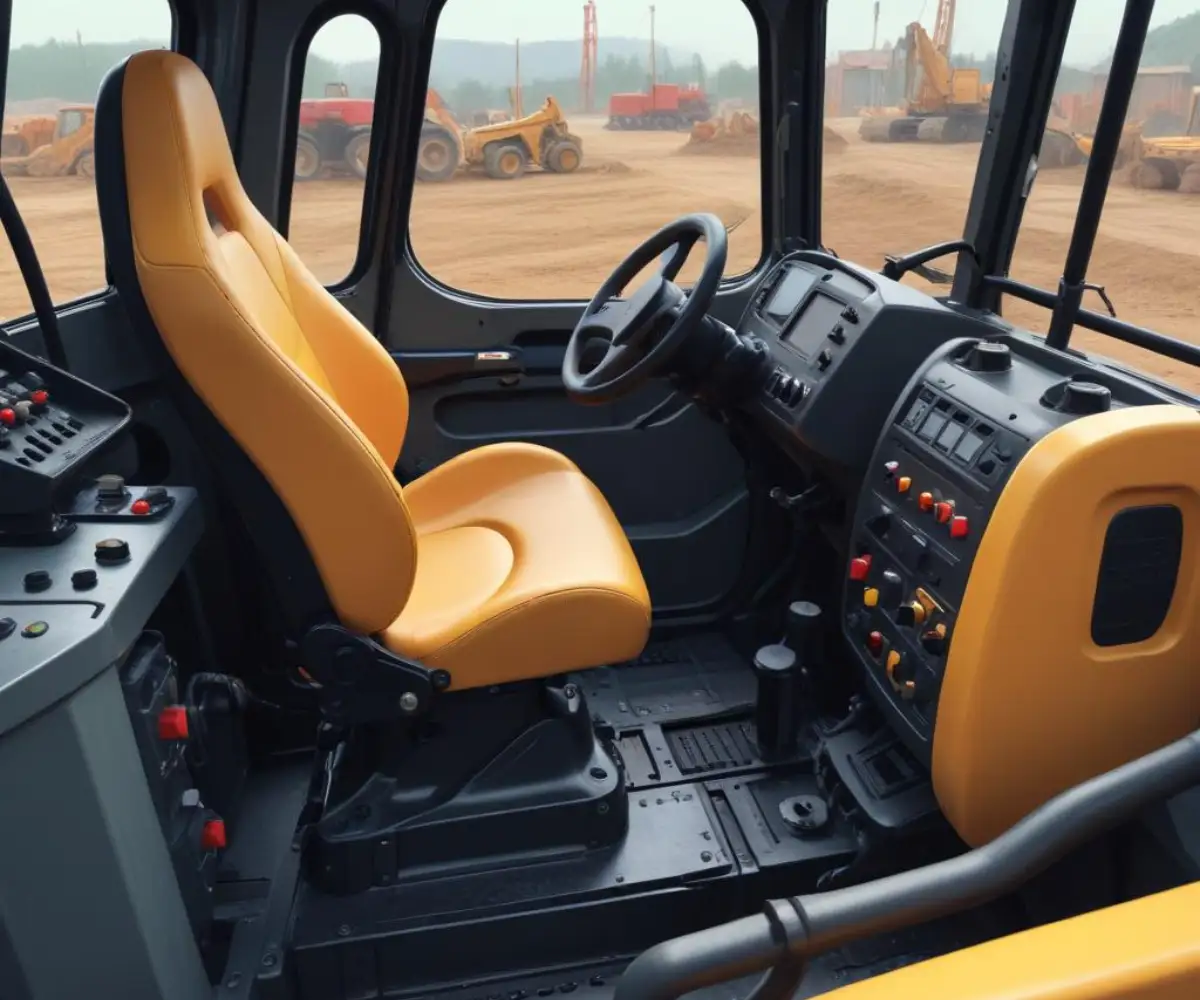
Decoding the Controls: Your Mini Excavator Cockpit Explained
The inside of a mini excavator can look complex, but the controls are surprisingly intuitive once you understand their functions. Most modern machines use a standardized control pattern called ISO (International Organization for Standardization). This means the skills you learn on one machine will likely transfer to another. Let’s break down the essential controls you’ll be using.
The primary controls are two joysticks, two travel levers (or pedals), and a lever for the front dozer blade. Think of it like playing a video game, where each hand controls a different set of coordinated movements. Smooth, deliberate motions with the joysticks are key to avoiding jerky operations that can destabilize the machine.
The Two Main Joysticks
Your hands will spend most of their time on the two main joysticks located on either side of your seat. These control the boom, stick (the arm part), bucket, and the 360-degree swing of the cab.
The right joystick typically controls the boom and the bucket. Pushing it forward lowers the main boom, and pulling it back raises the boom. Moving the joystick to the right opens or “dumps” the bucket, while moving it left curls the bucket in to scoop material. The left joystick handles the stick and the cab’s swing. Pushing it forward extends the stick away from you, and pulling it back brings the stick closer. Moving this joystick left or right swings the entire cab and boom assembly in that direction.
Moving the Machine
In front of you, you’ll find two long levers, often with foot pedals as well. These are your travel controls, and they function like the controls on a zero-turn mower. Each lever controls one track independently. Push both levers forward to move straight ahead. Pull both back to reverse. To make a gradual turn, you push one lever slightly more than the other. For a sharp, spinning turn, push one lever forward while pulling the other back.
Below is a simple breakdown of the standard ISO control layout that you’ll find in most mini excavators.
| Control | Action | Resulting Machine Movement |
|---|---|---|
| Left Joystick | Push Forward | Stick/Arm extends out |
| Left Joystick | Pull Back | Stick/Arm retracts in |
| Left Joystick | Move Left | Cab and boom swing to the left |
| Left Joystick | Move Right | Cab and boom swing to the right |
| Right Joystick | Push Forward | Boom lowers |
| Right Joystick | Pull Back | Boom raises |
| Right Joystick | Move Left | Bucket curls in (scoops) |
| Right Joystick | Move Right | Bucket curls out (dumps) |
| Travel Levers | Push Both Forward | Machine travels forward |
| Travel Levers | Pull Both Back | Machine travels backward |
| Dozer Blade Lever | Push/Pull | Lowers or raises the front blade |
Is It *Really* That Hard? The Truth About the Learning Curve
For a complete novice, the first few minutes can feel awkward. It’s like learning to pat your head and rub your stomach at the same time. The movements might be jerky, and you’ll likely overcorrect as you get a feel for the sensitivity of the hydraulic controls. However, most people report that it “clicks” within the first hour of practice.
The learning curve can be broken down into stages. Getting comfortable with each individual control function might take 30-60 minutes. After that, you’ll spend the next couple of hours learning to blend those functions for smooth, efficient digging. By the end of a solid day of practice, a beginner can typically perform basic tasks like digging a trench or loading a small trailer with reasonable confidence.
Your First Day on the Job: A Step-by-Step Guide to Getting Started
Ready to get your hands dirty? The key to a successful first experience is to take things slow, prioritize safety, and practice in an open area away from obstacles. Don’t try to dig your final trench on your first attempt. Give yourself time to play with the controls and build muscle memory.
Pre-Flight Checklist: Safety First, Always
Before you even turn the key, a pre-operation inspection is non-negotiable. This simple routine helps prevent accidents and costly breakdowns. A quick walk-around is all it takes.
First, check the tracks for any obvious damage or excessive wear. Look under the machine for any signs of fluid leaks, like oil or coolant. Ensure all attachments, like the bucket, are securely fastened. Finally, check the fluid levels for engine oil and hydraulic fluid to make sure they are within the recommended range. This simple check is one of the most important parts of the process.
Getting Comfortable in the Captain’s Chair
Once your walk-around is complete, it’s time to get in the cab. Use three points of contact (two hands and one foot, or one hand and two feet) when climbing in. Fasten your seatbelt—this is crucial for safety, especially on uneven ground. Before starting the engine, take a moment to simply sit and identify all the controls. Move the joysticks and levers with the machine off to get a feel for their range of motion.
Most mini excavators have a safety lever, usually on the left side, that must be lowered to engage the hydraulic controls. When this lever is up, the joysticks will not function, preventing accidental movement when entering or exiting the cab. Once you’re ready, turn the key to start the engine and lower the throttle to a low RPM while you’re learning. Lower the safety lever, and the machine is now live.
Mastering the Basic Moves
Start in a clear, level area. The first goal is to simply get a feel for each function one at a time. Begin with the travel levers. Gently push them forward to move a few feet, then pull them back to reverse. Practice turning left and right. Next, focus on the right joystick. Raise and lower the boom. Curl and uncurl the bucket.
Once you are comfortable with the right joystick, move to the left one. Extend and retract the stick. Swing the cab slowly from side to side. Pay close attention to your surroundings as you swing; it’s easy to forget how far the boom extends and accidentally hit something. After practicing each function individually, you can start combining movements. Try to scoop a small pile of dirt and dump it a few feet away. This simple exercise combines every basic function and is the foundation of all excavator work.
Common Mistakes Beginners Make (And How to Avoid Them)
Every new operator makes mistakes, but knowing the common pitfalls can help you avoid them. These errors not only reduce efficiency but can also be dangerous. Being mindful of these points will flatten your learning curve and keep you safe.
Jerky and Abrupt Movements: The most common beginner mistake is being too aggressive with the controls. Solution: Learn to “feather” the joysticks. Make small, gentle movements instead of pushing or pulling them to their limits. Smooth operation is not only safer but also more effective.
Forgetting the Dozer Blade: The front blade isn’t just for pushing dirt. Its primary function during digging is stability. Solution: Always lower the dozer blade to the ground before you start digging. This effectively lengthens the machine’s footprint and dramatically reduces the chances of it feeling tippy.
Ignoring Your Swing Radius: It’s easy to focus on the bucket and forget about the back of the cab. When you swing the machine, the counterweight on the back swings in the opposite direction. Solution: Always be aware of your entire machine’s “footprint,” including the swing radius. Before you start work, clear the area of any obstacles like walls, trees, or parked vehicles.
Digging with the Wrong Part of the Machine: New operators often try to use the boom’s downward force to push the bucket into the ground. This is inefficient and puts unnecessary strain on the hydraulics. Solution: Use the stick (controlled by the left joystick) to pull the bucket through the dirt. The primary digging force should come from curling the bucket and pulling the stick towards the cab.
From Novice to Pro: Advanced Techniques to Master
Once you’ve mastered the basics of digging and dumping, you can move on to more advanced skills that truly unlock the mini excavator’s potential. These techniques require more finesse and a better feel for the machine, but they are essential for professional-quality work.
Grading and Leveling
Creating a smooth, level surface is one of the most challenging but rewarding skills. This is often done by using the edge of the bucket to drag material backward toward the machine. It requires very precise control of the boom, stick, and bucket simultaneously. Many operators also use the front dozer blade for backfilling trenches and final grading, pushing piles of dirt to level the ground.
Trenching
For digging utility trenches, the key is to keep your trench straight and at a consistent depth. Start by digging a shallow pass to establish a straight line. Then, work your way down in layers. Avoid trying to dig the full depth in one scoop. This disciplined approach ensures a cleaner trench and is easier on the machine. Mastering trenching opens the door to a wide range of property improvement tasks, from foundation work to landscaping.
Serious projects like these sometimes uncover deeper structural issues. If you’re working near your home’s foundation and find a problem, it’s crucial to know who to hire to replace a sill plate, as this is a job best left to specialized professionals.
How Long Does It *Actually* Take to Get Good?
While you can learn the basics in a day, true proficiency takes time. Here’s a realistic timeline based on “seat time”:
1-8 Hours (A Weekend Rental): You’ll move past the initial awkwardness and be able to perform basic tasks like digging holes, moving piles of dirt, and rough trenching. Your movements will still be slow and deliberate.
40 Hours (A Full Week): At this point, you’ll feel much more confident. Your movements will become smoother, and you’ll start to operate the controls without consciously thinking about each one. You can likely tackle most DIY projects with good results.
500+ Hours: This is where you enter the realm of professional operators. You can grade surfaces with precision, dig complex shapes, and work quickly and efficiently in tight spaces. The machine truly feels like an extension of your own body.
A mini excavator can be the first step in a complete outdoor renovation, clearing the ground for new features like a deck or patio. After the heavy lifting is done, you might turn your attention to the finishing touches. For homeowners looking to complete the project, knowing simple skills like how to hang things on vertical siding can be incredibly useful for adding planters, lights, or other decorations.
Conclusion: A Skill Worth Learning
So, how hard is it to operate a mini excavator? The answer is that it’s easier than it looks but requires practice to master. The initial learning curve is surprisingly short, and most people can become functional operators for basic tasks within a single day. The key is to respect the machine, prioritize safety, and be patient with yourself as you build muscle memory.
Don’t let intimidation stop you from taking on your next big project. By understanding the controls, following a step-by-step learning process, and being aware of common mistakes, you can confidently take a seat in the cab. That power to reshape the earth will be, quite literally, at your fingertips.