House Has No Insulation: Fix It & Insulate Properly
Is your home always chilly in the winter, no matter how high you crank the thermostat? Do your energy bills seem to skyrocket during the summer? If so, you might be facing a common but costly problem: a house with no insulation.
Many older homes were built before modern building codes mandated insulation, leaving them vulnerable to the elements. This lack of a thermal barrier means your heated or cooled air escapes right through your walls, attic, and floors, forcing your HVAC system to work overtime and draining your bank account. The consequences go beyond high utility bills; an uninsulated home can suffer from moisture problems, mold growth, and even structural damage over time.
You'll Learn About
The Telltale Signs of a House with No Insulation
Not sure if your home is properly insulated? There are several clear indicators that your house is under-insulated or has no insulation at all. Being aware of these signs is the first step toward creating a more comfortable and energy-efficient living space.
One of the most obvious signs is experiencing fluctuating temperatures from room to room. You might find that your living room is cozy while a bedroom down the hall feels like an icebox. This inconsistency happens because heat is escaping through uninsulated pockets of your home.
Another common symptom is feeling cold drafts, especially near walls, windows, and electrical outlets. The interior surfaces of your walls, floors, and ceilings might also feel cold or damp to the touch, which indicates that there is no thermal barrier to keep the warmth inside.
Why You Can’t Afford to Ignore a Lack of Insulation
Living in a house without insulation is more than just a matter of comfort; it has significant financial and structural implications. The most immediate impact is on your energy bills. Without insulation, your heating and cooling systems have to run constantly to maintain a stable temperature, leading to drastically higher energy consumption and costs.
Beyond the financial strain, a lack of insulation can lead to serious moisture issues. When warm, moist indoor air comes into contact with cold, uninsulated walls, condensation can form. This moisture can lead to the growth of mold and mildew, which can pose health risks and cause structural damage to your home’s framework over time.
In colder climates, an uninsulated attic can lead to the formation of ice dams on your roof. This happens when heat escaping from the living space melts snow on the roof, which then refreezes at the colder eaves, causing water to back up under your shingles and potentially leading to leaks and water damage.
Your Step-by-Step Guide to Insulating Your Home
Addressing a lack of insulation is one of the most effective home improvement projects you can undertake. It will not only enhance your comfort but also provide a significant return on investment through energy savings. Here’s a breakdown of how to tackle this project, from assessment to installation.
1. Conduct a Home Energy Audit
Before you start buying insulation, it’s crucial to understand where your home is losing the most energy. You can hire a professional to conduct a home energy audit, which often includes a blower door test to pinpoint air leaks. An auditor can give you a detailed report on which areas of your home—attic, walls, basement, or crawl space—need the most attention.
If you prefer a DIY approach, you can perform a visual inspection. Look for signs of old, compressed, or non-existent insulation in your attic and crawl space. On a cold day, you can often feel drafts around windows, doors, and electrical outlets, which are common sources of heat loss.
2. Prioritize Your Insulation Projects
Not all areas of your home are created equal when it comes to heat loss. To get the most bang for your buck, you should prioritize insulating the areas where the most significant energy loss occurs. For most homes, the priorities are as follows:
The Attic: Since heat rises, the attic is typically the single largest source of heat loss in a home. Insulating your attic floor is often a straightforward DIY project if you have easy access.
Walls: Insulating existing walls can be more challenging, but it’s essential for comprehensive thermal protection. This often requires professional help to blow insulation into the wall cavities.
Basements and Crawl Spaces: Insulating the foundation walls and the rim joists (the wooden frame that sits on top of the foundation) can prevent cold floors and reduce overall heat loss.
Choosing the Right Insulation Material
Once you’ve identified where you need to insulate, the next step is to choose the right type of insulation. The best material for your project will depend on the location, your budget, and whether you plan to DIY or hire a professional. It’s important to understand the different options available, and a discussion about fiberglass vs. cellulose insulation can provide valuable insights.
Each insulation type has its own R-value, which is a measure of its ability to resist heat flow. The higher the R-value, the better the insulating performance. The recommended R-value for your home will depend on your climate zone.
| Insulation Type | Average R-Value per Inch | Average Cost per Square Foot (Installed) | Pros | Cons |
|---|---|---|---|---|
| Fiberglass Batts | 3.1 – 4.3 | $0.40 – $1.50 | Affordable, DIY-friendly for open spaces. | Can be less effective if not installed perfectly, can irritate skin. |
| Blown-In Cellulose | 3.2 – 3.8 | $0.50 – $1.50 | Excellent for filling existing wall cavities and irregular spaces, made from recycled materials. | Can settle over time, requires specialized equipment to install. |
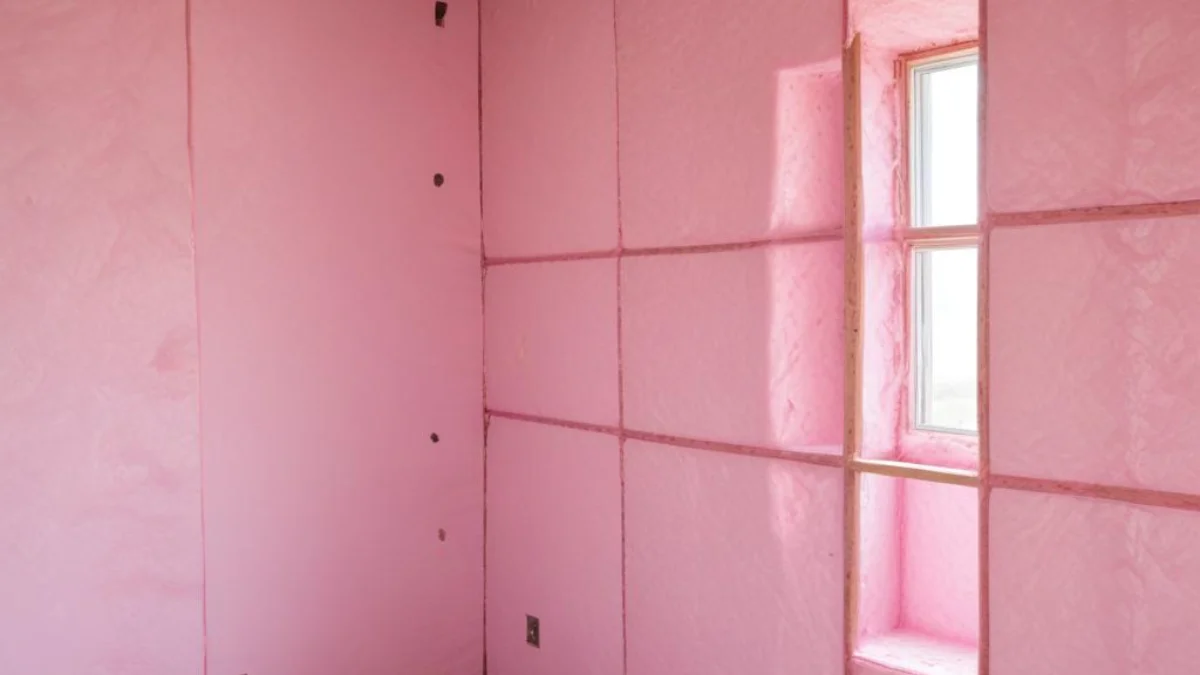
| Spray Foam (Closed-Cell) | 6.0 – 7.0 | $1.50 – $3.50 | Highest R-value, provides an air and moisture barrier, adds structural strength. | Most expensive option, requires professional installation. |
| Mineral Wool | 3.0 – 3.3 | $1.40 – $2.10 | Excellent fire resistance and soundproofing qualities, moisture-resistant. | Higher cost than fiberglass, can be harder to find. |
How to Insulate Different Areas of Your House
The method for installing insulation will vary depending on the part of the house you are working on. Here are the common approaches for the most critical areas.
Insulating the Attic
For an unfinished attic with open joists, laying down rolls or batts of fiberglass insulation is a common DIY project. The insulation should be placed between the joists, and a second layer can be laid perpendicular to the first to cover the tops of the joists and create a continuous thermal barrier.
If your attic has existing but insufficient insulation, you can add more on top of it. Blown-in cellulose or fiberglass is an excellent option for this, as it can easily fill in gaps and create a seamless layer of insulation.
Insulating Existing Walls
Insulating finished walls without tearing them down requires a technique often called “drill-and-fill.” This process involves drilling small holes into the exterior or interior walls and using specialized equipment to blow loose-fill insulation, such as cellulose or injection foam, into the wall cavities. This is a job best left to professionals to ensure the cavities are filled completely and to avoid damaging your walls.
Dealing with uninvited guests in your walls before you insulate is crucial. If you’re hearing scratching sounds, you might be facing an issue with mice in walls but not in the house, which needs to be addressed first.
Insulating Basements and Crawl Spaces
For basements and crawl spaces, rigid foam board or spray foam insulation applied directly to the foundation walls is highly effective. These materials are moisture-resistant and provide a continuous barrier against heat loss. It’s also important to insulate the rim joists, which are a significant source of air leakage.
Professional Installation vs. DIY
While some insulation projects, like adding batts to an open attic, can be handled by a motivated DIYer, others require professional expertise and equipment. For tasks like blowing insulation into walls or applying spray foam, hiring a qualified contractor is the best course of action. A professional will ensure the job is done correctly, safely, and up to code.
When hiring a contractor, be sure to get multiple quotes, check references, and ensure they are licensed and insured. A professional will also be able to advise you on the best type of insulation for your home and climate.
Sealing Air Leaks: A Critical First Step
Before you install any new insulation, it’s essential to seal any air leaks in your home’s envelope. Insulation works best when air is not moving through it. Common sources of air leaks include gaps around windows and doors, openings for pipes and wiring, and cracks in the foundation.
Use caulk to seal small gaps and expanding foam sealant for larger ones. Pay special attention to the attic and basement, as these are often major sources of air infiltration. This step will maximize the effectiveness of your new insulation and further reduce your energy bills.
Financial Incentives and Long-Term Savings
Insulating your home is an investment that pays for itself over time through lower energy bills. In many cases, you can also take advantage of government rebates and tax credits to help offset the initial cost. Be sure to check for federal, state, and local incentives for energy-efficient home improvements.
The long-term savings from properly insulating your home can be substantial. You’ll not only enjoy a more comfortable living environment but also a lower carbon footprint and an increased property value. When considering your home’s overall energy efficiency, you might also wonder, should I buy a house with baseboard heating?, as the heating system and insulation work hand-in-hand.
Taking the step to properly insulate your home is a smart decision for your comfort, your finances, and the environment. Don’t let your hard-earned money leak out through uninsulated walls any longer.