DIY Hobo Fire Barrel: Build Your Own Burn Drum
There’s a timeless appeal to gathering around a crackling fire. Yet, the cost and permanence of a traditional stone fire pit can be daunting. You want warmth, ambiance, and a place to gather, but you face the problems of expense, complex installation, and often, a surprising amount of smoke that follows you around the circle.
This common dilemma leads many to a brilliantly simple, rustic, and effective solution: the hobo fire barrel. More than just a steel drum, a properly designed fire barrel can be a highly efficient, low-smoke, and portable centerpiece for your backyard. It solves the problem of cost while offering a unique, hands-on DIY project.
You'll Learn About
What Exactly Is a Hobo Fire Barrel (and Why You Need One)
A hobo fire barrel, at its core, is a repurposed 55-gallon steel drum modified for use as a fire pit or outdoor heater. The term “hobo” harkens back to an era of resourcefulness, where migrant workers would create makeshift stoves from discarded cans and barrels for warmth and cooking. This spirit of ingenuity and simplicity is what defines the modern hobo barrel.
Unlike a simple hole in the ground or a flimsy store-bought pit, a steel barrel contains the fire effectively. Its height helps to channel heat outwards, warming those gathered around it. With a few simple modifications, it can be transformed from a basic container into a sophisticated, clean-burning heat source.
From Necessity to Novelty: A Brief History
The concept of the hobo stove was born out of the Great Depression, a time when resourcefulness was a critical survival skill. Migratory workers, known as hobos, needed portable and efficient ways to cook and stay warm while traveling the country, often by rail. They ingeniously repurposed discarded items like coffee cans and larger drums into functional wood-burning stoves.
These early versions were simple, focusing on directing heat upward for cooking with minimal fuel. Over time, this practical solution has been embraced by outdoor enthusiasts, homesteaders, and DIYers. The hobo fire barrel has evolved from a symbol of hardship into a celebrated icon of rustic charm and self-sufficiency.
The Modern Appeal: More Than Just a Steel Drum
Today, the appeal of a hobo fire barrel is multifaceted. It represents an affordable alternative to expensive commercial fire pits, offering a durable and long-lasting solution for a fraction of the price. The DIY aspect is a major draw, providing a satisfying project that results in a functional and personalized backyard feature.
Furthermore, a well-designed fire barrel can be surprisingly portable. Unlike a permanent brick structure, a steel drum can be moved to different locations in your yard or even taken on camping trips. This flexibility makes it a versatile tool for any outdoor gathering.
Before You Burn: The Hidden Dangers of a Poorly Made Barrel
The biggest problem with a DIY fire barrel isn’t the concept, but the execution. Simply tossing wood into an unmodified steel drum can lead to a host of issues. These pitfalls can turn your dream of a cozy backyard fire into a frustrating and potentially dangerous experience.
Without proper knowledge, you risk creating a smoky mess, a rapidly rusting eyesore, or worse, a fire hazard. Understanding these common problems is the first step toward building a barrel that is safe, efficient, and enjoyable for years to come.
The Smoke Monster: Why Your Barrel Smokes Too Much
The most frequent complaint about makeshift fire pits is excessive smoke. This isn’t just an annoyance; it’s a sign of an inefficient, incomplete burn. When a fire lacks sufficient oxygen, the wood smolders rather than combusts cleanly, producing thick, acrid smoke and harmful particulates.
An unmodified barrel severely restricts airflow, especially at the base of the fire. This oxygen starvation is the root cause of the “smoke monster” that can drive guests away and irritate neighbors. The key to defeating it lies in understanding and engineering proper ventilation.
Rust and Ruin: The Battle Against Corrosion
A standard steel drum is not invincible. When exposed to the intense heat of a fire and the moisture of the elements, it will inevitably begin to rust. Ash, when mixed with rainwater, creates a caustic slurry that can rapidly eat through the bottom of the barrel, drastically shortening its lifespan.
Without proper drainage and elevation, your fire barrel can become a rusty, unstable hazard in just a season or two. Protecting your investment from corrosion is crucial for both safety and longevity. This is an issue that requires proactive design choices from the very beginning of your build.
Legal Hot Water: Are Burn Barrels Even Legal?
Before you strike the first match, you must address the legalities. Open burning regulations vary significantly by state, county, and even city. Some municipalities have outright bans on burn barrels, while others have specific rules regarding their use for recreational fires versus waste disposal.
It is crucial to check your local ordinances and fire department regulations. Burning prohibited materials like trash, plastics, or treated wood can result in heavy fines and environmental damage. A recreational hobo fire barrel used for burning clean firewood is often permissible where fire pits are allowed, but you must verify this first.
Step-by-Step Guide: From Rusty Drum to Backyard Centerpiece
Building the perfect hobo fire barrel is a straightforward process when you follow a clear plan. This guide will walk you through each critical step, from choosing the right materials to applying the finishing touches. The goal is to create a fire barrel that is not only functional but also safe, efficient, and aesthetically pleasing.
With the right tools and a little bit of effort, you can transform a simple steel drum into a source of warmth and community. Pay close attention to the details, especially regarding safety and airflow, to ensure your project is a resounding success.
Step 1: Selecting the Right Barrel (Safety First!)
The most critical decision is choosing the right 55-gallon drum. Never use a barrel that has contained flammable chemicals, petroleum products, pesticides, or other toxic substances. Vapors can remain trapped inside and can cause a catastrophic explosion when cut or exposed to heat. Your safest bet is to source a “food-grade” barrel that previously held items like oils, juices, or syrups.
Look for an unlined, carbon steel drum. Lined drums have interior coatings (often epoxy-phenolic) that can release toxic fumes when burned. If you’re unsure, it’s better to find another barrel. A local feed store, car wash, or online marketplace can be a good source for suitable, clean drums.
| Barrel Type | Description | Suitability for Fire Barrel | Safety Notes |
|---|---|---|---|
| New, Unlined Steel Drum | A brand new barrel with no prior contents or internal lining. | Excellent | The safest and most ideal choice. Often has a rust-inhibitor enamel that will burn off. |
| Used, Food-Grade Drum | Previously contained non-volatile, non-toxic substances like juice, oil, or soap. | Very Good | Must be thoroughly cleaned with soap and water before cutting. |
| Used, Lined Drum | Has a red or tan epoxy-phenolic lining inside for chemical resistance. | Poor (Avoid) | The lining can release toxic fumes when heated. Not safe for fire pits. |
| Used, Unknown Origin | Any barrel where the previous contents cannot be 100% verified. | Dangerous (Avoid) | Risk of explosion from flammable vapors is too high. Do not use. |
Step 2: Essential Tools and Materials
Gather your tools before you begin to ensure a smooth workflow. You will need safety gear, including heavy-duty gloves and safety goggles, which are non-negotiable. For marking and cutting, you’ll need a tape measure and a marker.
To make the cuts and holes, you have several options: an angle grinder with a cutting wheel is fast and efficient, a reciprocating saw (Sawzall) with a metal-cutting blade also works well, or a drill with a step bit or hole saw for creating clean ventilation holes. Finally, have a few concrete blocks or bricks on hand to serve as a stable base for the finished barrel.
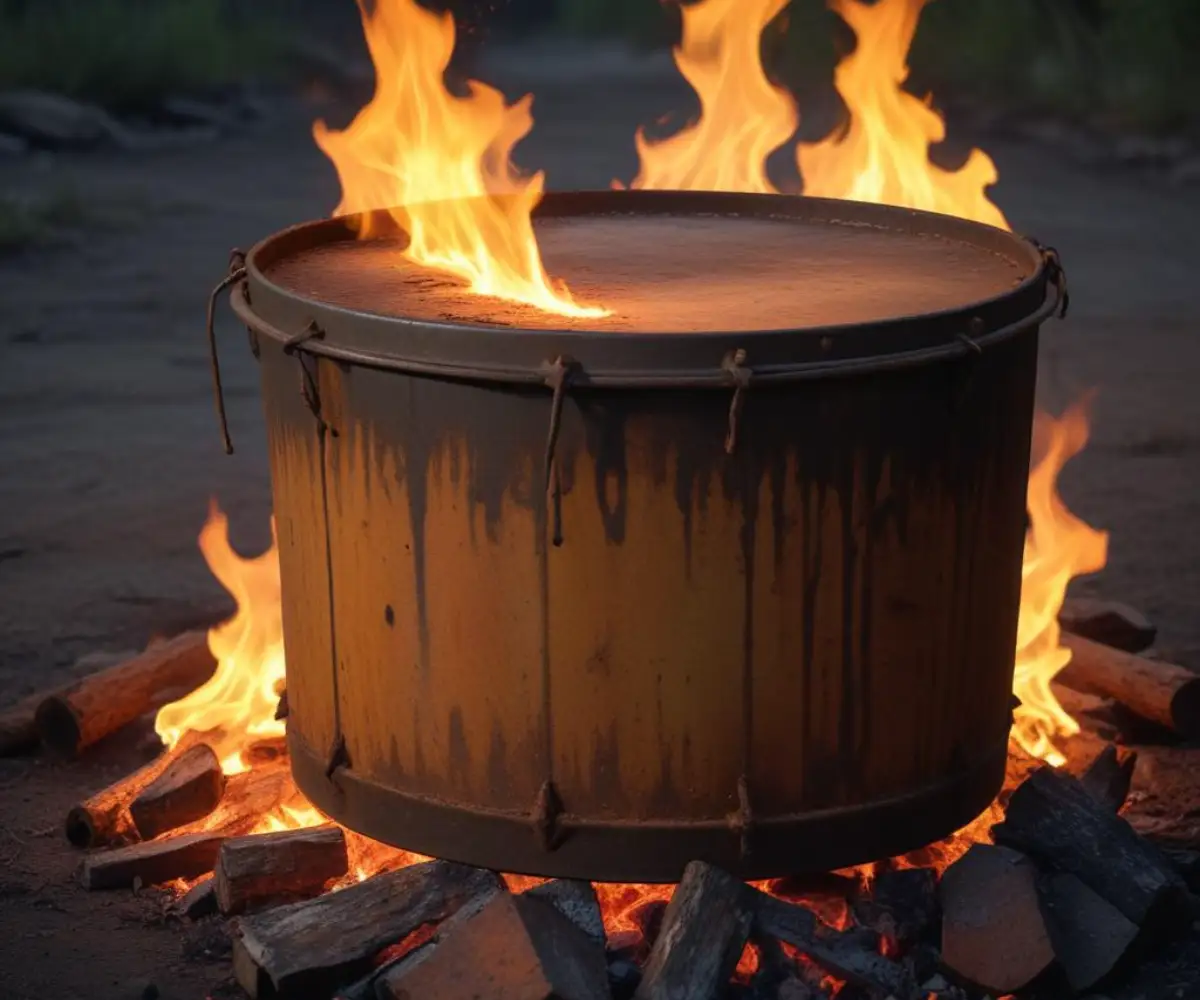
Step 3: Designing for Optimal Airflow (The Secret to a Smokeless Fire)
This is the most crucial step for performance. A clean, hot fire requires a constant supply of oxygen from below. You need to create intake vents near the bottom of the barrel to feed the fire and exhaust vents near the top to allow for secondary combustion, which burns off smoke particles.
Mark a series of holes or slots, about 1-2 inches in diameter, around the entire circumference of the barrel, positioned 3-4 inches from the bottom. This will be your primary air intake. You should also drill several small drainage holes directly in the bottom of the barrel to prevent water from collecting and causing rust.
Step 4: Cutting and Drilling with Precision
With your design marked, it’s time to cut. Always wear your safety glasses and gloves. If your barrel has a sealed top, you will need to cut it off. An angle grinder provides the cleanest cut along the rim. Take your time and make a steady, controlled cut.
Next, create the ventilation holes at the bottom using your drill or grinder. Consistent size and spacing will not only improve performance but also give your barrel a more professional appearance. Some people choose to cut creative designs into the upper portion of the barrel, which can cast beautiful light patterns at night.
Step 5: Curing the Barrel and Applying a Heat-Resistant Finish
Before its first official use, your barrel needs to be cured. This involves burning a small, hot fire inside to burn off any residual manufacturing oils or coatings from the steel. The initial smoke may be unpleasant, so do this in a well-ventilated area away from your house.
Once the barrel has cooled completely, you can apply a finish. While optional, painting the exterior with a high-temperature grill or stove paint will significantly inhibit rust and improve its appearance. A proper finish is key to longevity; a poor coating can lead to issues much like discovering paint cracking around a door frame—it indicates an underlying problem that will only get worse. Choose a paint rated for at least 1200°F (650°C).
Beyond the Build: Safe and Efficient Operation
Your hobo fire barrel is built, but mastering its use is key to a safe and enjoyable experience. Proper operation involves more than just lighting a fire. It requires an understanding of how to season the barrel, what fuel to use, and the unwavering discipline to follow safety protocols.
These practices will ensure your fire burns brightly and cleanly, maximizing heat output while minimizing smoke and risk. A well-managed fire is the difference between a relaxing evening and a potential emergency.
The First Burn: Seasoning Your Barrel Like a Pro
Your very first fire, the curing burn, is essential. Start with a small amount of kindling and gradually build a moderately hot fire. The goal is to heat the entire barrel evenly to burn off any coatings and temper the steel.
Let this fire burn down completely and allow the barrel to cool naturally. This process sets the stage for all future fires and prepares the surface for any high-temperature paint you plan to apply. Do not use the barrel for cooking or gathering until this initial curing is complete.
Fueling the Fire: Best and Worst Woods to Burn
The quality of your fire depends directly on the quality of your fuel. Always use dry, seasoned hardwood like oak, maple, or hickory. Seasoned wood has been cut and dried for at least six to twelve months, reducing its moisture content and allowing it to burn hotter and cleaner.
Never burn trash, plastic, treated lumber, particleboard, or painted wood. These materials release toxic chemicals and create noxious smoke. The simplicity of using clean wood is a welcome contrast to the complexities of modern utilities; you don’t need to wonder how to turn gas back on after disconnection when your fuel is stacked right in your backyard.
Safety Protocols You Cannot Ignore
Safety must always be your top priority. Place your barrel on a stable, non-combustible surface like gravel, pavers, or bare dirt—never on a wooden deck or dry grass. Just as you ensure a stable foundation for projects inside your home, like creating a vinyl plank flooring transition to carpet on concrete, your fire barrel needs a solid, safe base.
Maintain a clear zone of at least 10-15 feet around the barrel, free of any flammable materials. Never leave the fire unattended, and always have a fire extinguisher, garden hose, or large bucket of water nearby. Before leaving the area, ensure the fire is completely extinguished by dousing it with water until no embers remain.
Level Up Your Barrel: Creative Mods and Uses
Once you’ve mastered the basics, you can explore a range of modifications to enhance your hobo fire barrel’s functionality and safety. These creative additions can transform your simple fire pit into a versatile outdoor cooking station or a stunning piece of yard art.
These upgrades are not just about aesthetics; they can also improve performance and make your fire barrel even safer to operate. Let your creativity and practical needs guide your next steps.
Adding a Cooking Grate: From Fire Pit to BBQ
One of the most popular modifications is adding a cooking surface. A simple, heavy-duty metal grate placed across the top of the barrel instantly turns it into a rustic grill. You can cook anything from burgers and hot dogs to steaks and vegetables over the open flame.
For more control, you can weld small brackets to the inside of the barrel at different heights. This allows you to adjust the distance between the grate and the coals, giving you more precise temperature control for different types of cooking.
Spark Arrestors and Lids for Enhanced Safety
A spark arrestor is a critical safety upgrade, especially in windy conditions or areas with dry vegetation. A simple screen made from hardware cloth or expanded metal can be fitted over the top of the barrel. This cover will contain flying embers and sparks, significantly reducing the risk of an accidental fire.
A solid metal lid is also useful for extinguishing the fire. By placing a snug-fitting lid over the top, you can cut off the oxygen supply and safely suffocate the flames. The lid also serves to keep rain out of the barrel when not in use, preventing rust.
Artistic Designs: Making Your Barrel a Work of Art
Your fire barrel doesn’t have to be purely functional. With a plasma cutter or an angle grinder and a steady hand, you can carve intricate designs into the sides of the barrel. Popular themes include wildlife scenes, geometric patterns, or personalized logos.
When the fire is lit, these cutouts will glow, creating a stunning visual effect and casting captivating shadows. This is your opportunity to turn a humble steel drum into a unique and personalized piece of functional art for your backyard.
The Hobo Fire Barrel: A Timeless Solution for Modern Outdoor Living
The hobo fire barrel stands as a testament to timeless ingenuity, offering a practical and affordable solution to the modern desire for an outdoor fire feature. It solves the core problems of cost, smoke, and permanence associated with traditional fire pits. By embracing its DIY nature, you create more than just a heat source; you build a centerpiece for connection, warmth, and memories.
By following the principles of safe sourcing, smart design for airflow, and diligent safety practices, you can craft a fire barrel that is efficient, long-lasting, and a true asset to your outdoor space. It’s a project that rewards you with the crackle of a clean-burning fire and the satisfaction of having built it yourself.