Why Is Gutter Wrap Around Corner Leaking? Here’s Your Permanent Fix
Leaky, sagging gutter corners are a homeowner’s nightmare. That constant drip-drip-drip isn’t just annoying; it’s a sign of a bigger problem that can lead to costly water damage to your foundation, fascia, and landscaping. Traditional mitered corners, with their multiple seams, are notorious failure points.
But what if there was a better way? A solution that not only stops leaks for good but also enhances your home’s curb appeal. Enter the gutter wrap around corner, a seamless, durable, and surprisingly simple upgrade for your rainwater management system.
You'll Learn About
The Problem with Traditional Gutter Corners
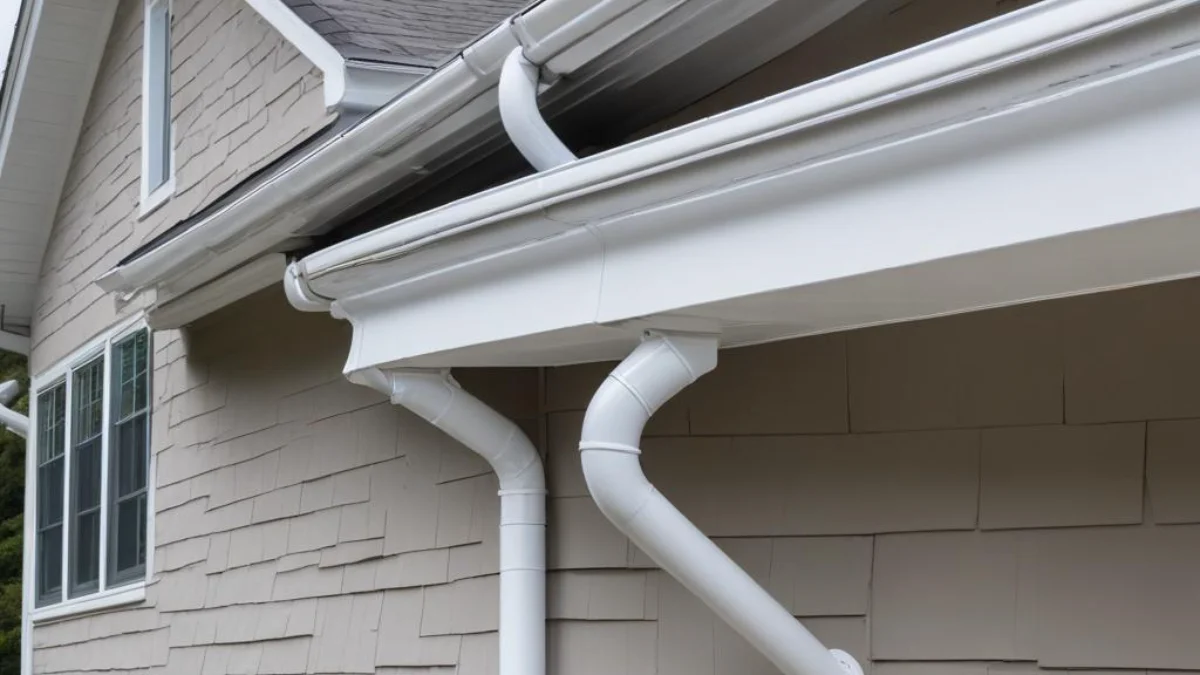
For decades, the standard method for creating gutter corners involved cutting two pieces of gutter at 45-degree angles and joining them with sealant and rivets. These are known as mitered corners. While functional initially, they have inherent weaknesses that inevitably lead to problems.
Why Seams Spell Trouble
The primary issue with mitered corners is the seams. Every seam is a potential point of failure. Over time, the sealant used to join the pieces can degrade due to exposure to UV rays, extreme temperatures, and the constant flow of water. This degradation leads to cracks and gaps, allowing water to escape.
Furthermore, the expansion and contraction of the metal gutters with temperature changes puts stress on these seams. This constant movement can widen small cracks, turning a minor drip into a significant leak. This is a common issue that homeowners often overlook until significant damage has occurred.
Debris Buildup and Clogs
The internal seam of a mitered corner creates a ridge that can easily snag leaves, twigs, and other debris. This snag point accelerates the formation of clogs, causing water to back up and overflow. Overflowing gutters can saturate the ground next to your foundation, leading to soil erosion and potential basement flooding.
This constant need for cleaning can be a hassle, and if neglected, can render your gutter system ineffective. It’s a maintenance headache that a seamless design can eliminate entirely. This kind of preventative maintenance is crucial for home upkeep, much like knowing how to open storm windows from the outside for proper seasonal care.
The Superior Solution: The Gutter Wrap Around Corner
A gutter wrap around corner, also known as a seamless corner or a one-piece corner, is fabricated from a single piece of gutter material. The gutter trough is precisely cut and folded to create a continuous, seamless turn. This innovative design eliminates the inherent weaknesses of traditional mitered corners.
Because there are no seams at the corner’s most critical point, there is simply no place for leaks to start. The smooth, uninterrupted channel allows water and debris to flow freely, drastically reducing the chances of clogs and backups. This makes them a far more reliable and low-maintenance option for any home.
Key Benefits of Going Seamless
The advantages of upgrading to wrap around gutter corners are significant. Homeowners who make the switch enjoy greater peace of mind and a more effective water management system. The benefits extend beyond just preventing leaks.
Unmatched Durability: The single-piece construction is inherently stronger and more rigid than a seamed corner. It can better withstand the weight of heavy rainfall, snow, and ice without sagging or pulling away from the fascia. This structural integrity ensures a longer lifespan for your entire gutter system.
Improved Water Flow: The smooth, seamless interior allows water to flow unimpeded around the corner. This efficiency is crucial during heavy downpours, ensuring water is directed away from your home’s foundation quickly and effectively. This prevents the pooling and overflow common with mitered corners.
Enhanced Curb Appeal: Gutter wrap around corners provide a clean, custom, and professional look. The smooth, flowing lines complement your home’s architecture, unlike the often chunky and unsightly appearance of seamed corners. It’s a subtle upgrade that makes a noticeable difference to your home’s exterior aesthetic.
Installation Guide: How to Fit a Wrap Around Corner
While professional installation is always recommended for the best results, a skilled DIYer can tackle this project. The process involves precise measurements and careful cutting and folding of the gutter material. Having the right tools is half the battle.
Tools and Materials Checklist
Before you begin, gather all the necessary tools and materials to ensure a smooth installation process. A well-prepared workspace is key to a successful outcome. Proper preparation prevents delays and ensures a professional-quality finish.
| Tool/Material | Purpose |
|---|---|
| Gutter Section | The raw material for creating the corner. |
| Tape Measure | For precise measurements. |
| Speed Square | To mark accurate 45-degree angles. |
| Aviation Snips (Left, Right, Straight) | For cutting the aluminum gutter material. |
| Hand Seamer/Folding Tool | To create crisp, clean folds in the metal. |
| Gutter Sealant | To waterproof the single relief cut. |
| Drill with 1/4″ Hex Head Driver | For securing the gutter to the fascia. |
| Gutter Screws/Hangers | To mount the gutter corner securely. |
Step-by-Step Installation Process
Follow these steps carefully to create a perfect wrap around gutter corner. Accuracy is critical, so measure twice and cut once. Working methodically will yield the best results.
1. Measurement and Marking: First, determine the exact center point of the corner on your fascia board. Measure a new section of gutter that is long enough to extend at least 12 inches in both directions from the corner. Mark the center point on the back of the gutter.
2. Creating the Relief Cut: From the center mark, use a speed square to draw two 45-degree lines outward, forming a V-shape or “pie” section on the bottom and back of the gutter. This V-section is the only part that will be removed. Do not cut the front face of the gutter.
3. Cutting the Gutter: Using aviation snips, carefully cut along the marked lines on the back and bottom of the gutter, removing the V-shaped piece. Make a single, straight relief cut down the inside corner where the back and bottom meet the front face. This cut allows the gutter to bend.
4. Folding the Corner: Gently but firmly, bend the two sides of the gutter inward to form a 90-degree corner. The front face will curve naturally. Use a hand seamer to create a clean, crisp fold on the bottom and ensure the back pieces meet flush.
5. Sealing and Finishing: Apply a generous bead of high-quality gutter sealant to the small seam on the inside bottom of the corner. Create a small tab from a piece of scrap gutter, apply sealant to it, and place it over the seam for added protection. Smooth the sealant with your finger for a watertight seal.
6. Mounting the Corner: Lift the finished corner into place and secure it to the fascia board using gutter screws and hangers. Ensure it is properly sloped towards the downspout for optimal drainage. Connect it to the adjoining straight gutter sections using standard connectors and sealant.
Professional vs. DIY Installation
While the steps are straightforward, achieving a professional-quality, leak-proof result requires practice and precision. Cutting and folding aluminum requires a certain feel to avoid kinking the metal. For this reason, many homeowners opt for professional installation.
A professional has the experience and specialized tools to fabricate perfect corners quickly and efficiently. They can also ensure the entire system is properly sloped and secured, guaranteeing optimal performance and longevity. Sometimes home projects are best left to experts, just as one might need help to turn off WiFi on a Honeywell thermostat for troubleshooting.
Long-Term Maintenance and Care
One of the best features of wrap around corners is their minimal maintenance. However, “low maintenance” does not mean “no maintenance.” Regular inspections are still crucial to ensure the longevity of your entire gutter system.
At least twice a year, in the spring and fall, clear any accumulated debris from your gutters to prevent clogs. While doing so, inspect the wrap around corner for any signs of damage or wear. Check that the sealant on the single relief cut is still intact and that the corner remains securely fastened to the fascia.
Taking care of your home’s exterior systems is paramount. Just as you might use specific cleaning methods for inside, like considering if you can use an ozone generator in an apartment, your home’s exterior requires its own routine. A well-maintained gutter system with durable wrap around corners is a long-term investment in your home’s health and value, protecting it from water damage for years to come.