Gravel Drip Edge: Stop Roof Leaks & Fascia Rot for Good!
Your roof is your home’s first line of defense against the elements—but even the smallest design details can make a huge difference in how well it performs. One such often‑overlooked component is the gravel drip edge, a specially designed roofing edge that guides rainwater away from vulnerable roof edges and prevents it from seeping into the structure below.
Without an effective drip edge, water can travel under shingles or behind gutters, leading to costly leaks, rot in fascia boards, and premature roof deterioration. Installing the right drip edge creates a reliable barrier that protects your roof system, extends its lifespan, and keeps your home dry and structurally sound—no more wood rot, no more ugly water stains, and far fewer repairs down the road.
You'll Learn About
Is Your Flat Roof Secretly Destroying Your Home?
You look at your home and see a solid, sturdy structure. But silent destroyers could be at work, causing damage that costs thousands to repair. The culprit is often something you’ve never even heard of: a missing or failed gravel drip edge.
Water stains streaking down your siding, peeling paint on your fascia boards, and mysterious dampness near your foundation are all warning signs. These issues often point to a single, critical failure at the perimeter of your flat or low-slope roof.
Understanding the Enemy: How Water Infiltrates Your Roof’s Edge
Water is persistent. Due to a scientific principle called surface tension, water droplets cling together and adhere to surfaces. On a roof without a proper drip edge, this causes rainwater to curl under the edge of the roof and run down the fascia board.
This constant dampness creates the perfect environment for wood rot, mold, and mildew. In colder climates, the freeze-thaw cycle turns this problem critical. Water soaks into the wood, freezes, expands, and splits the material apart, leading to rapid deterioration.
What Exactly Is a Gravel Drip Edge (and Why Is It So Important)?
A gravel drip edge, often called a “gravel stop,” is a piece of metal flashing installed at the perimeter of a flat or low-slope roof. It’s a simple component that serves two vital, non-negotiable functions that protect your entire home.
First, it acts as a barrier, holding the gravel ballast or aggregate of a built-up roof system in place. Second, and most importantly, it features a projecting lower flange that directs water away from the fascia and siding, forcing it to drip cleanly to the ground or into a gutter system. This prevents the destructive water-clinging effect.
Without this component, your home’s structural integrity is at risk. It’s not just a piece of trim; it is your roof’s first line of defense against water infiltration at its most vulnerable point.
Choosing Your Armor: A Comparison of Drip Edge Materials
The material you choose for your gravel drip edge directly impacts its longevity, durability, and cost. Each option comes with its own set of advantages and disadvantages. Making the right choice is crucial for long-term performance and peace of mind.
Understanding these differences will help you select the best material for your budget, climate, and aesthetic preferences. This decision should balance upfront cost with the expected lifespan and maintenance requirements of the flashing.
| Material | Pros | Cons | Average Cost (Per Linear Ft.) | Estimated Lifespan |
|---|---|---|---|---|
| Aluminum | Lightweight, rust-proof, easy to install, comes in various colors. | Can be dented easily, less durable than steel in harsh weather. | $2 – $5 | 20-30 years |
| Galvanized Steel | Strong, durable, resistant to dents and damage from ladders. | Can rust if the galvanized coating is scratched, heavier than aluminum. | $3 – $7 | 30-50 years |
| Copper | Extremely durable, develops an attractive patina, longest lifespan. | Very expensive, requires skilled installation. | $15 – $30+ | 80-100+ years |
Aluminum: The Lightweight Standard
Aluminum is the most common choice for residential gravel drip edges for good reason. It is incredibly resistant to rust and corrosion, making it ideal for wet climates. Its lightweight nature also makes it easier for a professional or a skilled DIYer to handle and install.
However, its main drawback is its relative softness. It can be easily dented by ladders, falling branches, or severe hail. While functional, cosmetic damage can detract from its appearance over time.
Galvanized Steel: The Heavy-Duty Workhorse
For homeowners who prioritize strength and durability, galvanized steel is an excellent option. It is significantly stronger than aluminum and stands up well to physical impacts. The zinc coating provides robust protection against rust.
The primary vulnerability of galvanized steel is a deep scratch that penetrates the protective coating. If the underlying steel is exposed to moisture, rust can begin to form, potentially compromising the flashing over many years.
Copper: The Premium, Long-Lasting Choice
Copper is the ultimate choice for a drip edge, offering unparalleled longevity and a timeless aesthetic. It will never rust and, over time, develops a beautiful blue-green patina that is highly sought after for historic or high-end homes.
The significant barrier to entry for copper is its cost, which is substantially higher than both aluminum and steel. It also requires specialized tools and expertise to install correctly, as improper handling can lead to issues.
A Critical Note on Galvanic Corrosion
A factor that is rarely discussed is galvanic corrosion. This is an electrochemical process that occurs when two different types of metal are in contact in the presence of an electrolyte, like rainwater. This can rapidly degrade the less noble metal.
For example, you should never use steel fasteners on a copper drip edge, as the steel will corrode quickly. Always ensure that the fasteners you use are made of a compatible material (e.g., copper nails for copper flashing, stainless steel for aluminum) to ensure the longevity of the entire system.
The Installation Process: An Overview for Homeowners
While installing a gravel drip edge is best left to professional roofers, understanding the process is crucial for any homeowner. It allows you to oversee the work and ensure it’s done correctly. A proper installation is key to its effectiveness.
A flawed installation can be just as bad as having no drip edge at all. Make sure every step is followed meticulously to create a waterproof, secure, and long-lasting roof perimeter.
Step 1: Safety and Preparation
Safety is the absolute priority when working on any roof. This means using proper fall protection, ensuring the ladder is secure, and working on a clear, dry day. The old roofing material at the edge must be cleaned away to expose the roof deck for a fresh installation.
Step 2: Measuring and Cutting the Flashing
The drip edge sections are measured for each side of the roof. Corners require precise miter cuts to ensure a tight, overlapping fit that will prevent water from seeping through the joints. This step requires precision for a professional-looking and effective result.
Step 3: Securing the Drip Edge
The gravel stop is installed on top of the base roofing membrane but under the final cap sheet. It must be fastened securely to the roof deck with compatible roofing nails, spaced every 8-10 inches. The fasteners should be driven flush without denting the metal.
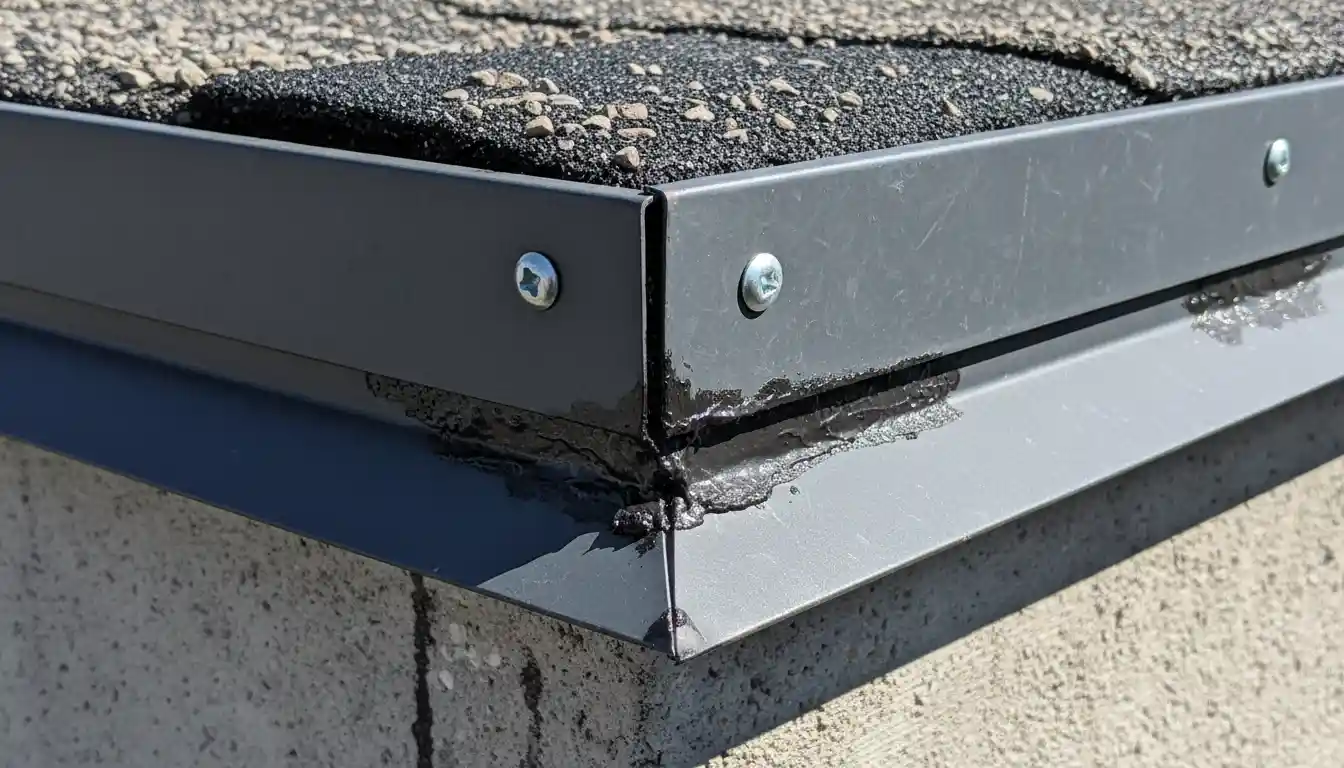
Step 4: Sealing the Seams
All seams, joints, and corners where sections of the drip edge meet must be sealed. A high-quality roofing sealant is applied to the overlapping joints to create a completely watertight barrier. This prevents any water from finding a path behind the flashing.
Step 5: Integrating with the Top Roofing Layer
Finally, the top layer of the roofing membrane (like a torch-down or self-adhered cap sheet) is installed over the top flange of the gravel drip edge. This creates a powerful, integrated system where water flows over the flashing, not under it, ensuring total protection.
Beyond the Edge: Integrating Drip Edges with Gutters
A gravel drip edge performs best as part of a complete water management system. For maximum effectiveness, it should be properly integrated with your home’s gutters. This is a detail that is often overlooked but is vital for foundation protection.
The drip edge should extend out far enough from the fascia so that it hangs directly over the center of the gutter. This ensures that all water draining from the roof is captured and channeled away from your home’s foundation, preventing soil erosion and basement leaks.
The Cost of Neglect vs. The Price of Protection
It can be tempting to skip a component like a drip edge to save a little money on a roofing project. This is a classic example of being “penny wise and pound foolish.” The small upfront cost of a professionally installed gravel drip edge is minuscule compared to the potential repair bills down the road.
The cost of replacing rotted fascia boards, soffits, and sheathing can easily run into thousands of dollars. If the water damage extends to structural components or causes foundation issues, the costs can become astronomical. A gravel drip edge is one of the best investments you can make in your home’s longevity.
Maintenance and Inspection: Keeping Your Edge in Top Shape
Once installed, a gravel drip edge requires minimal maintenance, but it shouldn’t be completely forgotten. A quick visual inspection once or twice a year can catch small problems before they become big ones. Check for any signs of damage, corrosion, or sealant failure.
Seasonal upkeep is also important. After clearing your driveway in the winter, perhaps with a reliable machine like the Honda HS621 snowblower, take a moment to look up at the roofline. Ensure no ice dams have formed that could be putting stress on the edge. Protecting your home’s exterior also preserves its curb appeal, allowing your landscaping efforts to shine. A well-maintained home is the perfect backdrop for a garden showcasing beautiful flowers like dramatic dahlias and roses.
Frequently Asked Questions (FAQs)
Homeowners often have specific questions about this critical but little-known roofing component. Getting clear answers helps you make informed decisions about protecting your property.
Can I install a drip edge on an existing roof?
Yes, it is possible to retrofit a drip edge onto an existing roof, but it is more complex than installing it during a roof replacement. The process involves carefully prying up the edge of the existing roofing material to slide the drip edge underneath and then sealing it thoroughly. This is a job that should only be done by an experienced roofing professional to avoid damaging the roof.
What’s the difference between a gravel stop and a regular drip edge?
While all gravel stops are a type of drip edge, not all drip edges are gravel stops. A standard drip edge is typically smaller and designed for sloped shingle roofs. A gravel stop has a taller, more pronounced vertical face designed specifically to hold back the layer of stone on a built-up flat roof while also directing water away.
How do I know if my current drip edge has failed?
The tell-tale signs of a failed drip edge are visible on the fascia board directly below it. Look for peeling or bubbling paint, dark water stains, or soft, rotting wood. You may also see drips forming along the bottom of the fascia during rain instead of falling cleanly from the metal edge.
The Final Verdict: A Non-Negotiable Investment in Your Home
The gravel drip edge is a small, inexpensive, yet profoundly important part of your roofing system. It is the unsung hero that works tirelessly to protect your fascia, siding, and foundation from the relentless threat of water damage. It is a fundamental component for any flat or low-slope roof.
Ensuring your home has a properly installed, high-quality gravel drip edge is a proactive step toward preserving its value and structural integrity. For those who enjoy tackling significant home projects, understanding these foundational elements is just as rewarding as more visible upgrades, like figuring out how to creatively turn your metal shed into a greenhouse. It’s an investment that pays for itself many times over by preventing costly future repairs.