Garbage Disposal Blade Broke Off? Your Ultimate Fix-It Guide
That horrible, grinding noise from your kitchen sink is a sound no homeowner wants to hear. It’s a metal-on-metal screech that instantly signals something is seriously wrong.
If you suspect a garbage disposal blade broke off, you’re facing a common but critical kitchen appliance failure. Don’t panic; this guide will walk you through everything you need to know to diagnose the problem and find the right solution.
You'll Learn About
What Really Happens When a “Blade” Breaks
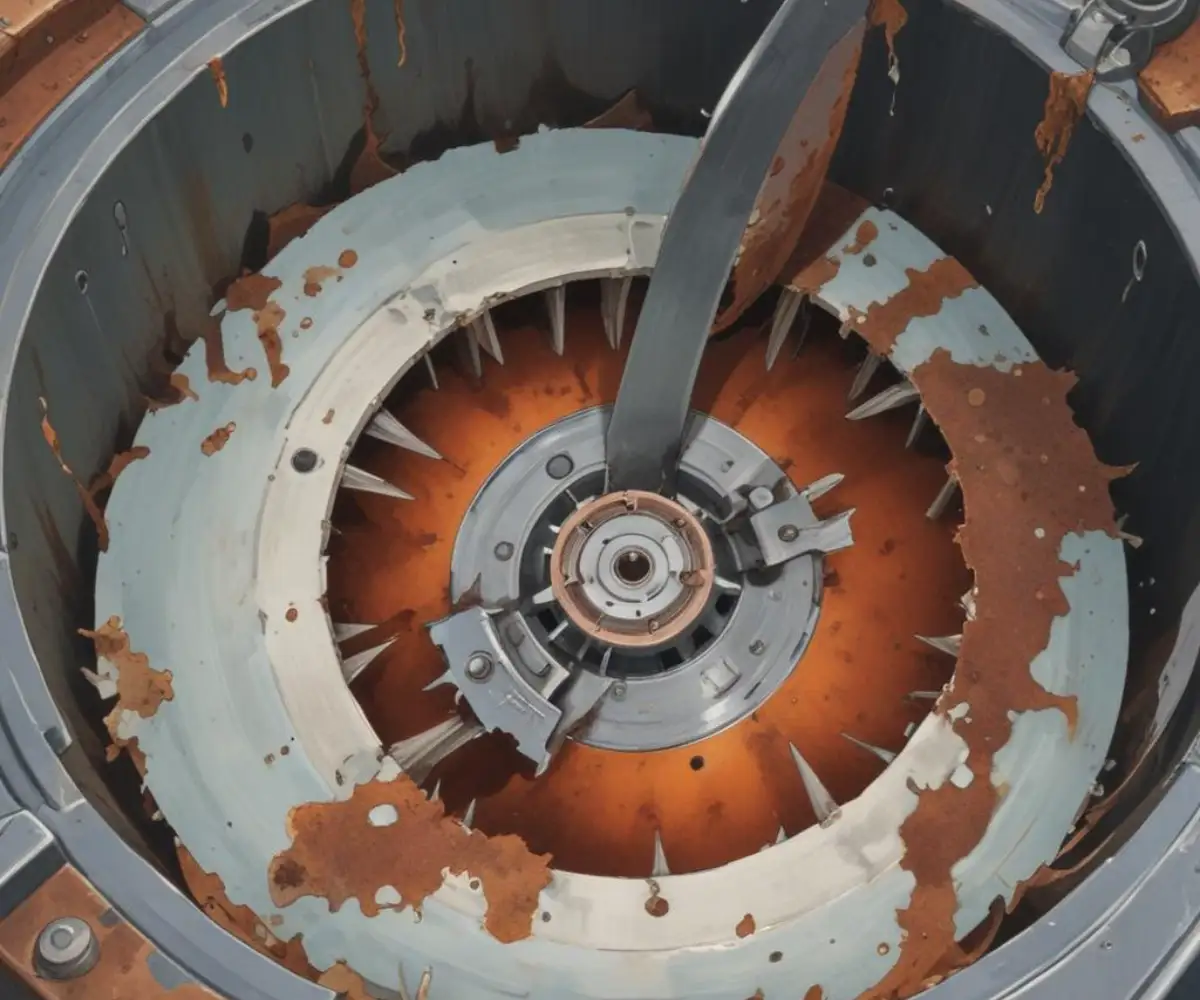
First, let’s clear up a common misconception. Your garbage disposal doesn’t have blades like a blender. Instead, it has impellers or lugs mounted on a spinning plate.
These blunt impellers use centrifugal force to repeatedly fling food waste against a stationary grind ring, pulverizing it into tiny particles that can be washed away. When we say a “blade broke off,” we mean one of these critical metal impellers has sheared off its mounting.
Top Causes for a Broken Garbage Disposal Impeller
This kind of damage doesn’t happen without a reason. Understanding the cause can help you prevent it from happening again with your next unit.
The most common culprit is introducing foreign, hard objects into the disposal. Accidental spoons, bottle caps, screws, glass shards, or large, dense bones can easily snap an impeller lug under the high torque of the motor.
Over time, constant exposure to water and acidic food waste can lead to severe corrosion and rust. This weakens the metal impellers and the plate they are attached to, making them brittle and prone to breaking even under normal operating stress.
The Telltale Signs: How to Confirm a Broken Blade
You don’t need to be a master plumber to diagnose a broken impeller. The signs are usually loud and clear, making it obvious that something is catastrophically wrong inside the unit’s grinding chamber.
The most immediate and alarming symptom is an incredibly loud, metallic grinding or clanking sound. This is the sound of the broken-off piece of metal being thrown around inside the disposal chamber by the remaining impeller and the motor.
You may also notice a significant drop in performance. The motor might hum, but the disposal will fail to grind food waste effectively, leading to instant jams and a sink that won’t drain properly.
Visual Inspection: The Final Confirmation
If you want to be absolutely certain, you can perform a visual inspection. This is the most important step, and you must prioritize safety above all else.
First, and most importantly, you must completely disconnect the power to the garbage disposal. Go to your home’s circuit breaker and flip the breaker that controls the disposal. For an extra layer of safety, unplug the unit from the wall socket underneath the sink.
Once you are 100% certain there is no power to the unit, shine a bright flashlight into the sink drain. Use a pair of pliers or tongs—never your hands—to move the spinning plate around. You should be able to see the stationary impellers and spot if one is missing or clearly broken.
The Critical Question: Can You Replace Just the Blade?
This is the question every homeowner asks, hoping for a simple and cheap fix. Unfortunately, the answer is a straightforward and resounding no.
The impellers are not designed to be replaceable parts. They are permanently riveted or welded onto the turntable, which is the large metal plate that spins. There is no way for a consumer (or even a professional plumber) to simply unscrew a broken impeller and attach a new one.
Why Repair Isn’t an Option
The entire grinding system is a single, integrated component. When one impeller breaks off, it signifies that the entire turntable assembly is compromised, likely due to metal fatigue or widespread corrosion.
Even if you could somehow reattach the blade, the unit’s balance would be thrown off, leading to violent vibrations that could damage your sink and plumbing. A broken impeller means the garbage disposal has reached the absolute end of its service life.
The Only Real Solution: Replacing the Entire Unit
Once you’ve confirmed a broken impeller, the only safe and effective solution is to replace the entire garbage disposal unit. Trying to use the disposal with a broken piece of metal inside is incredibly dangerous and can cause further damage.
While this might sound daunting, it’s a manageable DIY project for many homeowners. It offers the peace of mind of a new appliance, a fresh warranty, and often, a quieter and more efficient model.
Choosing Your New Garbage Disposal
When selecting a replacement, consider the horsepower (HP) you need. For most families, a 1/2 HP or 3/4 HP model is perfectly sufficient for handling everyday food scraps.
Also, look for features like stainless steel grinding components, which offer superior durability and corrosion resistance. Many modern units also feature advanced sound insulation for much quieter operation.
Step-by-Step Guide to Replacing Your Garbage Disposal
Ready to tackle the replacement yourself? With the right tools and a bit of patience, you can have a new unit installed in just a couple of hours. This process is a great way to build your DIY confidence, much like other home projects.
Before you begin, make sure you have everything you need on hand. This will prevent multiple trips to the hardware store and make the process much smoother.
Step 1: Gather Your Tools and Materials
You will need a new garbage disposal unit, plumber’s putty, a bucket, old towels, channel-lock pliers, a flathead screwdriver, and a Phillips head screwdriver. Having a headlamp or flashlight will also be very helpful for working under the sink.
Ensure the new disposal is compatible with your existing plumbing setup. Most modern units are designed for standardized sink openings, making replacement relatively straightforward.
Step 2: Disconnect and Remove the Old Unit
With the power still turned off at the breaker and the unit unplugged, place your bucket under the P-trap pipes to catch any residual water. Use your pliers to loosen the slip nuts connecting the disposal’s drain pipe to your main sink drain.
Next, you’ll need to detach the unit from the sink flange. Most disposals use a mounting ring system. You’ll insert a screwdriver into one of the lugs on the lower mounting ring and turn it counter-clockwise to unlock the disposal from the sink. Be prepared to support the weight of the unit as it comes free.
Step 3: Install the New Sink Flange
With the old disposal removed, push the old sink flange up through the sink drain and clean away all the old plumber’s putty. Take a generous rope of new plumber’s putty and apply it to the underside of the new flange.
Press the new flange firmly into the sink drain opening from above. From below, slide on the backup flange, fibrous gasket, and mounting ring, securing it all with the provided screws. Tighten the screws evenly until the mounting ring is snug and excess putty squeezes out around the flange in the sink basin.
Step 4: Mount and Connect the New Disposal
If your new unit came with the power cord detached, now is the time to wire it according to the manufacturer’s instructions. Next, lift the new disposal into place, aligning the three tabs on the disposal with the ramps on the mounting ring.
Push the unit up and turn the lower mounting ring clockwise until the disposal locks securely into place. Reconnect the drainpipe to the unit and the main P-trap, tightening the slip nuts. If you have a dishwasher, now is the time to use a screwdriver to knock out the dishwasher plug from the disposal’s side inlet.
Step 5: Final Checks and Testing
Plug the new unit into the wall outlet and then restore power at the circuit breaker. This is a good time to ensure your power source is reliable; for some, a new installation is a great opportunity to learn how to install a garbage disposal switch for easier access.
Place a stopper in the sink and fill it with a few inches of water. Remove the stopper and turn on the disposal, checking carefully underneath for any signs of leaks from the flange or pipe connections. Let the water run for a minute to ensure everything is flowing smoothly.
How to Prevent Future Garbage Disposal Disasters
You’ve successfully replaced your unit; now you need to protect your investment. Proper use and maintenance are key to ensuring your new garbage disposal lasts for years without issue. Avoiding another broken blade is all about what you do—and don’t—put down the drain.
Treating your disposal correctly from day one will maximize its lifespan and prevent the kind of damage that leads to catastrophic failure. Think of it as a powerful tool, not an indestructible trash can.
Garbage Disposal Do’s and Don’ts
The best way to avoid problems is to follow a simple set of rules. This table breaks down the most important practices for keeping your disposal in top shape.
| What You SHOULD Do | What You should NOT Do |
|---|---|
| Run a strong flow of cold water before, during, and after use. | Pour grease, oil, or fat into the unit. It solidifies and clogs pipes. |
| Cut up large food scraps into smaller, more manageable pieces. | Grind fibrous materials like celery, corn husks, or artichokes. |
| Regularly clean the disposal by grinding ice cubes or citrus peels. | Put in hard materials like animal bones, fruit pits, or seafood shells. |
| Operate the disposal regularly to prevent rust and corrosion from seizing parts. | Overfill the grinding chamber. Work in small batches for best results. |
When Is It Time to Call a Professional Plumber?
While replacing a garbage disposal is a manageable DIY task for many, there are situations where calling a licensed plumber is the smarter choice. Your safety and the integrity of your home’s plumbing should always come first.
If you are not comfortable with basic electrical wiring or plumbing connections, it’s best to leave it to a professional. Incorrect wiring can be a fire hazard, and improper plumbing can lead to slow leaks and major water damage over time.
Signs You Need an Expert
If your under-sink cabinet has old or complex plumbing, or if the new unit doesn’t seem to align correctly, a plumber can easily adapt the pipes for a perfect fit. They have the tools and experience to handle any unexpected challenges.
Additionally, if you’re undertaking a larger kitchen remodel, it’s wise to have a professional manage all the plumbing components. For example, if you’re learning how to remove granite countertops without damaging cabinets, a plumber can ensure the sink and disposal are disconnected and reinstalled correctly during the process. Tackling home improvement projects can be rewarding, but knowing when to delegate is key, whether it’s plumbing or understanding the nuances of installing vinyl plank flooring over old glue.
Your Kitchen Sink’s New Lease on Life
A broken garbage disposal blade can be a shocking and frustrating event, but it doesn’t have to be a catastrophe. By understanding that the problem requires a full unit replacement, you can avoid wasting time on impossible repairs.
Whether you choose to tackle the replacement as a DIY project or call in a professional, you are now equipped with the knowledge to make an informed decision. Following proper care and maintenance guidelines will ensure your new unit serves your kitchen reliably for many years to come.
“`