Garage Door Scratched My Car? Your Ultimate Guide to Fixing & Preventing It
It’s a heart-sinking moment. You hear a gut-wrenching scrape, and you instantly know: the garage door just scratched your car. This scenario is frustratingly common, turning a routine departure or arrival into a costly and annoying problem.
But don’t despair. Understanding the root cause of the issue is the first step toward a solution. This comprehensive guide will walk you through identifying the problem, fixing the damage to your car and door, and ensuring this never happens again.
You'll Learn About
That Horrible Sound: Identifying Why Your Garage Door Attacked Your Car
A garage door doesn’t just decide to scratch your car; there’s always an underlying mechanical issue. Finding the culprit is crucial. Neglecting the root cause means the problem will almost certainly happen again, leading to more damage and expense.
Before you do anything else, you must determine why the contact occurred. The most common reasons involve misalignment, sensor failure, or protruding hardware. A careful inspection will reveal exactly what you need to fix.
The Sneaky Culprit: Misaligned Tracks and Rollers
The metal tracks that guide your garage door can become bent or misaligned over time from impacts or simple wear and tear. When this happens, one side of the door may travel unevenly. This can cause the door to tilt and make contact with your vehicle as it moves.
Worn-out rollers can also be to blame. If rollers are cracked or broken, they won’t glide smoothly in the track, leading to jerky movements and misalignment that can easily cause a scratch.
Sensor Failure: When Your Door’s Eyes Are Closed
Modern garage doors have photoelectric safety sensors mounted near the floor on either side of the opening. These sensors project an infrared beam that, when broken, tells the door to reverse. If these sensors are dirty, knocked out of alignment, or faulty, the door won’t “see” your car and may close on it.
Even bright sunlight shining directly into one of the sensors can sometimes interfere with the beam, tricking the system. It’s a critical safety feature that, when compromised, becomes a significant hazard to your vehicle.
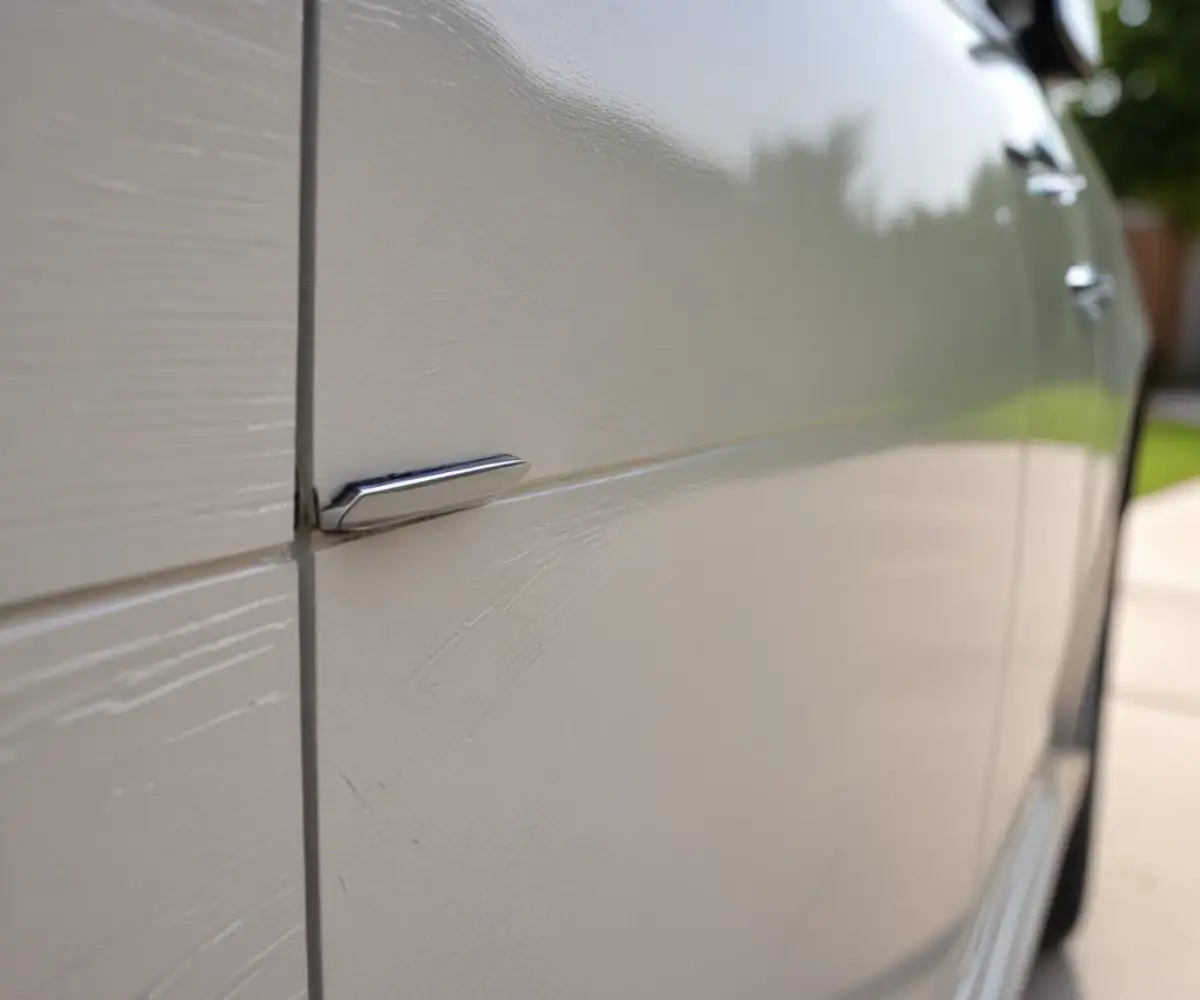
Loose Hardware and Protruding Parts: The Hidden Snags
Years of vibration can cause bolts, hinges, and brackets on your garage door to loosen. A protruding bolt head or a piece of weatherstripping that has come undone can easily snag your car’s paint as you drive past.
These small, seemingly insignificant parts are often the source of long, deep scratches. Regularly checking and tightening all hardware is a simple but effective preventative measure.
Weather Stripping and Seals Gone Rogue
The rubber or vinyl weather seal at the bottom of your garage door is designed to keep out the elements. Over time, it can become brittle, crack, or even partially detach from the door.
A piece of hardened, loose weatherstripping can act like a blade, dragging across your car’s roof or hood as the door closes. Always inspect the condition of your seals as part of your regular maintenance routine.
Assessing the Damage: A Two-Part Inspection of Car and Door
Once you’ve stopped panicking, it’s time for a calm and methodical damage assessment. You need to inspect both your car and the garage door. This two-part process will determine your repair strategy and help you pinpoint the exact cause.
Knowing the severity of the scratch on your car dictates the repair method, from a simple DIY polish to a professional body shop visit. Simultaneously, finding the sharp or misaligned part on the door is essential for preventing a repeat incident.
Step 1: Evaluating the Car Scratch Severity
Car paint is made of multiple layers: a clear coat, a color coat, a primer, and then the metal panel. The depth of the scratch determines the complexity and cost of the repair. Run your fingernail gently over the scratch; if it doesn’t catch, it’s likely just in the clear coat.
If your nail does catch, the scratch is deeper and will require a more involved repair. Ignoring deep scratches can lead to rust, turning a cosmetic issue into a much more serious problem.
| Scratch Type | How to Identify It | DIY Fixable? | Estimated Professional Cost |
|---|---|---|---|
| Clear Coat Scuff/Scratch | Fine lines, often whiteish. Fingernail does not catch. | Yes, often with polishing compound. | $150 – $300 |
| Paint Scratch | Scratch is visible and shows the same color as the car, but deeper. Fingernail catches slightly. | Yes, with a touch-up paint kit. | $400 – $1,000 |
| Primer Scratch | Scratch shows a different color underneath (usually white or grey). | Challenging for DIY. Requires careful layering of primer, paint, and clear coat. | $800 – $1,500 |
| Deep Scratch to Metal | Bare, silver-colored metal is visible. | No, professional repair is highly recommended to prevent rust. | $1,500 – $2,500+ |
Step 2: Inspecting the Garage Door for the Cause
Carefully examine the entire garage door system for the culprit. Look for loose screws, bolts, or hinges that may be sticking out. Check the tracks for dents, debris, or misalignment.
Inspect the rollers for cracks or excessive wear. Run your hand along the weatherstripping at the bottom and sides to feel for any hardened, sharp, or detached sections that correspond with the height of the scratch on your car.
Your Action Plan: Repairing the Scratch Without Breaking the Bank
Seeing a fresh scratch on your car is disheartening, but many repairs are more manageable than you might think. Depending on the depth, you may be able to achieve excellent results at home with the right products and a little patience. Knowing your limits is key.
For minor blemishes, a DIY approach can save you hundreds of dollars. However, for deep scratches that expose the metal, calling a professional is a wise investment to ensure a lasting, high-quality repair and prevent future rust issues.
For Light Surface Scratches: The DIY Polishing Method
If the scratch is only in the clear coat, you’re in luck. A good quality polishing or rubbing compound can often remove these minor blemishes. Start by thoroughly washing and drying the affected area.
Apply a small amount of compound to a microfiber cloth and rub it into the scratch using firm, circular motions. Wipe away the excess residue and check your progress, repeating if necessary. This process essentially smooths the clear coat, making the scratch invisible.
Tackling Deeper Scratches: Touch-Up Paint Kits
For scratches that have gone through the clear coat into the paint layer, a touch-up paint kit is your best option. These kits, available from your car’s dealership or auto parts stores, are matched to your vehicle’s specific color code.
The process involves carefully cleaning the scratch, applying thin layers of paint with a very fine brush, and then sealing it with a layer of clear coat. The key is patience and applying multiple thin coats rather than one thick one.
When to Call a Professional Auto Body Shop
If the scratch has penetrated through the paint and primer to the bare metal, it’s time to call in the professionals. A deep scratch requires sanding, priming, professional painting, and clear coating to properly seal the metal and prevent rust.
While more expensive, a professional repair will be seamless and durable. Attempting a DIY fix on such a deep scratch often leads to a visibly poor result and fails to protect the metal from corrosion.
Fixing the Root Cause: How to Tame Your Garage Door
Repairing your car is only half the battle. If you don’t fix the garage door, you’re just setting yourself up for another scratch. Most garage door adjustments are straightforward and can be done with basic tools, but safety should always be your top priority.
Never attempt to adjust or repair garage door springs yourself. These are under extreme tension and can cause serious injury or death. If you suspect a spring issue, call a professional garage door technician immediately.
Realigning the Garage Door Sensors
If your sensors are the problem, fixing them is often simple. First, ensure the lenses are clean by wiping them with a soft, dry cloth. Check the small LED lights on both sensors; they should be solid and not blinking.
If a light is blinking, it means the sensors are misaligned. Gently loosen the bracket of the blinking sensor and adjust its position until the light becomes solid, indicating it is aligned with the other sensor. Once aligned, tighten the bracket securely.
Tightening Loose Nuts, Bolts, and Hinges
A routine inspection with a socket wrench can prevent a world of hurt. At least twice a year, go over every nut and bolt on your door panels, hinges, and roller brackets. The constant vibration of the door’s movement can easily work them loose.
Pay close attention to anything that looks out of place. This is also a good time to understand the hardware involved. Knowing, for instance, how much weight a 1/4 inch lag bolt holds highlights the importance of using the correct, secure hardware for a heavy, moving object like a garage door.
Adjusting Tracks and Replacing Worn Rollers
Check the vertical tracks to ensure they are plumb. You can use a level to verify this. If a track is out of alignment, you can gently loosen the mounting brackets and tap the track back into the correct position before retightening.
Inspect each roller for cracks, chips, or signs of wear. Worn rollers should be replaced to ensure the door operates smoothly. Remember to never remove the bottom bracket on either side of the door, as this is attached to the high-tension springs.
Managing and Replacing Damaged Weather Seals
A damaged weather seal is an easy fix. Replacement seals are available at most home improvement stores. You’ll need to remove the old, damaged seal from the track at the bottom of the door and simply slide the new one into place, cutting it to length.
A new, flexible seal not only protects your car but also improves your garage’s insulation. This simple replacement can save you from costly scratches and lower your energy bills.
The Secret No One Tells You: Hidden Dangers of DIY Garage ‘Hacks’
In an effort to save money, some people turn to questionable DIY “hacks” found online. These shortcuts are often dangerous and can lead to catastrophic failure, causing far more damage than the original problem.
Understanding why these ‘fixes’ are a bad idea is crucial for your safety and the longevity of your garage door system. A proper repair is always cheaper than dealing with a major accident.
Why Bypassing Sensors is a Catastrophic Mistake
Some ‘hacks’ suggest taping sensors together or rewiring them to bypass the safety reverse feature. This is incredibly dangerous. The safety sensors are the primary mechanism that prevents the door from crushing an object, a pet, or a person.
Disabling them not only puts your car at risk but creates a serious liability and safety hazard. The sensors are there for a reason; never disable them.
The Peril of Over-Lubricating the Wrong Parts
Lubrication is essential, but using the wrong type or applying it to the wrong parts can cause problems. Never use a heavy grease like WD-40 on garage door tracks. It doesn’t lubricate effectively and attracts dirt and grime, which will gum up the rollers.
Use a silicone- or lithium-based spray lubricant specifically designed for garage doors, and apply it only to the hinges, rollers, and springs. The tracks themselves should be kept clean, not greasy.
Using Makeshift Parts: A Recipe for Disaster
Using improper hardware or trying to patch a broken part with makeshift materials is asking for trouble. A garage door is a heavy, complex system, and each component is rated for specific loads and stresses.
Using a random bolt or trying to wire a broken cable back together can lead to sudden failure. This not only risks damage to your property but also exposes you to potential hazards, much like the unseen risks of exposed garage ceiling insulation, where hidden dangers can have serious consequences.
Prevention is Key: Ensuring This Never Happens Again
Once you’ve repaired the damage and fixed the door, the final step is to implement a prevention strategy. A few simple additions and a consistent maintenance routine can provide peace of mind and protect your vehicle for years to come.
These proactive measures are inexpensive and easy to implement. They are the best way to ensure you never have to deal with a garage-door-induced car scratch again.
The Ultimate Garage Parking Aid Guide
Parking aids are a simple and effective solution. The classic method is hanging a tennis ball on a string from the ceiling. When the ball touches your windshield, you know you’ve pulled in far enough.
Modern alternatives include laser parking guides that mount on the ceiling and project a laser dot onto your dashboard, and ultrasonic sensors that use red, yellow, and green lights to guide you to the perfect spot. Clearing floor space by moving storage items, a task made easier with tools like furniture sliders on concrete, can also create a safer parking zone.
Create a Monthly 5-Minute Maintenance Routine
You don’t need to be a mechanic to perform a quick monthly check-up. Once a month, take five minutes to do the following:
Watch and Listen: Operate the door and listen for any scraping, grinding, or unusual noises.
Test the Sensors: Place an object (like a roll of paper towels) in the door’s path to ensure it reverses when the beam is broken.
Check Hardware: Visually inspect the hinges, rollers, and tracks for anything that looks loose or out of place.
This simple habit allows you to catch small problems before they become big, expensive ones.
Upgrading Your System: Smart Garage Door Openers
Consider upgrading to a modern, smart garage door opener. Many new models offer features like video monitoring and the ability to open or close the door from your smartphone. This allows you to double-check that the door is fully open before you back out and confirm it’s closed safely after you leave.
Some systems can even send you an alert if the door is left open for an extended period. It’s a technological solution that adds another layer of security and convenience.
Conclusion: Taking Back Control of Your Garage
A garage door scratching your car is a deeply frustrating experience, but it is entirely solvable and preventable. By systematically identifying the cause, assessing the damage, and performing the correct repairs on both your vehicle and the door, you can resolve the issue completely.
The real key to long-term peace of mind is prevention. A simple monthly maintenance routine and the use of parking aids can transform your garage from a potential hazard zone into a safe, reliable space for your vehicle. Take control of the situation, and you’ll never have to hear that terrible scraping sound again.