Gable Peak Lighting: Your Home’s #1 Curb Appeal Mistake (and How to Fix It!)
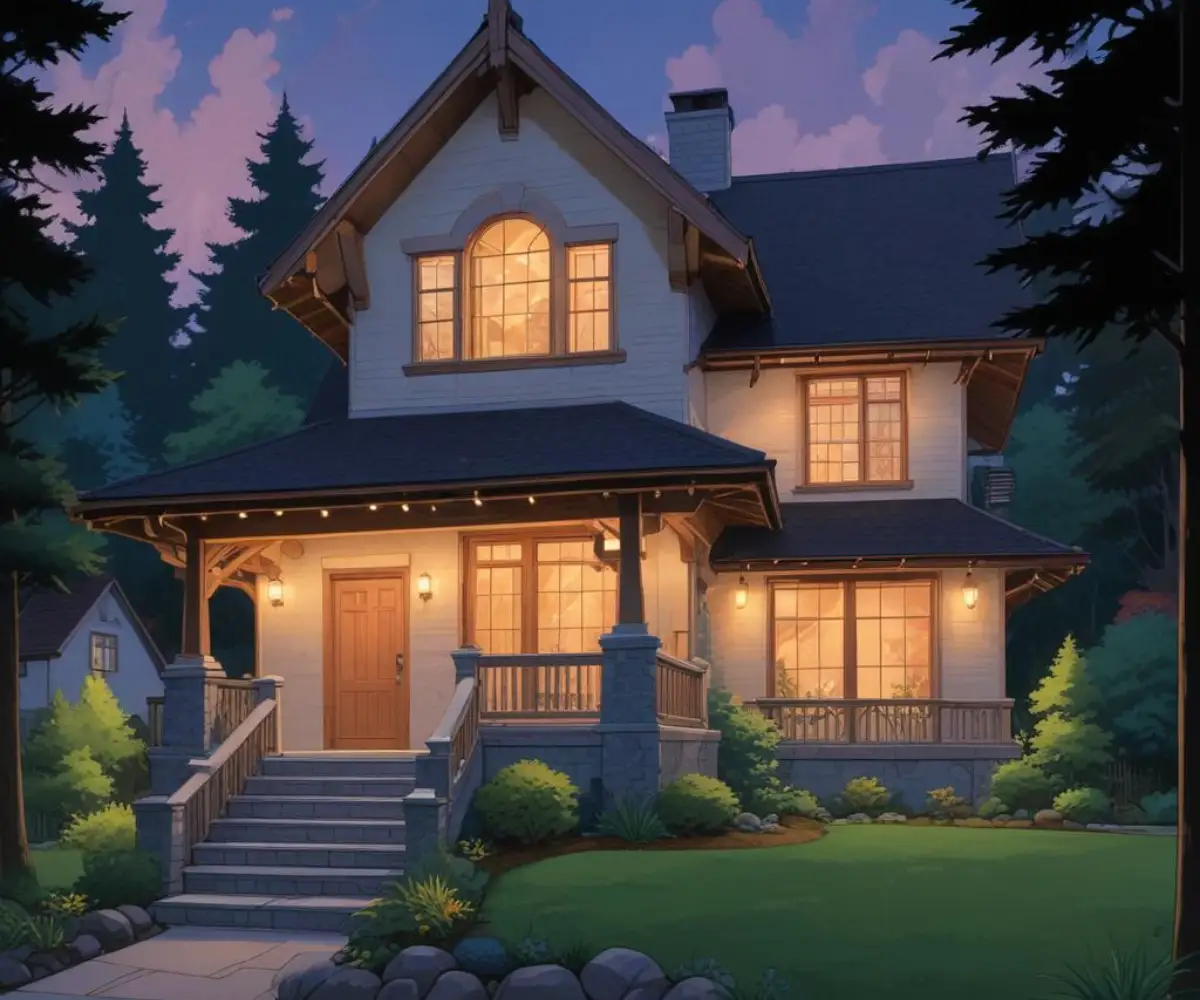
As the sun sets, your home’s carefully chosen paint colors and beautiful landscaping begin to fade into the darkness. While pathway lights and porch sconces do their part, a critical architectural feature is often left neglected—a dark, forgotten void at the very top of your home: the gable peak.
This oversight is one of the most common missed opportunities in exterior home design. Leaving your gables unlit makes your home appear smaller and less dimensioned at night, completely hiding the architectural character you cherish during the day. The problem is, many homeowners don’t know where to start, fearing a complicated, expensive, or tacky-looking outcome.
Fortunately, illuminating your gable peaks is one of the most transformative upgrades you can make to your home’s nighttime presence. With the right approach, you can create a sophisticated, high-end look that enhances security, boosts curb appeal, and makes your home the standout property on the block. This guide will walk you through the entire process, from solving the core challenges to choosing the perfect fixtures and techniques.
You'll Learn About
The Core Problem: Why Are Gables So Hard to Light?
Lighting a gable peak isn’t as simple as placing a lamp. Homeowners and even some professionals run into several key challenges that can make the project seem daunting. Understanding these issues is the first step to overcoming them and achieving a flawless result.
The most immediate hurdle is the physical location. Gable peaks are, by definition, the highest points of a roofline, making them difficult and dangerous to access without the right equipment. Running electrical wiring to these lofty spots presents a significant challenge, often requiring attic access, specialized wiring techniques, and a thorough understanding of electrical codes to ensure a safe and durable installation.
Another major concern is weatherproofing. Any light fixture installed on your home’s exterior is exposed to rain, wind, snow, and extreme temperatures. Improperly installed or sealed fixtures can lead to water intrusion, causing short circuits, corrosion, and potential damage to your home’s structure. This is why professional-grade, outdoor-rated (UL Wet Rated) fixtures are non-negotiable.
The Aesthetic Challenge: Avoiding the “Airplane Runway” Look
Beyond the technical difficulties lies the artistic challenge: how to make it look elegant and intentional. A poorly chosen or badly aimed light can create a harsh, glaring effect, washing out architectural details and spilling unwanted light into your neighbors’ windows. This is often referred to as “light trespass” and is a common mistake in DIY outdoor lighting projects.
Many people also struggle with creating “hot spots”—intensely bright circles of light that create sharp, unflattering contrast against dark siding. The goal is to create a gentle “wash” or a focused “graze” of light that enhances texture and form, not a blinding spotlight. This requires a careful understanding of fixture types, beam angles, and placement strategies.
The Solution: A Strategic Approach to Gable Lighting
Achieving beautiful and effective gable peak lighting comes down to a three-part solution: strategic planning, selecting the right hardware, and employing proper installation techniques. By breaking it down, you can tackle this project with confidence and achieve a professional-quality result that transforms your home’s exterior.
Step 1: Planning Your Architectural Lighting Design
Before you purchase a single fixture, you need a plan. Start by standing across the street from your home at dusk and observing how the light and shadows play on its surfaces. Identify the primary gables you want to highlight. Not every peak needs a light; often, focusing on the most prominent ones creates a more powerful and sophisticated statement.
Next, decide on the desired effect. Are you aiming for a soft, wide “wash” of light that evenly illuminates the entire gable surface, or a dramatic “grazing” effect that rakes across the siding to highlight its texture? Wall washing is great for smooth surfaces, while grazing is stunning on stone, brick, and textured siding. This decision will directly influence the type of fixture and beam angle you’ll need.
Finally, consider the logistics. How will you get power to the location? The most common methods involve running low-voltage wire from a transformer, which is safer and easier for DIY installation than line-voltage wiring. The wire can often be tucked into J-channels, behind downspouts, or run through the attic and out a small, sealed hole in the soffit for a clean, hidden installation.
Step 2: Selecting the Perfect Gable Lighting Fixtures
The fixture you choose is the heart of your project. Modern outdoor lighting is dominated by LED technology for good reason: LEDs are incredibly energy-efficient, have lifespans of 50,000 hours or more, and offer a wide range of color temperatures and brightness levels. When selecting a fixture, there are four key specifications to understand:
Lumens (Brightness): For most residential gables, a fixture between 200 and 500 lumens is sufficient. It’s better to start with a less powerful light and add more if needed than to create a single, overwhelmingly bright spot.
Beam Angle: This is perhaps the most critical factor. A narrow beam (12-25 degrees) creates a focused, dramatic shaft of light perfect for grazing tall, narrow peaks. A wider beam (40-60 degrees) is better for washing broader gables with a softer, more even light.
Color Temperature (Kelvin): Measured in Kelvin (K), this determines the “warmth” or “coolness” of the light. For a classic, welcoming look that complements most home styles, choose a warm white light between 2700K and 3000K. Cooler temperatures can appear stark and commercial.
Fixture Type: Bullet-style spotlights are the most common choice for their versatility and ease of aiming. They can be mounted directly to the wall or soffit. Another option is a recessed fixture installed into the soffit below the peak, which offers a very clean, built-in look.
To help you choose, here is a comparison of common fixture options:
| Fixture Type | Best For | Pros | Cons |
|---|---|---|---|
| Bullet Spotlight | Versatile grazing and washing | Easy to aim and adjust; widely available; durable. | More visible on the house than recessed options. |
| Recessed Downlight | Clean, hidden soffit installation | Sleek, invisible look; protected from elements. | Requires cutting into the soffit; less adjustable beam. |
| Well Light (In-Ground) | Uplighting from the ground | Completely hidden during the day; great for single-story gables. | Requires digging; can be obscured by landscaping or snow. |
| Linear Wall Grazer | Evenly lighting wide, textured surfaces | Creates a beautiful, uniform grazing effect. | Can be more expensive and visually prominent. |
Step 3: Installation – The Pro Approach vs. The DIY Path
This is where safety and precision are paramount. While a dedicated DIYer can tackle a low-voltage lighting installation, it’s crucial to know your limits. High gables on a two-story home present a significant fall risk, and any work involving line-voltage (120V) power should be left to a licensed electrician.
Hiring a Professional
A professional landscape lighting installer will ensure the job is done safely and correctly. They have the proper ladders, safety equipment, and experience in running wire discreetly. They can also provide a design consultation to ensure the best possible aesthetic outcome and will use high-quality, weatherproof connectors to prevent failures down the road. The average professional installation cost can range from $1,000 to over $3,500, depending on the number of fixtures and complexity.
The Confident DIYer’s Guide
If you’re comfortable working on a ladder and have experience with basic wiring, a low-voltage system is a manageable project. Here’s a simplified overview of the process:
1. Mount Your Transformer: Install a low-voltage transformer in a convenient, protected location like a garage or basement wall, near a GFCI-protected outlet.
2. Run the Low-Voltage Wire: Plan a path for your direct-burial rated low-voltage cable from the transformer to the gable peak. Hide the wire by tucking it behind siding channels, corner trim, or running it through the attic for the cleanest look. This careful planning is similar to how you would hang a pegboard without wall damage; meticulous planning prevents unsightly results.
3. Mount the Fixture: Securely mount your chosen fixture to the soffit or wall near the peak. Drill a small hole to pass the fixture’s wire through to your main cable run. This is a critical point for waterproofing.
4. Waterproof the Connection: Use specialized waterproof wire nuts filled with silicone to connect the fixture to the main cable. This is the single most important step to prevent corrosion and failure. After installation, it’s critical to seal any holes you’ve drilled with high-quality exterior caulk, a process that shares principles with learning how to caulk a gutter to the fascia board to ensure a watertight seal against the elements.
5. Connect and Test: Connect the main cable to the transformer, turn it on, and aim your fixture. Wait until dark to make your final adjustments to the angle and position for the perfect effect.
Advanced Techniques and Common Mistakes to Avoid
Once you’ve mastered the basics, you can elevate your design with more advanced strategies. For very wide gables, using two smaller lights angled slightly outward from the center can create a more balanced and encompassing wash of light, eliminating the “hot spot” that a single, powerful fixture might create.
It’s also worth considering smart controls. Connecting your transformer to a smart plug or using an integrated smart transformer allows you to set schedules, dim the lights, and control them from your phone. This adds a layer of convenience and allows for dynamic adjustments for holidays or special occasions.
Top 3 Mistakes to Steer Clear Of
1. Choosing the Wrong Color Temperature: Avoid “cool” or “daylight” bulbs (4000K+). They often look blueish and sterile on a home’s exterior. Stick to the warm 2700K-3000K range for a timeless, inviting glow.
2. Creating Glare Bombs: Always aim your lights carefully. The light source itself should ideally be hidden from view from the street or your neighbor’s property. Use glare shields or adjust the angle to direct light only where it’s wanted.
3. Neglecting the Attic Connection: While running wire, you might be working in your attic space. This is a good time to remember the importance of your home’s entire thermal envelope. Just as proper lighting enhances the exterior, having adequate insulation is key to your home’s interior comfort and efficiency. You can learn more about if you can you double up insulation to see how different home systems work together.
By thoughtfully planning your design, selecting the right high-quality LED fixtures, and prioritizing a safe, weatherproof installation, you can finally illuminate your home’s best features. Gable peak lighting is more than just a functional upgrade; it’s an aesthetic statement that adds elegance, dimension, and unparalleled curb appeal to your home long after the sun goes down.