Front Steps Leaking into Basement? Your Ultimate Guide to a Dry Home
There are few homeowner problems more disheartening than discovering a puddle of water in your basement. That damp, musty smell and the sight of moisture creeping across the floor can instantly trigger worries about mold, property damage, and expensive repairs. While you might first suspect a cracked foundation wall or a plumbing issue, the real culprit is often hiding in plain sight: your front steps.
It’s a surprisingly common issue. Those solid-looking concrete or masonry steps can act as a direct funnel for rainwater, channeling it straight against and through your foundation wall. This guide will walk you through exactly why this happens, how to diagnose the problem like a pro, and the detailed steps you can take to fix it for good.
You'll Learn About
Why Your Front Steps Are a Gateway for Water Intrusion
To understand why your front steps are leaking into the basement, you need to think of them not as a solid, immovable object, but as a separate structure sitting right next to your house. Over time, a combination of factors works to create pathways for water to exploit. The forces of nature are constantly trying to drive a wedge between your steps and your home.
The primary issue is the joint or seam where the top or side of the steps meets the foundation wall. This joint is the most vulnerable point. Unless it was perfectly sealed during construction and meticulously maintained, it’s an open invitation for water to pour in during a rainstorm.
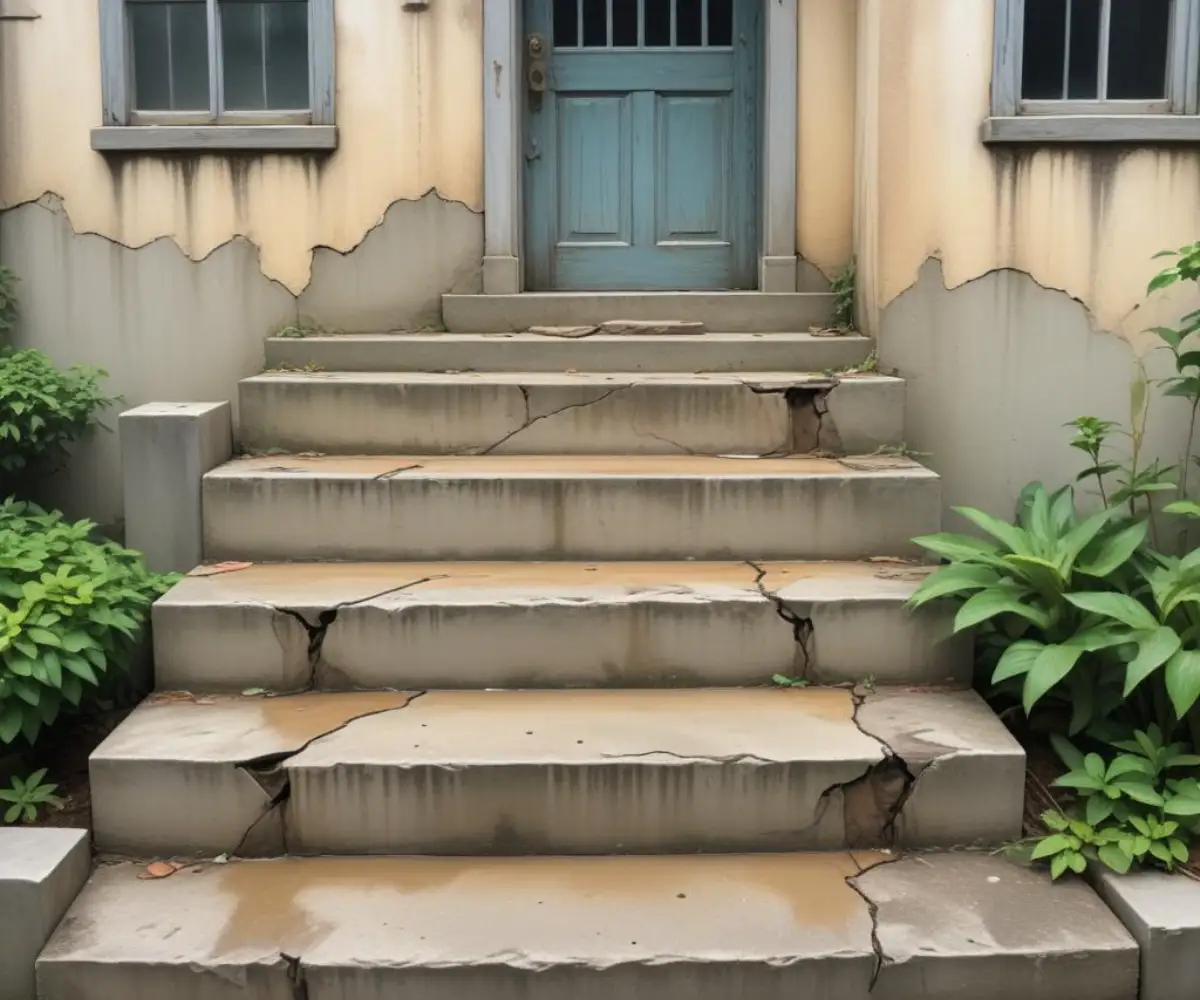
The Telltale Signs of a Front Step Leak
Before you can fix the problem, you need to be certain about its source. A leak originating from the front steps will leave behind a distinct set of clues in your basement. Look for these undeniable signs directly on the interior wall that sits behind your exterior steps.
- Dampness or Puddles: The most obvious sign is water pooling on the floor right at the base of the front foundation wall. It might only appear during or after heavy rain.
- Dark Stains on the Wall: Water seeping through concrete or cinder blocks will leave behind dark, damp stains. These stains can tell you the path the water is taking.
- Efflorescence: This is a white, chalky, or crystalline deposit left on the surface of concrete or masonry. It happens when water seeps through the material, dissolves salts inside it, and then evaporates, leaving the salt deposits behind.
- Musty Odors and Mold: A persistent damp spot will inevitably lead to the growth of mold and mildew, producing a characteristic musty smell. You might even see visible mold growth, which can appear as black, green, or white patches.
- Peeling Paint or Bubbling Drywall: If your basement is finished, moisture will cause the paint on the interior wall to bubble, flake, or peel. Drywall will become soft and eventually crumble.
Pinpointing the Exact Cause of the Leak
Water is relentless and will find the path of least resistance. Several specific failures related to your front steps can create this path. Identifying the precise cause is crucial for choosing the right repair strategy.
The Dreaded Stair-Foundation Gap
This is the most common culprit. Over time, the heavy concrete steps can settle into the soil or pull away from the foundation due to freeze-thaw cycles. This opens up a vertical or horizontal gap between the steps and the house. During rainfall, this gap acts like a trench, collecting a massive amount of water and directing it right against the foundation, where it eventually finds its way through small cracks or porous concrete.
Cracks in the Concrete Steps and Landing
Your steps themselves are a roof-like surface. If this surface is compromised with cracks, water won’t run off as intended. Instead, it will seep down into the cracks, saturating the concrete and the soil beneath, increasing the hydrostatic pressure against your foundation wall.
Poor Grading and Drainage
The ground around your home should always slope away from the foundation. If the soil around your front steps is flat or, worse, slopes toward the house, water will naturally pool in that area. This standing water creates constant pressure, eventually forcing its way into the basement.
Poor drainage is often compounded by issues with your roof’s water management system. Clogged gutters or downspouts that discharge water right next to the front steps are a recipe for disaster. Ensuring your roof runoff is properly managed is a critical first step; a poorly installed gutter corner, for instance, can undermine all other waterproofing efforts. If you’re looking into repairs, understanding the benefits of professional gutter installation can be a game-changer for keeping your foundation dry.
Porous Materials and Deteriorated Mortar
Older steps, particularly those made of brick or stone, rely on mortar joints to keep water out. Over the years, this mortar can crack and crumble. The bricks and concrete themselves can also become porous, absorbing water like a sponge and holding it against your foundation wall long after the rain has stopped.
Your Step-by-Step Guide to Fixing the Leak (DIY Solutions)
For minor to moderate leaks caused by visible gaps and cracks, a dedicated homeowner can often perform a lasting repair. The key to a successful DIY fix is meticulous preparation and using the right materials for the job. Always prioritize safety by wearing gloves and eye protection.
Essential Tools and Materials
- Wire brush (handheld and drill-mounted)
- Shop vacuum or blower
- Caulking gun
- Putty knife or small trowel
- Hammer and chisel
- Polyurethane-based concrete crack sealant or masonry caulk
- Foam backer rod (for larger gaps)
- Hydraulic cement (for active leaks)
- Concrete patching compound
- Elastomeric or cementitious waterproofing membrane
Solution 1: Sealing the Gap Between Steps and Foundation
This repair targets the primary entry point for water and is the most critical DIY task you can perform. Do not use standard silicone caulk; it will fail quickly. You need a flexible, durable, polyurethane-based sealant designed for concrete.
- Clean Out the Joint: Use a hammer and chisel to remove any old, failing caulk or crumbling mortar. Use a wire brush and a shop vacuum to clean the gap meticulously. The joint must be completely free of dust, dirt, and loose debris for the new sealant to adhere properly.
- Insert Backer Rod: For gaps wider than 1/4 inch, a foam backer rod is essential. This flexible foam strip is pushed into the gap to provide a solid base for the sealant and prevent you from using an excessive amount of caulk. The rod should be slightly wider than the gap so it fits snugly.
- Apply the Sealant: Cut the nozzle of the polyurethane sealant tube to match the width of the gap. Apply a thick, continuous bead of sealant over the backer rod, forcing it deep into the joint. Make sure it makes solid contact with both the foundation wall and the steps.
- Tool the Joint: Smooth the sealant bead with a putty knife or a gloved finger dipped in soapy water. This ensures a clean look and forces the sealant into full contact with the surfaces, creating a watertight seal. Allow it to cure completely as per the manufacturer’s instructions.
Solution 2: Repairing Cracks in the Steps and Landing
Sealing the cracks on the horizontal surfaces of your steps prevents water from getting under them in the first place. The process is similar to sealing the main joint.
- Prepare the Crack: Widen hairline cracks slightly with a chisel to give the sealant a better surface to grip. Thoroughly clean the crack with a wire brush and vacuum.
- Fill the Crack: Apply a bead of polyurethane crack sealant directly into the crack. For wider cracks, you may need a concrete patching compound, which can be applied with a putty knife.
- Smooth the Repair: Smooth the surface of the patch so it’s level with the surrounding concrete. Some patch materials can be textured to match the existing finish.
Solution 3: Applying a Waterproof Coating
For an added layer of protection, especially if your steps are made of porous brick or older concrete, consider applying a waterproof membrane. This is a paint-on coating that creates a seamless, durable barrier against moisture.
Choose an elastomeric or cementitious waterproofing product designed for exterior masonry. After thoroughly cleaning the steps, apply the coating with a heavy-duty roller or brush, paying special attention to the repaired cracks and joints. Two coats are typically recommended for the best protection.
| Repair Task | DIY Approach (Minor Issues) | Professional Solution (Major Issues) | Estimated Cost Range |
|---|---|---|---|
| Gap & Crack Sealing | Clean joint, insert backer rod, apply polyurethane sealant. | Grind out joint, use professional-grade epoxies or polyurethane injection. | DIY: $30 – $100 Pro: $250 – $800 |
| Waterproofing Surface | Apply roll-on elastomeric or cementitious membrane. | Apply commercial-grade liquid or sheet membranes, possibly asphalt-based. | DIY: $100 – $300 Pro: $500 – $1,500 |
| Grading Correction | Add topsoil to create a slope away from the foundation. Extend downspouts. | Excavate and regrade the area with heavy equipment. Install French drains. | DIY: $50 – $200 Pro: $1,000 – $5,000+ |
| Structural Repair | Not recommended for DIY. | Underpinning, mudjacking, or complete removal and replacement of steps. | Pro Only: $2,000 – $15,000+ |
When to Call a Professional Foundation Repair Expert
While DIY solutions are effective for surface-level problems, some issues are too complex and require professional intervention. Ignoring these signs can lead to severe structural damage to your home’s foundation. It is crucial to know your limits and call for expert help when needed.
Tackling a major repair like a foundation leak often makes homeowners re-evaluate their entire home improvement budget. Understanding the price of other common jobs, like the typical Lowe’s vanity installation cost, can help you create a more comprehensive financial plan for your property.
Signs You Need to Hire a Pro Immediately
- Large or Horizontal Foundation Cracks: If you see cracks on the basement wall behind the steps that are wider than 1/4 inch, or any horizontal cracks, this indicates significant hydrostatic pressure or foundation movement. This is not a DIY fix.
- Visibly Sinking or Tilting Steps: If your steps are dramatically pulling away from the house or sinking into the ground, it points to a serious problem with the soil or footings beneath them.
- Persistent, Heavy Leaking: If water continues to pour into your basement despite your best sealing efforts, the problem is likely below grade and requires excavation.
- Bowing or Leaning Basement Walls: If the foundation wall itself appears to be bowing inward, you have a critical structural issue that needs immediate attention from a structural engineer or foundation specialist.
Advanced Professional Solutions
Foundation repair contractors have specialized tools and techniques to provide a permanent solution to severe leaks.
- Polyurethane Injection: For actively leaking cracks, professionals can inject a polyurethane foam that expands to fill the entire crack from the inside, creating a flexible, waterproof seal.
- Exterior Excavation and Waterproofing: The most comprehensive solution involves excavating the soil around the front steps and down to the foundation footing. The wall is then cleaned, and a heavy-duty waterproof membrane is applied, often along with a drainage board, to completely seal the foundation from the outside.
- Stair Removal and Replacement: In some cases, the steps themselves are so damaged or poorly constructed that the best option is to demolish them, properly waterproof the foundation wall behind them, and pour new steps with correct footings and drainage.
Preventing Future Leaks: Proactive Maintenance Is Key
Once you’ve stopped the leak, the goal is to never let it happen again. A little bit of proactive maintenance can save you thousands of dollars and countless headaches down the road. Make these simple checks a part of your annual home maintenance routine.
Annual Inspection Checklist
- Inspect All Sealants: At least once a year, carefully check the sealant joint between your steps and foundation. Look for any signs of cracking, peeling, or pulling away and re-caulk any questionable spots immediately.
- Maintain Positive Grading: Check the soil and mulch around your foundation. If you see any signs of settlement, add more compacted soil to ensure water continues to flow away from your house.
- Clean Your Gutters: Regularly clean your gutters and ensure downspouts are clear of debris. Confirm that the downspout extenders are directing all roof water at least 6-10 feet away from the foundation.
- Look for New Cracks: Periodically examine your concrete steps for any new cracks and seal them as soon as they appear, before they have a chance to grow and let water in.
Discovering your front steps are leaking into your basement is stressful, but it’s a problem with a clear solution. By methodically identifying the source, performing thorough repairs, and committing to regular maintenance, you can protect your foundation and ensure your basement remains a dry, healthy, and usable part of your home.