French Drain Uphill? Stop Uphill Water From Flooding Your Yard
That beautiful hill in your backyard provides a stunning view, but it can also become a relentless source of water-related misery. When rain falls, all that water flows downhill, turning your yard into a swamp, threatening your home’s foundation, and creating a muddy mess. You’ve heard of French drains, but the problem is uphill, leaving you wondering how a drain can possibly solve an issue coming from above.
Many homeowners feel trapped by the topography of their land, assuming that because water flows down, any solution must be at the bottom of the problem. This leads to ineffective measures like building small barriers or simply living with a perpetually soggy lawn. The constant moisture can lead to soil erosion, damaged landscaping, and even costly structural damage to your home’s foundation from hydrostatic pressure.
The good news is that a specialized type of French drain, known as an interceptor drain, is the perfect solution. Instead of trying to manage water after it has already saturated your yard, an interceptor drain cuts it off at the source. This guide will demystify the process and show you exactly how to strategically place a French drain to reclaim your yard from uphill water.
You'll Learn About
Why Uphill Water is a Nightmare for Your Property
Water from a higher elevation doesn’t just create puddles; it wages a silent war on your property. As gravity pulls water down a slope, it saturates the soil, creating immense hydrostatic pressure. This pressure is powerful enough to push water through microscopic cracks in your foundation, leading to damp basements, mold growth, and in severe cases, significant structural damage.
Beyond the foundation, this constant flow of subsurface water erodes the topsoil, washing away valuable nutrients and destabilizing your landscape. The result is often a patchy, unhealthy lawn and gardens that struggle to thrive. A yard that is always wet is also a breeding ground for mosquitos and other pests, making it an unpleasant space for you and your family to enjoy.
The Myth of a “French Drain That Runs Uphill”
Let’s clear up a common and critical misunderstanding right away: water does not flow uphill on its own. The term “uphill French drain” is a bit of a misnomer that causes confusion. You cannot install a gravity-fed drain that carries water up a slope. The secret lies not in defying physics, but in clever placement.
The solution isn’t to make water run uphill, but to intercept it before it becomes a problem. An interceptor drain is installed across the slope, acting like a barrier that captures runoff and groundwater moving downhill. While the drain itself intercepts water coming from an uphill source, the pipe within the trench must still be sloped slightly downhill (a minimum of 1%) to carry the captured water away to a safe discharge point.
How an Interceptor French Drain Solves the Uphill Problem
Think of an interceptor drain as a protective moat for the lower part of your yard. By digging a trench along the uphill side of the area you want to protect, you create a path of least resistance for the water. The trench is filled with gravel and a perforated pipe, which quickly collects surface and groundwater as it moves down the slope.
Once inside the perforated pipe, the water is channeled along the gentle, gravity-fed slope of the drain to a designated exit point. This could be a storm drain, a dry well, or it could simply daylight at a much lower point on your property where it won’t cause any issues. This system effectively stops the water in its tracks, keeping your yard dry and your foundation safe.
Planning Your Uphill French Drain Installation: A Step-by-Step Guide
Proper planning is the most critical phase of this project. A well-designed interceptor drain will provide decades of protection, while a poorly planned one can fail quickly. Follow these steps carefully to ensure your success.
Step 1: Locating the Source and Mapping the Path
Your first task is to become a water detective. After a heavy rain, observe your property to pinpoint exactly where the water is coming from and the path it takes down the slope. The goal is to place your trench perpendicular to this flow to capture as much water as possible.
Use landscape flags or spray paint to mark the ideal path for your trench. Remember to also plan the route for the discharge pipe, which must run continuously downhill to a suitable exit point. Crucially, before you dig, you must call 811 to have all underground utility lines marked on your property. Accidentally hitting a gas or electrical line is extremely dangerous and can be a costly mistake.
Step 2: Choosing the Right Materials
The longevity and effectiveness of your French drain depend entirely on the quality of the materials you use. Skimping here will only lead to future headaches and potential system failure. You will need a perforated pipe, gravel, and non-woven geotextile fabric.
The debate between different pipe types and gravel is common, but some choices are better than others for this application. A solid understanding of your options ensures you build a drain that lasts. For a deeper dive into the specific role of aggregate, understanding if you need gravel for solid drain pipe can provide helpful context, even though you’ll be using a perforated pipe here.
Here’s a breakdown of the essential components to help you make an informed decision:
| Component | Option 1: Recommended | Option 2: Acceptable | Key Considerations |
|---|---|---|---|
| Perforated Pipe | 4-inch Rigid PVC Pipe | 4-inch Corrugated Pipe | Rigid PVC is more durable, less prone to crushing, and easier to slope consistently. Corrugated is cheaper and more flexible but can develop low spots where sediment collects. |
| Drainage Gravel | ¾” to 1 ½” Washed, Round Gravel | Crushed Angular Stone | Round gravel allows for better water flow and has more void space. Crushed stone can work but may compact over time, slightly reducing permeability. |
| Filter Fabric | 4 to 6 oz. Non-Woven Geotextile | Heavy-Duty Landscape Fabric | Non-woven geotextile fabric provides superior water permeability while effectively blocking silt and clay particles that can clog your drain. Standard landscape fabric is not designed for this purpose and can fail. |
Step 3: The Critical Task of Trenching on a Slope
This is the most labor-intensive part of the project. The trench for an interceptor drain should typically be about 18 to 24 inches deep and 10 to 12 inches wide. The depth is important for capturing subsurface water. You can find more detailed guidance on burial depth by reading about how deep to bury corrugated drain pipe, as the principles are similar.
The most important part of trenching is ensuring a consistent downward slope of at least 1% (a 1-inch drop for every 8-10 feet of length). Use a builder’s level or a laser level to check the grade frequently as you dig. An inconsistent slope can create bellies in the pipe where water will stand and sediment will collect, eventually leading to a clog.
Step 4: Installing the Geotextile Fabric
Once your trench is dug and properly sloped, you must line it completely with the non-woven geotextile fabric. This is a step you absolutely cannot skip. The fabric acts as a filter, allowing water to pass through into the gravel and pipe but preventing soil, silt, and clay from entering and clogging the system.
Drape the fabric into the trench so that it covers the bottom and extends up both sides, with plenty of excess fabric left over on both edges. This excess will be used to wrap over the top of the gravel later, completely encapsulating your drainage system in a protective layer.
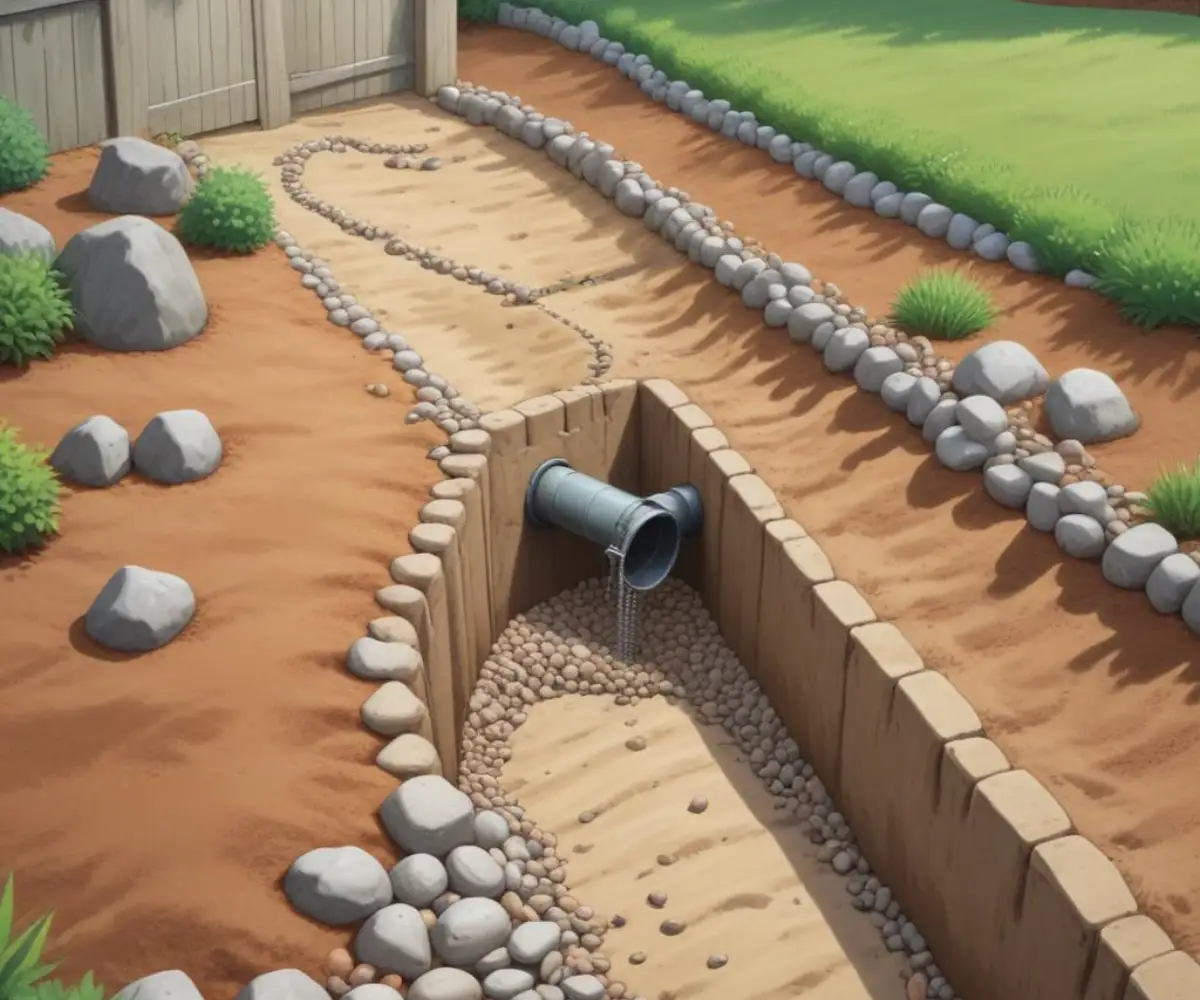
Step 5: Laying the Gravel and Perforated Pipe
With the fabric in place, add a 2 to 3-inch layer of washed gravel to the bottom of the trench. This creates a stable base for your pipe. Next, lay your perforated pipe on top of this gravel bed.
A critical detail: place the perforated pipe with the holes facing down. This might seem counterintuitive, but it is the correct way. As water fills the trench from the bottom up, it enters the pipe through the holes and is carried away. If the holes face up, the water level would have to rise above the pipe to drain, making the system less efficient.
After the pipe is positioned, carefully backfill the trench with more washed gravel, covering the pipe on all sides and filling the trench to within 3 to 4 inches of the surface. Be careful not to displace the pipe as you add the gravel.
Step 6: Finishing the Installation
Once the trench is filled with gravel, fold the excess geotextile fabric over the top of the gravel layer, overlapping the edges if possible. This completes the “burrito wrap,” sealing the entire system from soil intrusion. This final layer of protection is essential for the long-term, maintenance-free operation of your drain.
For the final step, you can cover the fabric-wrapped gravel with a layer of topsoil and then add sod or grass seed to blend the drain seamlessly into your landscape. In some cases, homeowners opt to fill the final few inches with decorative stone for a different aesthetic.
Common Mistakes to Avoid When Installing a French Drain on a Hill
Even with a solid plan, small mistakes can compromise your entire system. Being aware of these common pitfalls can save you from having to redo your hard work.
- Incorrect Slope: The number one cause of French drain failure is an improper or inconsistent slope. A negative slope or flat sections will cause the system to fail.
- Skipping the Fabric: Failing to use non-woven geotextile fabric is a fatal error. Your drain will become clogged with silt and soil within a few years.
- Using the Wrong Gravel: Using pea gravel or rocks that are too small will not provide enough void space for water to flow freely. Using dirty, unwashed gravel introduces silt directly into your system.
- Pipe Holes Facing Up: A common mistake that severely reduces the efficiency of the drain. Always place the holes facing down.
- Connecting Downspouts: Do not directly route your roof’s downspouts into your French drain. The sheer volume of water during a storm can overwhelm the system and introduce debris like leaves and shingle grit.
Maintaining Your Uphill French Drain for Long-Term Success
One of the best features of a properly installed French drain is that it requires very little maintenance. Because it is a subsurface system protected by fabric and gravel, it is designed to function for many years without intervention.
The most important maintenance task is to ensure the discharge point remains clear and unobstructed. Periodically check the outlet to make sure it is not covered by leaves, grass clippings, or other debris. If your system drains into a catch basin or dry well, inspect it annually and clean out any accumulated sediment.
Conclusion: Reclaim Your Yard from Uphill Water Woes
Dealing with water from an uphill source can feel like an unwinnable battle, but it doesn’t have to be. An interceptor French drain is a powerful, permanent solution that stops water before it ever has a chance to saturate your yard and threaten your home. It’s a project that relies on a sound understanding of gravity and strategic placement rather than complex machinery.
By carefully planning your installation, using high-quality materials, and avoiding common mistakes, you can build a drainage system that protects your property for decades. You can finally stop worrying every time it rains and start enjoying your beautiful, dry, and stable landscape.