French Drain Clay Soil Nightmare? Your Ultimate Fix Is Here
A waterlogged yard is more than just an inconvenience; it’s a swampy mess that can ruin your lawn, create a breeding ground for pests, and even threaten your home’s foundation. When your property is built on heavy clay soil, this problem multiplies tenfold.
Clay soil, with its tiny, densely packed particles, acts like a bathtub, holding onto water and refusing to let it go. This leads to standing water, suffocated plant roots, and endless frustration. For many, a French drain seems like the logical solution, but installing one in clay soil presents a unique set of challenges that can lead to complete failure if not done correctly.
You'll Learn About
Why Does Clay Soil Wreak Havoc on Drainage?
Understanding why clay is so problematic is the first step to conquering it. Unlike sandy soil, which has large particles and ample space for water to pass through, clay soil has microscopic particles. When wet, these particles stick together, creating a nearly impenetrable barrier.
This poor permeability means that even after a light rain, water can pool on the surface for hours or days. This constant saturation can cause foundation damage, basement flooding, and kill expensive landscaping. The unique properties of clay soil mean a standard drainage solution won’t just be ineffective; it could make the problem worse.
The #1 Reason French Drains Fail in Clay Soil
The primary enemy of a French drain in clay soil is clogging. The very soil you’re trying to drain is the biggest threat to your system. Fine silt and clay particles are easily carried by water.
Without the proper protection, these particles will infiltrate the gravel and perforated pipe of your French drain. Over time, this sediment buildup turns your carefully constructed drain into a useless, clogged underground mud trench. This is why many DIY attempts fail within a couple of years, leaving homeowners back where they started, only with a lot less money and a lot more frustration.
The Indisputable Solution: The Geotextile “Burrito Wrap”
To build a long-lasting, effective French drain in clay soil, you must prevent silt infiltration at all costs. The solution is to completely encapsulate the entire drain system—gravel and pipe—in a special material called non-woven geotextile fabric. Think of it as making a “burrito” where the fabric is the tortilla, and the gravel and pipe are the filling.
This is not the same as standard landscape weed barrier, which can clog quickly. True non-woven geotextile fabric is designed to allow water to pass through freely while blocking fine soil particles. This protective layer is the single most critical element for the success and longevity of a French drain in dense clay.
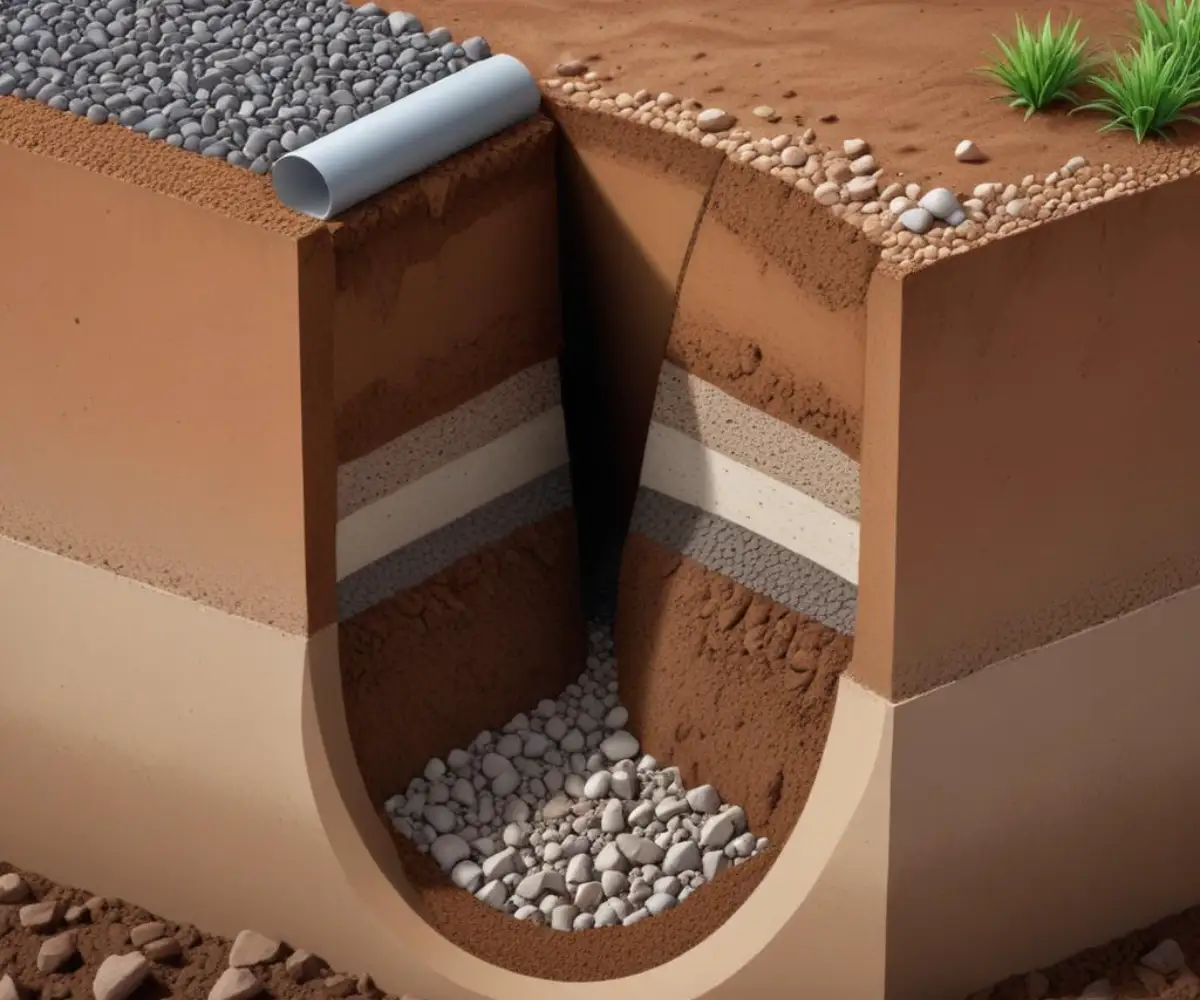
By lining the trench and wrapping it over the top, you create a self-contained drainage channel that is permanently protected from the surrounding clay soil. This method ensures water can enter the system, but the mud stays out.
Step-by-Step Guide to Installing a Bulletproof French Drain in Clay
Installing a French drain in clay is labor-intensive but entirely manageable with the right approach. Following these steps meticulously will ensure your system functions flawlessly for years.
Step 1: Strategic Planning and Trench Design
Proper planning is crucial. First, identify the soggiest parts of your yard and determine the best route for your drain. The drain must have a continuous downhill slope to a suitable exit point, known as a “daylight” location. This could be a street, a ditch, or a wooded area at a lower elevation.
A minimum slope of 1% is required, which means the trench should drop at least one inch for every 10 feet of length. For residential yards, a trench depth of 18 to 24 inches is typically sufficient to handle surface and subsurface water. The width should be around 12 inches to accommodate the pipe and a generous amount of gravel.
Step 2: Excavation
Digging in heavy clay is tough work. Before you start, call 811 to have underground utilities marked. This is a critical safety step you cannot skip. Use marking paint or flags to outline your trench path.
A trenching machine can be rented for longer runs, but for smaller projects, a sharp spade and a pickaxe will be necessary. As you dig, place the excavated clay soil on a tarp to make cleanup easier. You will not be using this soil to backfill the trench.
Step 3: Line the Trench with Geotextile Fabric
Once the trench is excavated to the correct depth and slope, it’s time to install the non-woven geotextile fabric. Roll the fabric out and press it firmly into the trench, ensuring it conforms to the bottom and sides. Leave at least 12-18 inches of excess fabric on both sides of the trench; you will use this to wrap over the top later.
Step 4: Add the Gravel Base and Pipe
Pour a 2-3 inch layer of clean, washed drainage gravel into the bottom of the fabric-lined trench. The gravel should be in the 1/2-inch to 1-inch size range. Hard rocks like granite or river rock are ideal.
Next, place your 4-inch perforated drain pipe on top of the gravel bed. It’s vital to position the pipe with the perforation holes facing down. This allows rising water in the trench to enter the pipe efficiently and be carried away.
Step 5: Backfill with Gravel and Complete the “Burrito”
Carefully backfill the trench with more of the same washed gravel, covering the pipe completely. Fill the trench until the gravel is about 4-6 inches from the ground surface.
Now, take the excess geotextile fabric you left on the sides and fold it over the top of the gravel. Overlap the edges to ensure no soil can get in from above. You have now completed the “burrito wrap,” fully protecting your drainage system.
Step 6: Finish with a Permeable Top Layer
The final step is to cover the wrapped drain. Do not put the excavated clay soil back on top. Instead, use a permeable material like topsoil and sod, or cover it with decorative river rock or mulch for a maintenance-free finish.
Choosing the Right Materials for Clay Soil
The performance of your French drain is directly tied to the quality of the materials you use. In the challenging environment of clay soil, cutting corners is not an option. Here’s a breakdown of the best choices for each component.
| Component | Recommended Material | Why It’s Best for Clay Soil | Avoid |
|---|---|---|---|
| Filter Fabric | Non-Woven Geotextile Fabric (4-8 oz) | Allows high water flow while preventing fine clay particles from passing through and clogging the system. It’s the most critical component for longevity. | Standard landscape fabric (weed barrier) or pipe socks, as they clog quickly with clay silt. |
| Drainage Pipe | 4-inch Perforated PVC or Heavy-Duty Corrugated Pipe | Rigid PVC is durable and maintains a consistent slope. Corrugated pipe is flexible and resistant to crushing from expanding/shrinking clay. | Cheap, flimsy “Big O” style pipe that can be easily crushed. |
| Gravel/Aggregate | Clean, Washed River Rock or Granite (1/2″ to 1.5″ diameter) | Creates large voids for water to flow freely. Washed stone is free of dirt and fines that could contribute to clogging. The angular shape locks together for stability. | Pea gravel (too small, can clog) or unwashed gravel containing dirt and sand. |
| Top Layer/Backfill | Topsoil and Sod, or Decorative Stone | Allows water to easily percolate down into the drain. Using the excavated clay would create an impermeable cap, defeating the purpose of the drain. | The excavated clay soil you removed from the trench. |
Common Mistakes to Avoid at All Costs
Even with a good plan, small mistakes can lead to big problems down the road. Be aware of these common pitfalls:
- Skipping the Geotextile Fabric: This is the most catastrophic error. Without fabric, your drain is guaranteed to fail from silt clogging.
- Using the Wrong Fabric: A cheap weed barrier is not the same as a non-woven geotextile. It will clog and suffocate your system.
- Installing the Pipe with Holes Up: This is a frequent DIY mistake. The holes must face down to collect water that fills the trench from the bottom up.
- Forgetting the Slope: Water doesn’t flow uphill. A flat or improperly sloped drain will hold stagnant water, rendering it useless.
- Using Excavated Clay as Backfill: Putting the impermeable clay back on top of your drain blocks surface water from ever reaching it.
Integrating Your French Drain with Other Drainage Solutions
A French drain is a powerful tool, but it works best as part of a comprehensive water management plan. For properties with complex issues, such as a sunken patio or runoff from elevated areas, additional measures may be needed. You might even encounter situations requiring a specialized uphill drainage system to intercept water before it becomes a problem.
Modern alternatives can also complement or sometimes replace traditional systems. For example, some homeowners explore newer technologies after asking, “does HydroBlox really work?” By integrating downspout extensions and catch basins into your French drain, you can effectively manage both groundwater and roof runoff in a single, unified system.
Long-Term Maintenance for Your French Drain
A properly installed French drain in clay soil requires very little maintenance, but it’s not zero-maintenance. At least once a year, inspect the outlet point to ensure it’s clear of leaves, debris, or animal nests that could block the flow of water.
If you notice slow drainage after several years, it may be necessary to flush the pipe using a garden hose or a pressure washer inserted into a cleanout port. By taking these simple steps, you can ensure your investment continues to protect your property for decades to come.