Your Free Standing Pergola On Pavers Is A Ticking Time Bomb Without This Guide
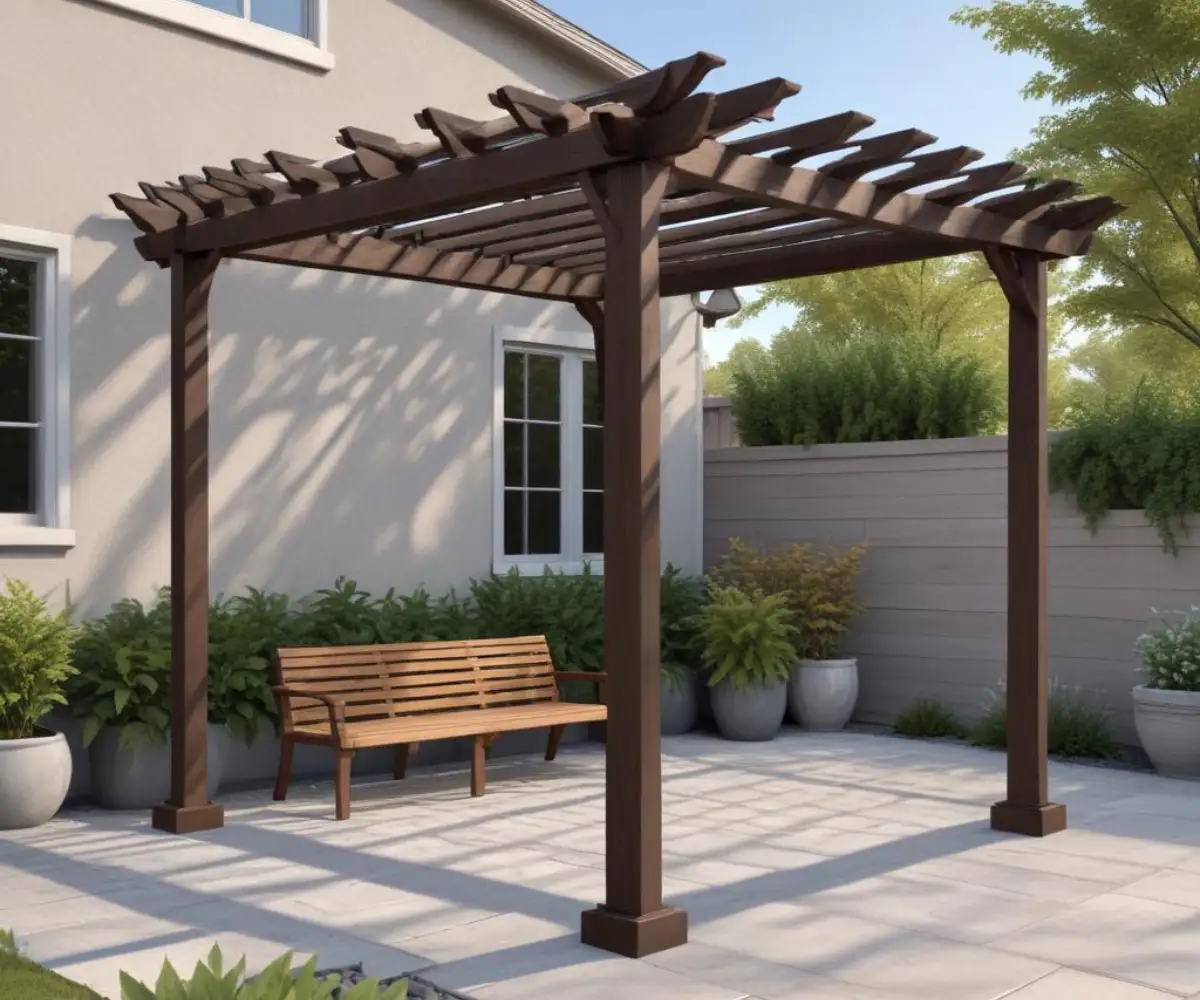
You have the perfect paver patio, a beautiful space for relaxing and entertaining. The dream is to complete it with a stylish free-standing pergola, creating a defined, shaded oasis. But a nagging fear holds you back: how do you secure it without drilling into and potentially shattering your expensive pavers, or creating a structure that could topple in the first strong wind?
This isn’t an unfounded fear. Installing a free standing pergola on pavers is a unique challenge that, if done incorrectly, can lead to costly damage and serious safety hazards. This comprehensive guide will walk you through the professional methods to ensure your pergola is both beautiful and rock-solid, preserving the integrity of your patio for years to come.
You'll Learn About
Why Your Paver Patio Presents a Unique Challenge for Pergolas
A paver patio is not a single, solid slab like concrete. It’s a “floating” system of interlocking pieces resting on a bed of sand and gravel. While strong under compression (the downward force of foot traffic and furniture), it’s vulnerable to uplift forces from wind and the concentrated pressure from pergola posts.
Simply placing a heavy pergola on top is a recipe for disaster. Wind catching the roof of a pergola can exert immense lifting force, and without proper anchoring, the entire structure can shift, wobble, or even be lifted. This is a critical safety issue that must be addressed correctly from the very beginning.
The Hidden Danger: Uneven Settling Over Time
A frequently overlooked problem is the long-term effect of concentrated weight. Each post of your pergola focuses hundreds of pounds onto just a few pavers. Over months and years, this pressure can cause the sand and gravel base beneath those specific pavers to compact and settle more than the surrounding patio.
This differential settling leads to a pergola that is no longer level. Joints can become stressed, the structure can start to lean, and what was once a beautiful addition now looks askew and becomes structurally compromised. Proper foundational support is not just about wind; it’s about ensuring long-term stability and levelness.
Before You Build: The Crucial Planning Phase
Proper planning is the most important step to a successful and safe installation. Before you purchase materials or assemble any parts, you must consider local regulations, the pergola’s material, and its precise placement on your patio.
Always check with your local building department and Homeowner’s Association (HOA) for any regulations regarding structures like pergolas. There may be setback requirements, height restrictions, or even specific anchoring methods mandated for safety. Understanding these rules beforehand can save you from costly fines and the need to dismantle your project, much like the regulations explored in our guide to fence height loopholes.
Choosing the Right Materials and Mapping Your Footprint
The material of your pergola—be it wood, vinyl, or aluminum—will significantly impact the anchoring requirements. Heavy wooden pergolas require more robust footing than lightweight aluminum structures. Consider the long-term maintenance as well; vinyl and aluminum are often lower-maintenance choices than wood, which may require regular staining or sealing.
Carefully measure and mark the exact location for your pergola posts on the paver patio. Use chalk or temporary markers. Consider the sun’s path throughout the day to optimize shade and think about foot traffic patterns. Ensure the location is clear of any underground utility lines before planning any digging.
The Great Debate: To Drill or Not to Drill into Your Pavers
The central question for every homeowner is how to anchor the pergola. There are two primary schools of thought: non-invasive methods that avoid drilling into your pavers, and more permanent solutions that involve drilling for maximum stability. Your choice will depend on your pergola’s weight, your local climate (especially wind), and your comfort level with altering your patio.
Each approach has distinct advantages and disadvantages. Non-drilling methods are excellent for preserving your pavers but may offer less stability, while drilling provides a secure foundation but requires permanent alteration of your patio surface.
Option 1: No-Drill Anchoring Methods for Paver Patios
For those who want to avoid permanently altering their pavers, several effective no-drill options are available. These methods are particularly suitable for lighter pergolas or in areas with low wind exposure. They prioritize the preservation of your patio surface above all else.
These techniques rely on weight and clever engineering to hold the structure in place, offering a reversible solution that is ideal for renters or those who may wish to relocate the pergola in the future.
The Power of Weight: Using Planter Boxes or Weighted Bases
One of the simplest no-drill methods is to use large, heavy planters at the base of each post. The posts are secured inside the planters, which are then filled with concrete, sand, or gravel to provide a substantial anchor. This method integrates beautifully into a garden aesthetic.
The key is ensuring the planters are heavy enough to counteract wind uplift. For a standard 10×10 pergola, you should aim for at least 300-400 pounds of weight per post. This solution is visually appealing and adds space for decorative plantings, but it does create a larger footprint for the pergola’s base.
Surface-Mounted Base Plates and Innovative Footings
Another option involves using heavy-duty, surface-mounted steel base plates. These plates are bolted to the bottom of the posts and spread the weight over a larger surface area, increasing stability. While some versions may require small pilot screws into the pavers, many can be secured with heavy-duty construction adhesive.
This approach is less obtrusive than large planters. It’s also worth noting the innovation in concrete-free anchoring systems. For instance, while designed for decks, a deep dive into a Titan Deck Foot Anchor review reveals how modern engineering is creating powerful anchoring solutions without the need for traditional concrete pouring, a concept that is inspiring new approaches for patio structures as well.
Option 2: Drilling Methods for Rock-Solid Stability
For the highest level of safety and permanence, especially for heavy pergolas or in areas with high winds, drilling is the recommended method. While more invasive, these techniques ensure your pergola is fundamentally connected to a stable substrate, providing peace of mind that it will not move.
There are two primary ways to approach this: drilling directly through the pavers or temporarily removing them to install concrete footings. Both methods provide exceptional stability but require careful execution.
The Professional Method: Removing Pavers for a Concrete Footing
This is the most secure and professionally recommended method. The process involves marking the post locations, carefully removing a few pavers in each spot, and digging a hole below the frost line for your area. A cardboard form tube (Sonotube) is placed in the hole and filled with concrete.
A galvanized post anchor is set into the wet concrete. Once the concrete cures, the pergola post is attached to this anchor, and the pavers are cut and replaced around the post for a clean, seamless finish. This method anchors the pergola to the stable ground beneath the patio, completely bypassing the floating paver system for unparalleled stability.
Direct Anchoring: When and How to Drill Through Pavers
It is possible to drill directly through your pavers and into the base below, but this method comes with caveats. It is only recommended if you have a substantial, compacted base or a concrete slab underneath your pavers. Drilling into a simple sand base will not provide sufficient holding power.
You must use a heavy-duty hammer drill with a masonry bit designed for pavers and concrete. Special expanding masonry anchors or long sleeve anchors are then used to secure the post brackets. There is a significant risk of cracking or damaging the pavers during this process, so it should be approached with extreme caution and precision.
Comparing Your Anchoring Options: A Head-to-Head Look
Choosing the right method depends on your specific needs. This table breaks down the key considerations for each primary anchoring technique to help you make an informed decision.
| Anchoring Method | Best For | Stability Level | Installation Difficulty | Paver Impact |
|---|---|---|---|---|
| Weighted Planters/Bases | Lightweight pergolas, low-wind areas, renters | Low to Moderate | Easy | None |
| Adhesive Surface Mounts | Lighter pergolas in moderate climates | Moderate | Moderate | Minimal / Reversible |
| Drilling Through Pavers | Solidly installed pavers over a concrete sub-base | High | Difficult | High (Permanent holes, risk of cracking) |
| Removing Pavers for Concrete Footings | All pergola types, high-wind areas, maximum safety | Very High | Very Difficult / Professional | Reversible (if pavers are cut carefully) |
Assembling Your Pergola: Tips for a Smooth Build
Once your anchoring system is in place, the assembly process can begin. Always read the manufacturer’s instructions thoroughly before you start. It is highly recommended to have at least one other person to help, as the beams and rafters can be heavy and unwieldy.
Lay out all the parts and hardware to ensure everything is accounted for. When erecting the frame, use a level on the posts and beams at every step. Do not fully tighten all bolts until the main structure is squared up to allow for minor adjustments.
Long-Term Care: Keeping Your Pergola Safe and Beautiful
Your new pergola requires regular maintenance to remain safe and attractive. Periodically inspect all hardware and connections, tightening any bolts that may have loosened over time. Clean the structure based on its material—wood may need re-staining every few years, while vinyl and aluminum typically only need washing.
To enhance the comfort and usability of your pergola, consider adding a retractable shade cover. A high-quality system like the one detailed in this look at the Shaderunner USA secret can provide adjustable sun protection, making your patio usable all day long.
The Overlooked Maintenance Step: Checking for Paver Settling
Revisit the integrity of your foundation annually. Place a long level across the beams of your pergola to check for any signs of sinking or leaning. Pay close attention to the pavers directly around the post bases.
If you notice a post has settled, you may need to address the foundation. This could involve temporarily supporting the pergola, removing the affected pavers, and adding more paver base material to re-level the area before reinstalling the pavers. Proactive checks will prevent small issues from becoming major structural problems.
Conclusion: Your Perfect Patio Oasis Awaits
Installing a free standing pergola on pavers is an ambitious but highly rewarding project. By understanding the unique challenges of a paver base and choosing the correct anchoring method for your specific situation, you can avoid the common pitfalls of instability and paver damage.
Whether you choose a non-invasive weighted base or the rock-solid security of a concrete footing, careful planning and execution are paramount. With the right approach, you can confidently build a safe, stable, and stunning pergola that transforms your paver patio into the backyard oasis you’ve always envisioned.