Free Plumeria Cuttings: Unlock Your Secret to an Endless Tropical Garden
Why spend hundreds of dollars at a nursery when your dream garden is just one cutting away? Plumeria is one of the most rewarding plants to grow because of its unique ability to ‘clone’ itself from a simple branch. Whether you’ve received a cutting from a neighbor or found a fallen branch after a storm, you hold the key to a lush, fragrant sanctuary. In this guide, we’ll show you how to source, prep, and root free plumeria cuttings to build an endless tropical garden that grows more beautiful every year.
You'll Learn About
Why Pay for Plumerias When You Can Grow Them for Free?
The allure of the plumeria, with its intoxicating fragrance and vibrant, pinwheel blossoms, is undeniable. These tropical beauties can transform any garden into a paradise, but purchasing established plants can be a significant investment. Many aspiring gardeners are held back by the cost, believing a lush plumeria collection is out of reach.
The solution is surprisingly simple and deeply rewarding: growing plumerias from cuttings. This method of propagation is not only effective but also provides a fantastic opportunity to acquire new plants for free, allowing you to build the tropical oasis of your dreams without spending a dime.
This comprehensive guide will walk you through every step of the process. You will learn the best places to source free cuttings, how to identify the perfect, healthy stem, and the precise techniques for rooting and nurturing your new plant into a magnificent, blooming tree.
The Secret Art of Sourcing: Where to Find Free Plumeria Cuttings
Your journey begins with finding a viable cutting. Fortunately, opportunities are all around you if you know where to look. With a little resourcefulness and community spirit, you can easily find the materials to start your plumeria collection.
Your Neighborhood: The Untapped Goldmine
The most accessible source for free plumeria cuttings is often right on your own street. Take a walk and observe your local surroundings; you will likely spot beautiful, mature plumeria trees in your neighbors’ yards. Many gardeners are more than happy to share their passion and their plants.
When you find a healthy specimen, approach the owner with a polite request. Explain your admiration for their plant and your interest in growing one yourself. Offer to take the cutting cleanly and carefully, ensuring no harm comes to their prized tree. Most plant lovers are generous and will be flattered by your interest.
Sometimes, the perfect branch might be hanging over a shared property line. Understanding local etiquette, such as who is responsible for a fence on one side of a yard, can be helpful, but direct and friendly communication is always the best first step before trimming anything.
Digital Communities: Connecting with Fellow Gardeners
The internet has created a global village for plant enthusiasts. Websites like Facebook and Reddit host countless groups dedicated to gardening, plant swaps, and specific species like plumeria. Join groups such as “Plumeria Growers” or “Plant Swap USA” to connect with a vast network of hobbyists.
In these forums, members frequently offer cuttings for free or for the cost of shipping. You can also post a request specifying what you are looking for. This is an excellent way to acquire unique and rare cultivars that you might not find locally.
The “Found” Cutting: Opportunity in Unexpected Places
Keep an eye out for landscaping and pruning activities in your community. Homeowners or professional landscapers often trim plumerias and leave the cuttings by the curb. Similarly, a strong storm can sometimes break off perfectly viable branches.
When you acquire a “found” cutting, a thorough inspection is critical. Check carefully for any signs of pests like spider mites or scale before bringing it into your home or garden. A little diligence at this stage can prevent a potential infestation among your other plants.
The Anatomy of a Perfect Cutting: What to Look For
Not all cuttings are created equal. The health and maturity of the stem you choose will have the single biggest impact on your success rate. Learning to identify a prime cutting is a crucial skill.
Decoding the Parent Plant’s Health
Before you even think about where to cut, assess the overall health of the parent tree. Look for a plant with vigorous, lush growth, vibrant green leaves, and a strong central trunk. Avoid taking cuttings from plants that appear stressed, have yellowing leaves, or show signs of disease.
A cutting from a struggling plant carries that stress with it and will have a much lower chance of developing roots. Pay close attention to the base of the tree; any signs of softness or discoloration could indicate a serious issue. Understanding the warning signs of plumeria trunk damage will help you select from only the healthiest sources.
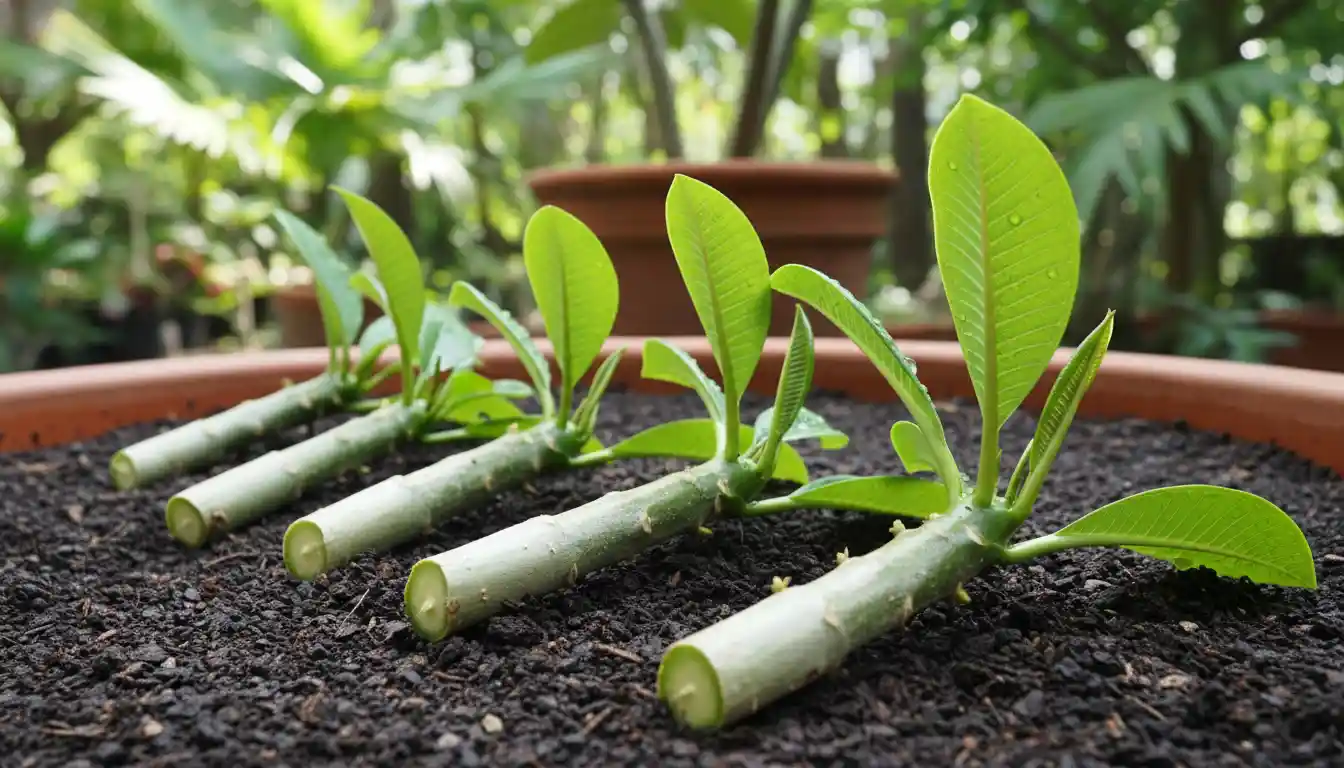
Choosing the Right Stem: Size, Age, and Type
Once you have identified a healthy parent plant, it is time to select the perfect branch. Look for a stem that is mature, firm, and greyish-brown, not new, green, and flimsy. A mature stem has the stored energy reserves needed to produce new roots and leaves.
The ideal cutting should be between 12 and 18 inches long and at least the thickness of your thumb. After taking the cutting, you will need to remove all but the very top cluster of small leaves. This directs the cutting’s energy toward root production instead of maintaining foliage.
The Clean Cut: How to Take and Prepare Your Plumeria Cutting
Proper preparation is a non-negotiable step for successful rooting. How you cut and cure the stem sets the stage for healthy root development and prevents the most common cause of failure: rot.
Tools and Sterilization: Your First Step to Success
Always use a sharp, sterilized cutting tool. A bypass pruner, a serrated knife, or a small handsaw will work well. A clean cut minimizes damage to both the parent plant and the cutting.
Sterilizing your tool is absolutely essential to prevent the introduction of bacteria and fungus. Simply wipe the blade with rubbing alcohol or a diluted bleach solution (one part bleach to ten parts water) before and after each cut. This simple act dramatically increases your chances of success.
The Curing Process: Patience is a Virtue
This is the most critical stage where many beginners go wrong. You cannot plant a fresh plumeria cutting directly into soil. The cut end needs to dry and form a hardened seal, a process known as “callusing.”
Place your prepared cutting in a dry, shady, and well-ventilated area for one to two weeks. The cut end will dry out and pucker, creating a protective barrier. Skipping this step will allow moisture to penetrate the soft tissue, leading to almost certain rot.
Rooting for Success: Turning a Stick into a Thriving Plant
With your cured cutting in hand, you are ready for the final and most exciting part: planting. The right environment and a careful watering schedule are key to encouraging new roots to sprout.
The Classic Soil Method
The most reliable way to root a plumeria is directly in soil. Choose a well-draining potting mix; a blend of cactus soil and perlite is an excellent choice. Good drainage is paramount, as plumeria roots hate to stay wet.
Select a one-gallon black plastic nursery pot, which absorbs heat and helps encourage root growth. Fill the pot with your soil mix and insert the callused end of the cutting about 3 to 4 inches deep. Gently firm the soil around the stem to provide support.
Do not water the cutting for the first week. After that, water very sparingly—only when the top few inches of soil are completely dry. Overwatering is the number one killer of new cuttings.
Protect your new plant from harsh weather. Extreme downpours can oversaturate the soil and cause rot, a type of garden damage that is thankfully less severe than finding your roof caved in from rain, but still damaging to your plant’s health.
The Water Rooting Debate: Can It Work?
Some gardeners attempt to root plumeria cuttings in water. While small roots may form, this method is generally not recommended. Water-grown roots are often brittle and do not adapt well when transplanted to soil, leading to a high failure rate.
For the best chance of long-term success, stick with the proven soil-rooting method. It creates a stronger, more resilient root system that is ready to support a thriving plant.
Troubleshooting Your Cuttings: Why Isn’t It Growing?
Patience is essential when rooting plumerias, as it can take several weeks or even months for them to establish. However, certain symptoms can indicate a problem. This table will help you diagnose and solve common issues.
| Symptom | Possible Cause | Solution |
|---|---|---|
| Stem is mushy or black at the base | Rot from overwatering or improper callusing. | Unfortunately, this is usually fatal. Discard the cutting and start over, ensuring the new cutting is fully callused before planting and that you water very sparingly. |
| Stem is shriveled and wrinkled | Dehydration or sunburn. | Move the cutting to a location with less direct sunlight. If the soil is bone dry, provide a small amount of water. The stem should plump up within a few days. |
| No new leaves after 2-3 months | Slow rooting or dormancy. | Be patient. As long as the stem is firm and not rotting, it is likely working on root development. Ensure it is in a warm location to encourage growth. You can check for roots by giving a very gentle tug; resistance means roots have formed. |
| White, fuzzy substance on soil surface | Harmless saprophytic fungus. | This is common in potting mixes and is not harmful to the plant. It indicates the soil may be staying too moist. Improve air circulation and allow the soil to dry out more between waterings. |
| Pests appear (spider mites, scale) | Pests were present on the parent plant or cutting. | Isolate the cutting immediately. Treat with horticultural oil, neem oil, or insecticidal soap according to the product directions. |
From Cutting to Canopy: The First Year of Care
The appearance of the first new, glossy leaves is a thrilling moment—it is the signal that your cutting has successfully rooted. Now, your care routine will shift slightly to support its growth into a beautiful plant.
When to Water and Fertilize
Once you see active leaf growth (leaves that are at least a few inches long), you can begin to water more regularly. Water thoroughly, but always allow the top half of the soil to dry out before watering again. Consistency is key.
Wait to fertilize until you have a set of 4-6 full-sized leaves. Start with a balanced fertilizer diluted to half-strength. Once the plant is established, you can switch to a high-phosphorus fertilizer to encourage blooming.
Acclimating to Sunlight
Plumerias are sun-lovers, but a newly rooted cutting needs to be introduced to direct sunlight gradually. Too much sun too soon can scorch the tender new leaves and stress the plant. Start with a few hours of morning sun and slowly increase the exposure over several weeks.
This process of acclimation will build the plant’s tolerance and set it up for a lifetime of healthy growth and prolific blooming. A happy plumeria will reward you with a stunning canopy of fragrant flowers.
Your Free Plumeria Journey Begins Now
You now possess the knowledge to grow an entire garden of plumerias without ever visiting a nursery. By sourcing cuttings from your community, carefully selecting healthy stems, and mastering the art of preparation and rooting, you have unlocked a sustainable and deeply fulfilling way to garden.
The process requires patience, but the reward is immense. Watching a simple “stick” transform into a thriving, flowering tree that you grew yourself is one of the great joys of gardening. Go forth and start your free plumeria collection today.