Frameless Shower Door Leaks at Hinge? Stop Drips For Good!
There’s nothing quite like the sleek, modern look of a frameless glass shower door. But that beautiful aesthetic can quickly turn into a daily frustration when you step out of the shower and onto a wet, slippery floor. A puddle forming right at the hinge of your gorgeous door is a common problem that can lead to water damage, mold growth, and a constant need for towels on the floor.
Unlike framed doors with bulky metal and rubber seals, frameless designs rely on precision and minimal components to keep water contained. When a leak appears at the hinge, it’s a sign that one of these precise elements is off. Fortunately, fixing it is often a straightforward process you can handle without calling a professional.
You'll Learn About
Why Your Frameless Shower Door Hinge is Leaking (The Hidden Causes)
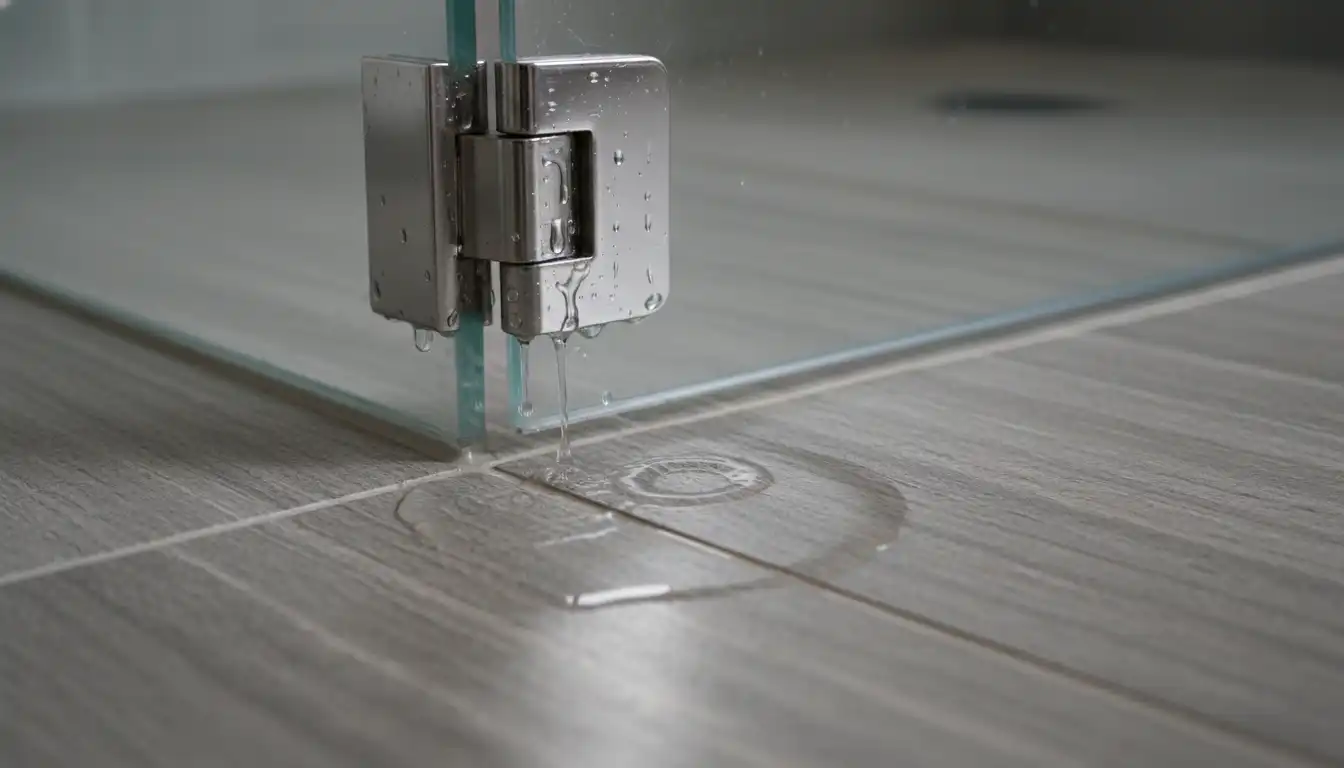
Understanding the root cause of the leak is the first step to a permanent fix. Water is relentless and will find any small gap or imperfection to escape. The hinge area is a common culprit due to its mechanical nature and the multiple seals involved in its installation.
Hinge Misalignment and Gapping
The most frequent reason for a hinge-side leak is a misaligned door. Over time, the sheer weight of heavy glass can cause the door to sag slightly, or the house itself may settle. This movement, even just a millimeter, can create a tiny vertical gap between the edge of the door and the wall or an adjacent glass panel, providing a perfect escape route for water.
Improper installation is also a major factor. If the door wasn’t set perfectly plumb and level from day one, it was destined to develop leaks. A door that doesn’t close squarely against its seals will always struggle to be watertight.
Worn-Out or Degraded Seals
When you think of shower door seals, you probably picture the long vinyl sweep at the bottom. However, the hinges themselves contain small, crucial gaskets or seals. These are typically made of clear rubber or plastic and sit between the metal hinge plate and the surface of the glass, cushioning it and creating a watertight barrier.
These internal gaskets can compress, crack, or dry out over the years. When they fail, water that runs down the glass can seep directly into the hinge mechanism and out onto your floor. This type of leak is often missed because the gaskets are hidden from view.
Compromised Mounting Points
A significant, yet often overlooked, cause of hinge leaks has nothing to do with the hinge itself, but with how it’s attached to the wall. Each hinge is secured with screws that go through the tile and into the wall structure. If these screw holes were not properly sealed with 100% silicone caulk during installation, they become direct channels for water.
Water can get behind the hinge plate, enter the unsealed screw holes, and travel through your wall, eventually emerging at the base of the shower. This is a particularly damaging type of leak, as it can cause hidden mold growth and deterioration of your wallboard. The integrity of your shower starts from the ground up, making the choice between a shower pan vs tiles a critical decision for long-term water management.
Your Step-by-Step Guide to Fixing a Leaky Hinge
With a clear understanding of the potential causes, you can now systematically diagnose and fix the problem. This process moves from the simplest solutions to the more involved, ensuring you don’t do more work than necessary.
Step 1: Pinpoint the Exact Leak Source
First, you need to become a detective. Close the shower door and have someone run the shower, directing water at the hinge area from inside. From the outside, watch closely to see exactly where the water first appears.
Does it emerge from the gap between the door and the wall? Does it seem to be weeping directly from the body of the hinge itself? Or is it coming from underneath the hinge plate where it meets the tile? Knowing the precise exit point is key to applying the right fix.
Step 2: The Simple Fix – Hinge Adjustment
If the leak is coming from the vertical gap next to the hinge, the cause is likely misalignment. Often, the hinge screws have simply loosened over time. Using the correct screwdriver (usually a Phillips head), check and tighten the screws that clamp the hinge to the glass and the screws that mount the hinge to the wall.
Do not overtighten, as this can damage the glass or the internal gaskets. Just ensure they are snug. After tightening, close the door and check the alignment. If it now sits flush, you may have solved the problem.
Step 3: Applying Strategic Sealant
If tightening the hinges doesn’t work, a targeted application of sealant is your next best step. For this, you will need 100% clear silicone sealant that is rated for kitchens and baths to ensure it is waterproof and mold-resistant.
If the leak comes from under the hinge plate, carefully apply a thin, clean bead of silicone around the perimeter of the hinge where it meets the tile. Use a caulking tool or a wet finger to smooth the bead for a professional, almost invisible finish. If the leak is from the vertical gap, you can install a clear polycarbonate or vinyl seal strip, which simply presses onto the edge of the glass to close the gap.
Step 4: Replacing Hinge Gaskets and Seals
For leaks that seem to come from the hinge body itself, the internal gaskets are likely the issue. This is a more advanced repair. You will need to support the door’s weight, unscrew the hinge plates from the glass, and carefully inspect the small plastic or rubber gaskets inside. Replacements can often be found online or from the door’s manufacturer.
This is also a good time to address compromised mounting holes. With the hinge removed from the wall, you can inject silicone directly into the screw holes before re-mounting the hinge, ensuring a completely waterproof seal.
Pro-Level Prevention: How to Stop Hinge Leaks Before They Start
The best way to fix a leak is to prevent it from ever happening. A little foresight and regular maintenance can keep your bathroom floor dry for years to come.
The Crucial Role of Proper Installation
Nearly all persistent leak issues trace back to the initial installation. Ensuring the shower curb is properly sloped, the walls are plumb, and all hardware mounting points are thoroughly sealed with silicone is non-negotiable. This foundation prevents water from ever finding a path out.
The style of door also plays a role in water management. Thinking about details like whether you want your shower door to swing in and out can impact which seals are most effective for your setup.
Regular Maintenance Checks
Once every few months, take a moment to inspect your shower door. Check that all hinge screws are snug. Look at the vinyl seals and sweeps for any signs of cracking, discoloration, or shrinking, and replace them if they look worn. A quick visual inspection can catch a small problem before it becomes a major leak.
Advanced Solutions and When to Call a Professional
While most hinge leaks are fixable with some patience and basic tools, some situations require an expert. Recognizing when you’re out of your depth can save you time and prevent costly damage.
Troubleshooting Quick Guide
Use this table to quickly identify your issue and the most likely solution. This can help you decide whether to proceed with a DIY fix or to contact a professional glass installer.
| Symptom | Likely Cause | DIY Solution | When to Call a Pro |
|---|---|---|---|
| Water drips from the gap between the door and wall. | Door misalignment or loose hinges. | Tighten all hinge screws; check door alignment. | If the door sags and cannot be adjusted. |
| Water weeps from under the hinge plate on the wall. | Failed sealant around mounting screws. | Apply a new bead of clear silicone around the hinge base. | If tile is cracked or water damage is extensive. |
| Leak appears to come from the hinge mechanism itself. | Worn internal hinge gaskets. | Disassemble hinge and replace gaskets (advanced DIY). | If you are not comfortable removing the door. |
| Door does not close smoothly or scrapes the floor/curb. | Severe door sagging or structural shift. | Attempt hinge adjustment, but proceed with caution. | Immediately. This indicates a serious installation issue. |
Recognizing When DIY Isn’t Enough
If you discover cracks in the glass around the hinge cutouts, this is a serious structural problem that requires immediate professional attention. Similarly, if the door has sagged so much that it’s difficult to adjust, a pro may need to reset the entire door. For complex designs, such as a shower door to ceiling, the weight and precision required often make professional help the safest option.
Conclusion: Enjoy a Leak-Free, Luxurious Shower
A leaking frameless shower door hinge is a solvable problem. By carefully diagnosing the source of the leak and following a methodical approach—from simple adjustments to replacing seals—you can restore the integrity of your shower enclosure. Taking a proactive stance with proper installation and regular maintenance is the ultimate strategy.
With these steps, you can eliminate those frustrating puddles and get back to enjoying the clean lines and open feel of your beautiful, and perfectly dry, frameless shower.