Flex Seal in Shower? The Truth Behind This Viral Fix
You have a nagging shower leak. Water is getting somewhere it shouldn’t, and visions of costly tile repairs and hidden mold dance in your head. In a moment of desperation, you remember those commercials—a boat sawed in half, then magically made seaworthy again with a simple spray. Could the answer to your problem be that easy? Can you use Flex Seal in your shower?
This question is more common than you’d think. The promise of a quick, rubberized, waterproof barrier is tempting for any homeowner facing a leak. But before you grab a can and aim it at your grout lines, it’s crucial to understand what you’re getting into. Using a product like this in a high-moisture, high-use area like a shower has significant implications, not all of them good.
The truth is, while Flex Seal creates a waterproof seal, it’s not designed as a long-term, permanent solution for tile and grout applications. There are critical factors like surface adhesion, durability under daily scrubbing, and potential for trapping moisture that you must consider. This article will break down the entire problem, exploring why people reach for Flex Seal, where it might seem to work, and the serious risks you take by using it as a primary shower sealant.
You'll Learn About
What is Flex Seal and Why is it So Tempting for Showers?
Flex Seal is a brand of liquid rubber sealant coatings. It’s famous for its ability to spray out as a thick liquid, seep into cracks and holes, and dry to a flexible, watertight, rubberized coating. The product line includes sprays, liquids, pastes, and tapes, all designed to stop leaks fast on a variety of surfaces.
The appeal for a leaking shower is obvious. Cracked grout, failing caulk at the seams, or a leaky shower pan all seem like perfect candidates for a quick spray-on fix. The idea of avoiding a costly and messy regrouting or retiling job by simply applying a few coats of a rubber sealant is a powerful motivator for homeowners looking for an easy solution.
The Common Culprits: Why Your Shower is Leaking
Before you can even consider a fix, you need to know the root of the problem. Shower leaks almost always come down to a few common failures in the system. Understanding these will clarify why a surface-level fix like Flex Seal often isn’t the right answer.
One of the most frequent issues is failing grout. Grout is porous and can crack or deteriorate over time, allowing water to slowly seep through to the backer board and wall framing behind it. Similarly, the caulk lines where the shower walls meet the floor or tub are critical barriers. If this caulk cracks, peels, or separates, it creates a direct path for water to escape.
Another serious concern is a leak in the shower pan itself. The shower pan is the waterproof liner beneath your tile floor, designed to catch any water that gets through the grout and direct it to the drain. A crack in the pan or a failed seal around the drain is a major problem that a topical sealant can’t truly fix.
The Big Question: Can You Use Flex Seal Products in a Shower?
The short answer is yes, you can technically use certain Flex Seal products in a shower, but it’s often a temporary fix with serious potential downsides. The Flex Seal family of products, particularly Flex Shot and Flex Caulk, are marketed for use in wet environments like bathrooms and kitchens. They are designed to be waterproof and mildew-resistant.
However, using the flagship product, Flex Seal Spray or Liquid, as a widespread coating over tiles and grout is highly discouraged by professionals. While it may stop a leak in the short term, it creates a host of other potential problems. Let’s explore the right and wrong ways to approach this.
Acceptable Uses: Flex Shot and Flex Caulk for Seams
Flex Shot is a thick, rubber-based sealant that comes in an easy-to-use can, much like a can of cheese, eliminating the need for a caulking gun. It’s designed specifically for sealing gaps and cracks. Similarly, Flex Caulk is a hybrid polymer that can be used for sealing around tubs, sinks, and shower seams. These products can be a viable alternative to traditional silicone caulk for sealing corners and joints.
The key advantage here is ease of application. For a homeowner who isn’t comfortable with a traditional caulking gun, Flex Shot offers a straightforward way to apply a waterproof bead. However, proper surface preparation is still critical. You must remove all old caulk and clean the surface thoroughly for it to adhere properly.
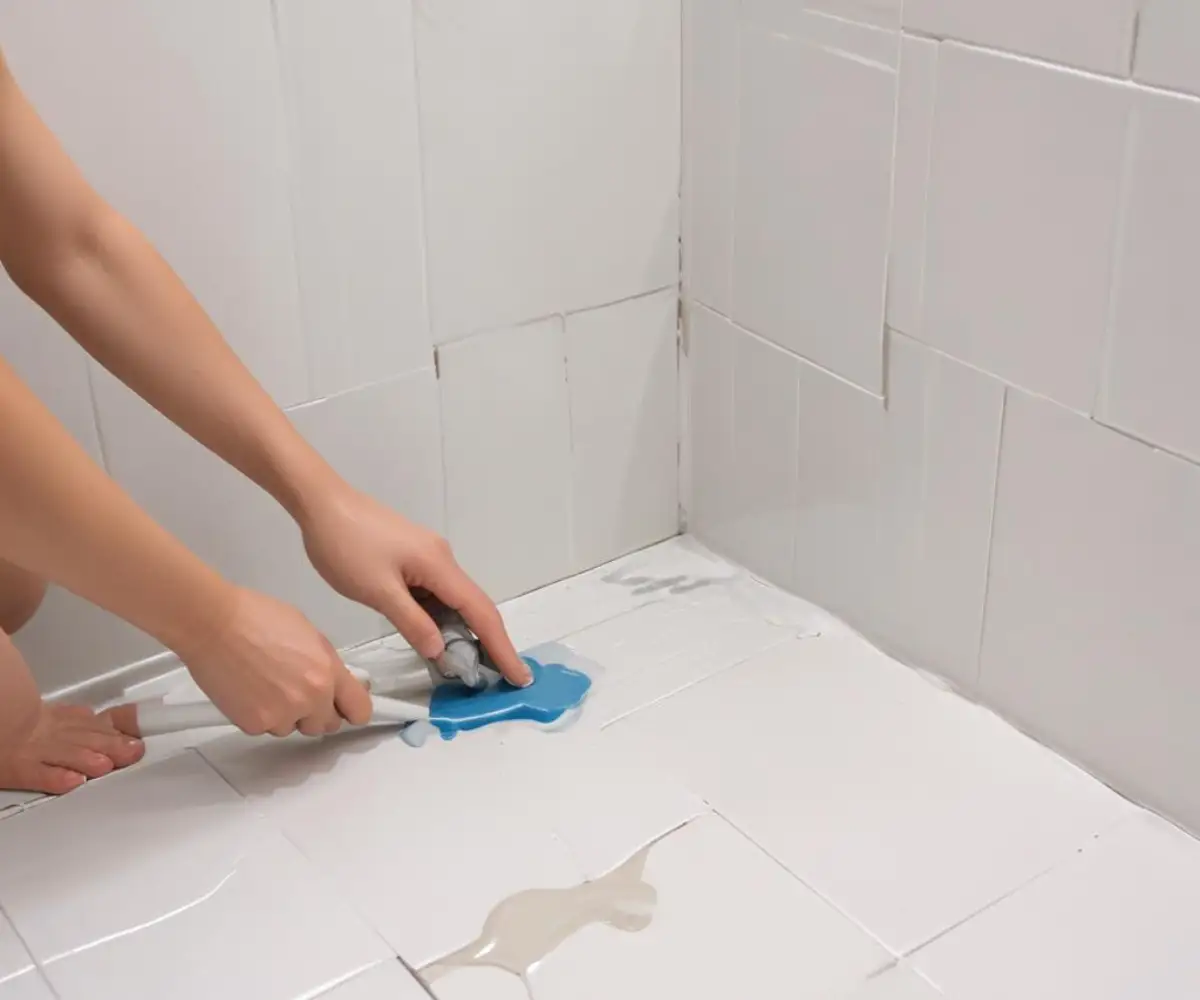
The Danger Zone: Using Flex Seal Spray or Liquid on Tile and Grout
This is where most homeowners go wrong. The idea of spraying the entire shower floor or a cracked wall with Flex Seal to create an impenetrable rubber barrier seems logical, but it’s a flawed approach. Tile and grout are not ideal surfaces for these products for several key reasons.
First, adhesion can be a problem. While Flex Seal bonds to many surfaces, it may not adhere perfectly to certain types of tile, especially those with a slick, glossy finish. Poor adhesion can lead to the coating peeling or blistering over time, especially with the constant exposure to water, soap, and cleaning products. This not only re-exposes the original leak but can also trap water underneath the peeled sections, leading to mold growth.
Second, this is only a surface-level fix. If you have cracked grout, the underlying issue might be movement in the wall or an improper installation. Simply covering the crack doesn’t address the root cause. The movement will likely continue, causing the Flex Seal coating itself to tear or separate over time.
The Potential Consequences of Using Flex Seal Incorrectly
Opting for a quick fix with Flex Seal can lead to bigger headaches down the road. One of the most significant risks is trapping moisture. If water is already behind your tiles, spraying a waterproof coating over the surface prevents that moisture from ever drying out. This creates a perfect breeding ground for mold and mildew, which can cause health issues and lead to rot in your wall studs and subfloor.
Another major issue is the aesthetic and practical finish. Flex Seal Liquid and Spray can leave a rubbery, textured finish that is difficult to clean and can look unsightly. Furthermore, some Flex Seal products, like Flex Seal Liquid and Flex Shot, cannot be painted over. This leaves you stuck with the color you applied, which may not match your bathroom decor. You also run the risk of creating a slippery surface on the shower floor, which is a serious safety hazard.
Finally, consider the difficulty of removal. If the Flex Seal application fails or you decide to do a proper repair later, removing the rubberized coating from tile and grout is an incredibly difficult and labor-intensive process. It can involve harsh chemicals and extensive scraping, potentially damaging the tile surface in the process.
A Better Approach: The Right Way to Fix Shower Leaks
Instead of reaching for a can of Flex Seal, addressing shower leaks correctly will save you time, money, and stress in the long run. The right method depends on the source of the leak.
For failing grout, the proper solution is to remove the old, cracked grout and apply new, high-quality grout. For an even more robust solution, using an epoxy grout can provide a stronger, more water-resistant, and stain-proof finish. When dealing with failing caulk seams, it’s essential to completely remove the old caulk, clean the joint with a solvent like denatured alcohol, and apply a 100% silicone caulk designed for kitchens and baths. For an even better seal, professionals often use a backer rod for caulking the shower to ensure the correct bead depth.
If you suspect a shower pan leak, this is a much more serious issue that requires a professional. The tile floor will likely need to be removed to access and repair or replace the pan liner. Ignoring this can lead to catastrophic water damage to the subfloor and the ceiling below. Don’t forget that other issues, like an incorrect shower curb thickness, can also contribute to water escaping the shower area.
Step-by-Step Guide to Properly Sealing a Shower Seam
- Remove the Old Caulk: Use a caulk removal tool or a utility knife to carefully cut and scrape away all the old caulk.
- Clean the Surface: Clean the joint thoroughly with a brush and a mixture of water and bleach to kill any mildew. Once dry, wipe it down with denatured alcohol to remove any soap scum or residue.
- Apply Painter’s Tape: For a clean, professional line, apply painter’s tape to either side of the joint, leaving a consistent gap for the new caulk.
- Apply 100% Silicone Caulk: Cut the tip of the caulk tube at a 45-degree angle. Apply a steady, consistent bead of caulk into the joint.
- Smooth the Bead: Immediately after applying, smooth the bead with a caulk finishing tool or a wet finger.
- Remove the Tape: Carefully remove the painter’s tape while the caulk is still wet to reveal a clean, sharp line.
- Allow to Cure: Let the caulk cure for at least 24-48 hours, or as directed by the manufacturer, before using the shower.
And remember, some problems, like recurring clogs, require a different kind of attention entirely. Forcing things down the drain can cause major pipe damage, so never try to flush something like toilet paper in the shower drain if you have a backup.
| Solution | Best For | Pros | Cons |
|---|---|---|---|
| Flex Shot / Flex Caulk | Sealing corners and seams around fixtures. | Easy to apply without a caulk gun; waterproof; mildew resistant. | Can be difficult to tool for a smooth finish; not paintable (Flex Shot); temporary fix. |
| Flex Seal Spray / Liquid | Emergency, temporary patch on a specific spot (not recommended for tile). | Very easy to apply; creates a quick waterproof barrier. | Poor long-term adhesion on tile; can trap moisture; difficult to remove; unsightly finish. |
| 100% Silicone Caulk | Permanent sealing of all shower seams and joints. | Highly durable and flexible; long-lasting waterproof seal; mildew resistant. | Requires a caulking gun; can be messy to apply if inexperienced. |
| Epoxy Grout | Regrouting shower walls and floors for maximum durability. | Extremely durable; waterproof and stain-proof; inhibits mold growth. | More expensive; shorter working time and more difficult to apply than standard grout. |
When to Call a Professional
While fixing a small caulk line is a manageable DIY project, some shower issues demand professional expertise. If you’ve sealed all the visible gaps and still find evidence of a leak, it’s time to call a plumber or a tile contractor.
Signs that you need a professional include soft spots in the wall around the shower, loose tiles, or water stains on the ceiling below the bathroom. These are indicators of a deeper problem that a surface sealant will not solve. A professional can properly diagnose the leak, whether it’s from the plumbing fixtures, the tile installation, or the shower pan, and perform the correct, lasting repair.
Final Verdict: Should You Use Flex Seal in Your Shower?
While the allure of a quick, spray-on fix is strong, using Flex Seal Spray or Liquid as a widespread solution for a leaking shower is a risky gamble that often creates more problems than it solves. It should be considered, at best, a very temporary patch for an emergency situation until a proper repair can be made.
For sealing specific joints and seams, products like Flex Shot or Flex Caulk can be an acceptable, though not always superior, alternative to traditional silicone caulk. However, for the long-term health and integrity of your shower, nothing beats the proven methods of properly applied grout and 100% silicone sealant. Addressing the root cause of the leak, rather than just covering it up, will always be the most effective and reliable solution.