Fix Dip at End of Driveway: Your Ultimate Repair Guide
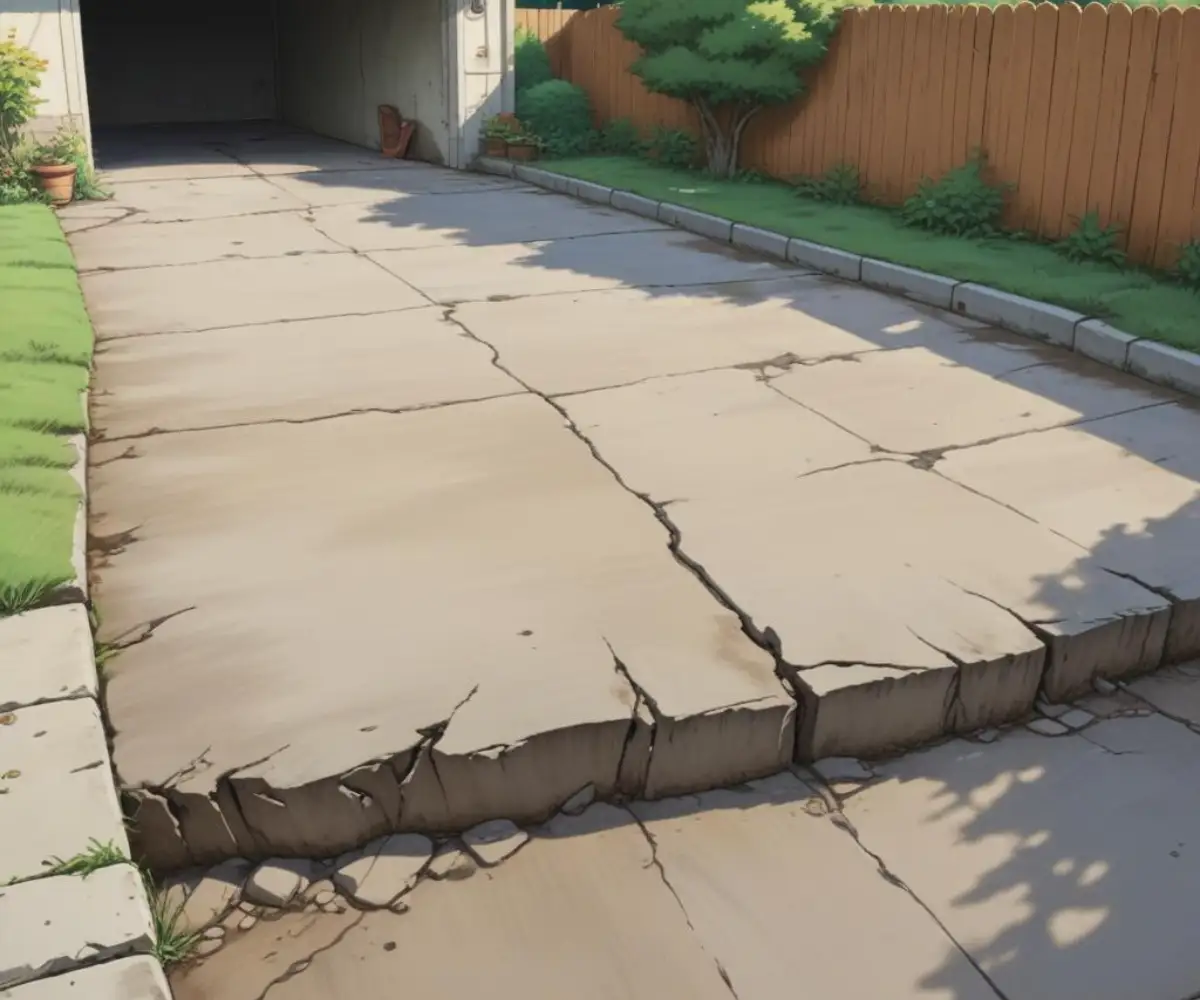
There’s nothing more frustrating than the jarring “thump” every time you pull in or out of your driveway. That dip at the end, where your driveway meets the road, is more than just a daily annoyance.
It’s an eyesore, a potential tripping hazard, and a silent killer of your car’s suspension and alignment. Ignoring it won’t make it go away; in fact, it will only get worse, leading to more significant damage and costlier repairs down the road.
This guide will walk you through everything you need to know, from diagnosing the root cause to implementing a permanent fix, whether you’re a seasoned DIYer or prefer to call in the pros.
You'll Learn About
Diagnosing the Culprit: What’s Causing Your Driveway to Sink?
Before you can fix the dip, you have to understand why it happened. A sunken driveway apron is almost always a symptom of a deeper problem. Simply patching the top without addressing the underlying cause is like putting a bandage on a broken arm—it’s a temporary fix destined to fail.
The #1 Cause: Water and Erosion
Water is the primary enemy of your driveway’s foundation. When water is allowed to pool or flow uncontrolled, it slowly washes away the soil and gravel base supporting the pavement above. This process, known as erosion, creates voids and empty pockets beneath the surface.
Without solid ground to rest on, the heavy asphalt or concrete slab will inevitably sink and crack under the weight of your vehicles. Poor drainage, improperly aimed downspouts, and incorrect grading of the surrounding landscape are often the main culprits.
Compacted or Poorly Prepared Sub-base
A driveway is only as strong as the foundation it’s built on. The sub-base—a layer of compacted gravel and soil—is critical for distributing the weight of traffic and providing stability.
If the original installers cut corners by not compacting the soil adequately or using a sub-base that was too thin, the ground will naturally settle and compact over time, causing the driveway surface to sink along with it.
The Hidden Problem: A Failing Culvert Pipe
Many driveways have a culvert, which is a large pipe that runs underneath the entrance to allow water to flow through a drainage ditch. If this pipe becomes crushed, clogged with debris, or separates at a joint, it can lead to severe erosion from below.
Water will leak out of the damaged pipe and saturate the surrounding soil, washing it away and creating a large void that causes the driveway above to collapse. It’s crucial to understand the structural limits of these pipes; this often brings up the question of whether you can you drive over a drain pipe without causing damage over time.
Heavy Loads and Vehicle Traffic
While your driveway is designed for cars, it may not be equipped to handle repeated stress from heavier vehicles. Garbage trucks, delivery vans, and construction equipment can exert immense pressure on the pavement, especially at the apron where it meets the street.
This excessive weight can accelerate the compaction of a weak sub-base and lead to premature sinking and cracking.
Choosing Your Battle: DIY Fix vs. Calling a Professional
Once you have a good idea of what’s causing the dip, you need to decide whether this is a project you can tackle yourself or if it’s time to call in a professional. The right choice depends on the severity of the problem, the type of driveway material, and your own skill level.
This table breaks down some common scenarios to help you decide.
| Problem Severity | DIY Approach (Asphalt) | Professional Solution (Asphalt & Concrete) | Estimated Cost |
|---|---|---|---|
| Shallow Dip (<2 inches) | Clean, fill, and tamp with cold patch asphalt. A straightforward weekend project. | Hot patch repair for a more durable finish or infrared asphalt repair. | DIY: $50 – $150 Pro: $200 – $750 |
| Deep Dip (>2 inches) | Requires building a new base with compacted gravel before applying cold patch. More labor-intensive. | Cut and replace the section, ensuring a new, properly compacted sub-base is installed. | DIY: $150 – $400 Pro: $750 – $3,000 |
| Sunken Concrete Slab | Not a recommended DIY fix due to the weight and equipment required. | Mudjacking or Polyurethane Foam Injection (Poly-lifting) to raise the existing slab. | Pro: $600 – $2,700 |
| Suspected Culvert Issue | Inspecting for clogs is possible, but excavation and replacement are not DIY-friendly. | Excavation, replacement of the damaged pipe, and rebuilding the driveway entrance. | Pro: $1,500 – $9,000+ |
Your Step-by-Step Guide to Fixing a Minor Asphalt Dip (DIY Method)
For a minor dip in an asphalt driveway caused by slight settling, a DIY repair using cold patch asphalt is a very manageable project. With the right preparation and materials, you can achieve a durable repair that lasts for years. Do not skip the preparation steps—they are the key to a long-lasting fix.
Step 1: Gather Your Tools and Materials
Before you start, make sure you have everything you need. There’s nothing worse than having to stop mid-project for a trip to the hardware store.
You’ll need a stiff wire brush, a broom, a strong degreaser, a garden hose or pressure washer, bags of cold patch asphalt, crushed gravel (for deeper dips), a hand tamper, and a shovel or trowel.
Step 2: Clean and Prepare the Area Thoroughly
This is the most important step. A clean, dry surface is essential for the new patch to bond correctly. Start by using the wire brush and broom to remove all loose asphalt, dirt, gravel, and weeds from the dip.
Next, scrub the area with a degreaser to remove any oil or grease stains, which can prevent the patch from adhering. Finally, rinse the area thoroughly with a hose or pressure washer and allow it to dry completely. This may take several hours or even a full day in the sun.
Step 3: Fill the Void and Build a New Base
If your dip is deeper than two inches, don’t just fill the entire thing with expensive cold patch. First, build up a new base using crushed gravel. Add the gravel in one to two-inch layers, using your hand tamper to compact each layer firmly before adding the next.
Continue this process until the gravel base is about two inches below the surface of the driveway. This creates the solid foundation that was missing before and ensures your repair won’t sink again.
Step 4: Apply the Cold Patch Asphalt
Shovel the cold patch asphalt into the prepared dip. Spread it evenly with your shovel or trowel, making sure it fills all corners and edges.
It’s crucial to overfill the dip slightly, so the patch is about half an inch higher than the surrounding driveway. This is because the material will compress during the next step.
Step 5: Compact for a Lasting Repair
Compaction is what makes the cold patch strong and durable. Use your hand tamper to firmly and repeatedly pound the entire surface of the patch. Work from the outside edges toward the center.
As you tamp, the material will become denser and sink down. For a final, thorough compaction, you can place a piece of plywood over the patch and slowly drive over it with your car a few times. The goal is to make the patch level and flush with the rest of the driveway.
Advanced Solutions for Serious Driveway Dips
When a simple patch won’t cut it, or if you’re dealing with a sunken concrete driveway, it’s time to look at professional solutions. Understanding these methods will help you have an informed conversation with a contractor.
Mudjacking and Slabjacking for Sunken Concrete
If you have a sunken concrete apron, you don’t necessarily have to replace it. Mudjacking (also called slabjacking) is a technique where a contractor drills large holes into the sunken slab and pumps a slurry mixture of cement, soil, and sand underneath.
This mixture fills the void and hydraulically lifts the concrete back to its original position. It’s a proven method that is often faster and less expensive than a full replacement.
Polyurethane Foam Injection (Poly-Lifting)
Poly-lifting is a modern, high-tech alternative to mudjacking. Instead of a heavy slurry, this method uses a high-density, expanding polyurethane foam. The process is similar: small holes are drilled, and the two-part liquid foam is injected below the slab.
The foam expands with incredible force, lifting the concrete with precision. The benefits are significant: the material is lightweight (preventing future sinking), waterproof, and cures in minutes, meaning you can use your driveway almost immediately.
The “Cut and Replace” Method
In cases of severe damage, where the asphalt or concrete is badly cracked and crumbling, the best option is often to remove the damaged section entirely. A contractor will use a concrete saw to make clean cuts around the sunken area.
The old material is then excavated, and most importantly, a new, properly compacted sub-base is installed before new asphalt or concrete is poured. This is the most invasive option but provides a brand-new, long-lasting surface.
Addressing a Failed Culvert Pipe
If you’ve determined a faulty culvert pipe is the root cause, no surface repair will ever be permanent until the pipe is fixed. This is a major job that involves excavating the entire area to remove the old pipe.
A new pipe is then installed, ensuring it has the proper slope for drainage. The area is then backfilled with gravel in compacted layers to provide solid support before the driveway surface is rebuilt. Just as with complex plumbing issues, like figuring out how to stop sharkbite from spinning, this is a job best left to professionals with the right equipment.
Prevention is the Best Medicine: How to Stop Future Dips
Once your driveway is fixed, the last thing you want is a repeat performance. Taking a few proactive steps can protect your investment and prevent future sinking.
Master Your Water Drainage
The single most important preventive measure is controlling water flow. Ensure your gutter downspouts are directed away from your driveway, ideally extending at least 10 feet out into your yard.
Observe where water flows during a heavy rain. If you see water pooling near the driveway’s edge, you may need to improve the grading of the adjacent lawn or install a French drain to channel water away.
Sealcoating and Crack Filling
For asphalt driveways, applying a quality sealcoat every 2-3 years is vital. Sealcoating provides a protective barrier against water penetration, UV rays, and chemical spills. It also helps to fill minor surface cracks.
For both asphalt and concrete, it’s crucial to fill any cracks as soon as they appear. Even a small crack allows water to seep into the sub-base, where it can freeze, expand, and erode the foundation of your driveway.
Avoid Overloading Your Driveway’s Edge
Be mindful of where you park heavy vehicles. The edges and the apron are the most vulnerable parts of your driveway. Whenever possible, avoid parking heavy RVs, boats, or commercial trucks right at the end of the driveway for extended periods.
Inspect Your Culvert Regularly
If you have a culvert pipe, make a habit of inspecting both ends a few times a year, especially after heavy storms. Clear away any leaves, branches, or debris that could cause a blockage.
A properly flowing culvert prevents water from backing up and saturating the soil around it, which is a primary cause of erosion and sinking.
Frequently Asked Questions (FAQs)
Homeowners often have similar questions when faced with a sinking driveway. Here are answers to some of the most common ones.
How much does it cost to fix a dip at the end of a driveway?
Costs vary widely based on the method and severity. A simple DIY cold patch repair might only cost $50 to $150. Professional repairs like mudjacking can range from $600 to $2,700, while a full cut-and-replace of the apron could be $750 to $3,000 or more.
Can I just pour more asphalt or concrete on top of the dip?
This is called “skin patching” and is strongly discouraged. Pouring a thin layer over the top without addressing the failed base underneath is a very temporary fix. The new layer has no foundation and will quickly crack and break apart, wasting your time and money.
How long does a cold patch asphalt repair last?
The longevity of a cold patch repair depends almost entirely on the quality of the preparation. If the area is thoroughly cleaned and the material is well-compacted, a patch can last for many years. However, a poorly prepared patch may fail within a year.
What is the best material to fill a large hole in a driveway?
For a large, deep hole, the best approach is a layered one. Start by filling the majority of the depth with compacted crushed gravel to create a solid sub-base. The final top two inches should then be filled with a surface material like cold patch asphalt or fresh concrete.
Conclusion: Reclaim Your Smooth Entryway
That dip at the end of your driveway is a fixable problem. The key is to approach it methodically: first, become a detective to diagnose the true underlying cause. Just as you would investigate a strange noise or smell, like a dehumidifier that smells like burning plastic, you must look beyond the surface issue.
Once you understand the cause—be it water, a poor base, or a failing culvert—you can choose the right repair method for your situation and budget. Whether you opt for a hands-on DIY patch or bring in a professional for a high-tech lift, meticulous preparation is the ultimate secret to a durable, long-lasting repair. By tackling the problem head-on, you can restore your driveway’s function, improve your home’s curb appeal, and finally enjoy a smooth, satisfying entry every time you come home.