Finish Exposed Drywall Edge Like a Pro: Your Ultimate Guide
There it is—that crumbly, gray, exposed edge of a drywall sheet. It happens in doorways without trim, on unfinished window returns, or where a wall simply ends. It looks unfinished, it’s vulnerable to chipping, and it can silently shed gypsum dust, a problem no homeowner wants.
Many DIYers are tempted to just smear some joint compound over the raw edge and hope for the best. This is a critical mistake. The gypsum core is soft and porous, lacking the paper facing that gives mud a proper surface to bond to. This approach always leads to a weak, lumpy, and unprofessional finish that will likely crack and crumble over time.
Fortunately, achieving a sharp, durable, and perfectly clean finish is not only possible but straightforward with the right materials and techniques. This guide will walk you through the professional methods for finishing an exposed drywall edge, transforming it from a liability into a crisp architectural feature.
You'll Learn About
Unveiling Your Best Options for a Flawless Drywall Edge
The secret to a durable and professional-looking exposed edge lies in using a dedicated finishing product. These components are designed to cap the raw gypsum, providing a hard, straight line that can be seamlessly integrated into the rest of the wall surface. Each type offers a different set of advantages depending on your specific situation.
Understanding these options is the first step toward choosing the right path for your project. Whether you need maximum durability, a minimalist look, or a perfect transition to another material, there’s a solution tailored for the job.
J-Bead: The Clean, Encapsulating Finish
J-bead is a J-shaped vinyl or metal channel that slides directly over the exposed drywall edge. It’s a fantastic solution for creating a clean, finished stop. The “J” profile neatly encapsulates the raw edge, providing immediate protection and a tidy appearance without the need for extensive mud work on the very edge itself.
The primary advantage of J-bead is its simplicity and the clean stop it provides, especially where drywall terminates against a different surface like a concrete block wall or a ceiling grid. However, it’s crucial to note that J-bead is typically installed before the drywall sheet is hung, as it slips over the edge first. A “mud-on” J-bead variation exists for retrofitting, which features a perforated flange for finishing with joint compound.
L-Bead (Corner Bead): The Versatile Workhorse
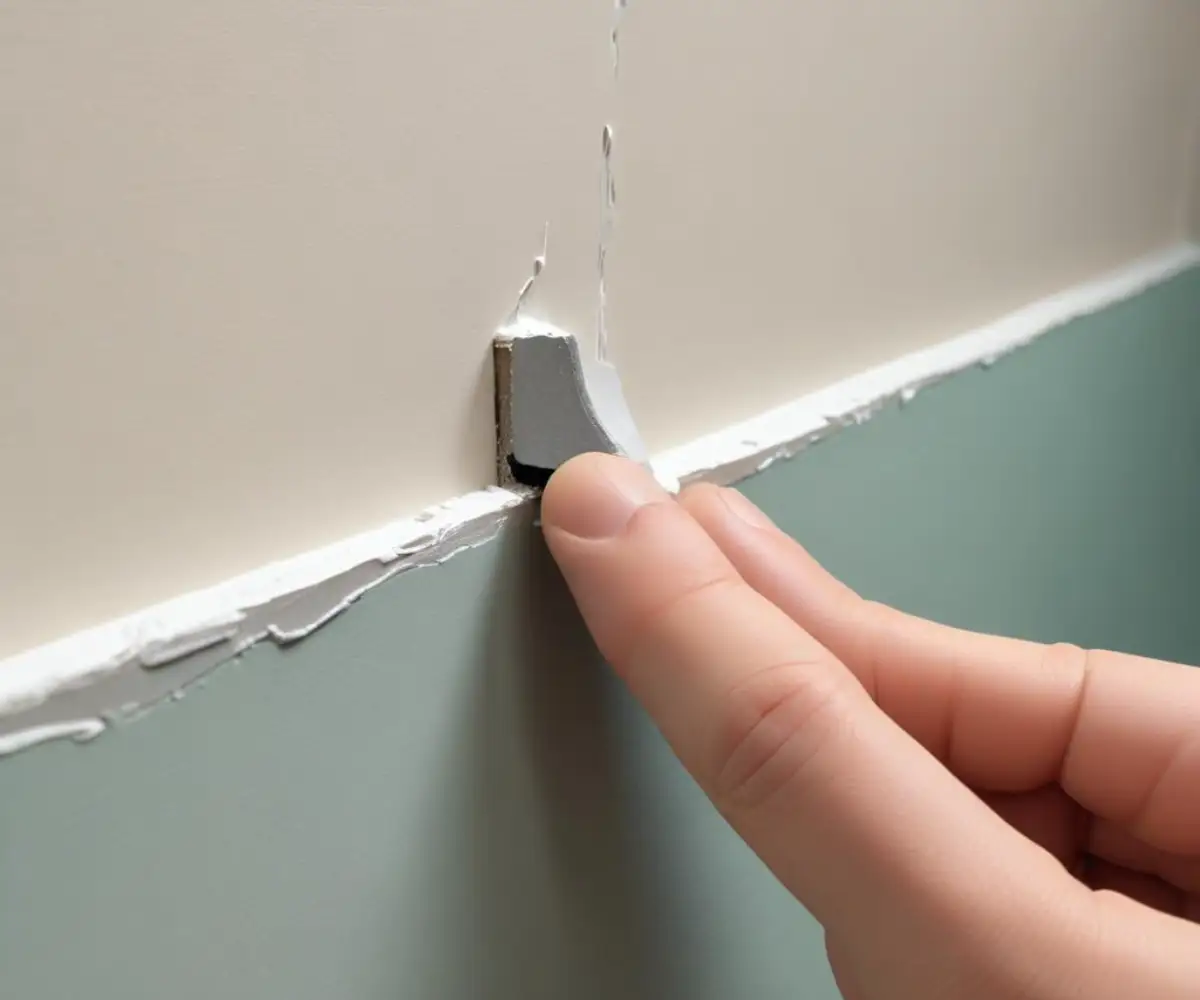
L-bead is the most common and versatile solution for finishing an exposed edge after the drywall is already installed. It’s essentially a standard outside corner bead. One flange attaches to the face of the drywall, while the other wraps around the raw edge, creating a new, durable metal or vinyl corner.
This method turns the exposed edge into a standard outside corner, which is then finished with joint compound just like any other corner in your home. This approach offers superior strength and creates a sharp, seamless edge that blends perfectly with the wall face. For situations requiring precise work, such as cutting drywall already on a stud, careful planning is key to ensure the L-bead fits perfectly. You can learn more about this by reading our guide on how to cut drywall on a stud without destroying your wall.
Tear-Away Bead: The Magician’s Trick for Clean Lines
A tear-away bead is a clever variation of L-bead designed for finishing drywall where it abuts a different surface, such as a window frame, brick wall, or cabinetry. It features a removable flange or “mud leg” that creates a temporary guide. You apply joint compound up to this guide, and once it’s dry, you simply tear the flange away.
The result is a perfectly straight, clean line of finish right against the adjacent surface, with no mud overspill. This is the go-to product for professionals seeking the cleanest possible transition between drywall and another material, eliminating the need for tedious cleanup or caulking a messy gap.
Wood or MDF Trim: The Classic, Decorative Solution
Sometimes, the best solution isn’t a drywall finishing product at all, but a piece of trim. Covering the exposed edge with a piece of wood or MDF casing is a traditional and highly durable option. This method is common for doorless entryways or half-walls where a more substantial, decorative edge is desired.
While it requires basic carpentry skills and tools, using trim completely encases the raw edge, offering the highest level of protection against impact. It also allows for more creative and architectural freedom, letting you match the trim to your baseboards or other moldings in the room for a cohesive look.
Comparing Your Edge Finishing Options
Choosing the right method depends on your project’s specific needs, your skill level, and the desired final appearance. To help you decide, here is a direct comparison of the most popular drywall finishing solutions.
| Method | Best For | Skill Level | Durability | Final Appearance |
|---|---|---|---|---|
| J-Bead | Cleanly terminating drywall against another surface (e.g., ceilings, concrete). | Beginner (if installed before hanging drywall). | Good | Clean, minimal, defined stop. |
| L-Bead (Corner Bead) | Creating a durable, seamless edge on open-ended walls or returns. | Intermediate | Excellent | Sharp, seamless corner that blends into the wall. |
| Tear-Away Bead | Perfect, crisp transitions against windows, doors, and other materials. | Intermediate | Very Good | Ultra-clean, sharp line with no caulk gap. |
| Wood/MDF Trim | High-traffic areas, doorless openings, decorative half-walls. | Intermediate (requires carpentry). | Superior | Traditional, decorative, and substantial. |
Your Step-by-Step Guide to a Rock-Solid Drywall Edge (Using L-Bead)
Since using L-bead is the most common and versatile method for finishing an already-installed exposed edge, we’ll walk through that process in detail. This technique will give you a robust and professional finish that will stand the test of time.
Step 1: Preparation is Everything
Before you begin, ensure the exposed drywall edge is clean and stable. Use a utility knife to trim away any loose paper or crumbled gypsum. The drywall sheet must be securely fastened to the framing; if it’s loose, add a few more drywall screws to firm it up.
A solid foundation is crucial for a lasting finish. Taking on a project of this scale, especially in a challenging area, requires careful planning from the very beginning. For instance, successfully navigating tight spaces, like in a basement renovation, is critical; our guide on how to get drywall into basement can help you avoid common pitfalls.
Step 2: Choosing and Cutting Your Bead
You can choose between metal and vinyl L-bead. Metal beads are traditional and very rigid, while vinyl beads are more flexible and resistant to denting. For most DIY applications, vinyl is more forgiving and easier to work with.
Measure the length of the edge you need to cover and cut the bead to size. Tin snips work best for metal beads, while a simple utility knife or miter saw is perfect for cutting vinyl beads. Always dry-fit the bead to ensure it sits flush and tight against the drywall.
Step 3: Installation – Nailing It Down
The most common way to attach L-bead is with drywall nails or screws. However, for a faster and more secure bond, many professionals use a combination of spray adhesive and staples. Lightly spray the inside of the bead and the drywall face with a suitable construction adhesive.
Press the bead firmly into place, ensuring the nose of the bead is snug against the drywall edge. Use a staple gun to place staples every 6-8 inches along the perforated flange to hold it securely while the adhesive sets and the mud is applied.
Step 4: The Art of the First Coat
Mix your joint compound to a smooth, thick consistency, similar to cake frosting. Using a 4 or 6-inch drywall knife, apply a generous amount of mud over the perforated flange of the L-bead, pressing firmly to embed it completely.
The goal of this first coat is to fill the void and lock the bead into place. Run your knife along the nose of the bead to remove excess mud, creating a clean, sharp line. Don’t worry about making it perfect yet; focus on full coverage.
Step 5: Building Up Coats for a Seamless Look
Once the first coat is completely dry, it’s time to build up the finish. Use a wider drywall knife (8-inch or 10-inch) for the second coat. Apply a thin layer of mud, extending it further onto the wall surface than the first coat.
This process, known as feathering, is key to creating a seamless transition. For the final third coat, use an even wider knife (10 or 12-inch) and apply a very thin skim coat, again extending the feathered edge. This meticulous layering is just as important when dealing with unique challenges, like learning how to approach drywall over protruding pipe, to ensure a flawless result.
Step 6: Sanding, Priming, and Painting
After the final coat has thoroughly dried, it’s time for the final touches. Lightly sand the entire area with fine-grit sandpaper (120 or 150-grit) on a sanding block. Your goal is to smooth out any ridges or imperfections, not to remove the compound.
Wipe away all dust with a damp cloth. The final, non-negotiable step is to apply a quality PVA drywall primer. Primer seals the porous joint compound and ensures your paint will have an even sheen and color. Once primed, you’re ready to paint and admire your perfectly finished, durable drywall edge.
Dodging Common Disasters: Mistakes to Avoid
Even with the right steps, a few common mistakes can derail your project. Being aware of these pitfalls can save you from a lot of frustration and rework.
Not Using a Bead at All
As discussed, the most frequent error is attempting to finish a raw edge with only mud and tape. This will never create a durable or crisp corner. Always use a dedicated product like L-bead or J-bead to protect the edge.
Using Too Much Mud
Piling on thick layers of joint compound will create a noticeable hump on the wall. The key is to apply multiple thin coats, feathering each one progressively wider. This gradually builds the surface for a smooth, invisible blend.
Not Feathering Properly
An abrupt edge where your mud stops is difficult to hide with paint. Always use a wide knife and light pressure on the outer edge of the knife to create a “feathered” transition that melts into the original wall surface. This is what makes the repair disappear.
From Crumbly Mess to Crisp Perfection
Finishing an exposed drywall edge might seem like a small detail, but it makes a huge difference in the overall quality and professionalism of your space. That vulnerable, crumbly edge can be transformed into a sharp, durable, and clean line that looks like it was always meant to be there.
By abandoning the idea of simply mudding the raw edge and instead embracing professional materials like L-bead or J-bead, you are guaranteeing a successful result. Follow the steps of proper installation, careful mudding, and light sanding, and you will achieve a finish that is not only beautiful but built to last.