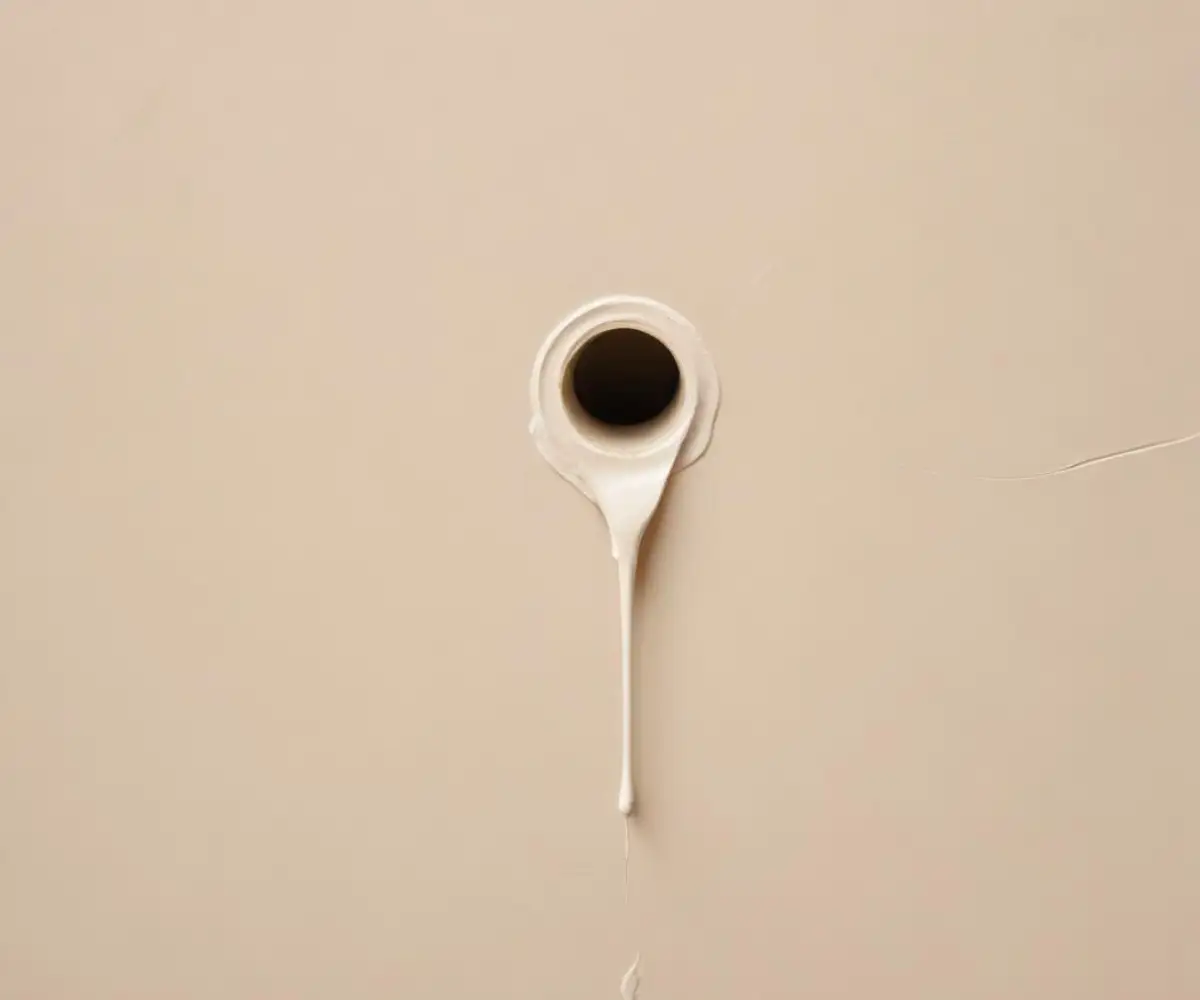
Filling Cable Holes in Exterior Walls? Your Home Is Exposed!
You’ve switched internet providers, ditched the satellite dish, or simply upgraded your system. But what about the ugly, empty holes left behind in your exterior walls? It’s more than just an eyesore; it’s a gaping invitation for serious problems.
That small, seemingly harmless hole is a direct gateway into your home. It compromises your home’s protective envelope, creating a vulnerability that pests, water, and drafts will eagerly exploit. Sealing these penetrations is a critical and simple task that protects your property’s value and structural integrity.
You'll Learn About
Why That Tiny Cable Hole Is a Ticking Time Bomb
Ignoring an old cable hole is a mistake that can cost you dearly. These small openings can lead to a cascade of expensive and frustrating issues that go far beyond simple aesthetics.
A Superhighway for Pests
To an ant, spider, or cockroach, a cable hole is a wide-open front door. They use these easy access points to invade your home, seeking shelter and food. In some cases, even small rodents can chew these holes wider to create a convenient entry point.
The Silent Threat of Water Damage
Rainwater doesn’t need much space to find its way inside your walls. Water seeping through a cable hole can saturate insulation, degrade wooden studs, and lead to widespread rot. This moisture is the perfect breeding ground for mold and mildew, which can cause serious health issues and costly remediation.
If you ever notice that your interior drywall moves when pushed, it could be a sign that moisture from an exterior breach has already caused significant damage within the wall cavity. Don’t wait for the problem to reach this stage.
Skyrocketing Energy Bills
Your home’s exterior wall is also a thermal barrier. Every unsealed hole allows conditioned air to escape and outside air to infiltrate. This creates drafts and forces your heating and cooling systems to work harder, leading to a noticeable increase in your monthly energy bills.
Choosing the Right Sealant: Your First Line of Defense
The success of your repair hinges on selecting the correct product. Using interior-grade filler on an exterior wall is a guaranteed failure. You need a material specifically designed to withstand temperature fluctuations, UV radiation, and moisture. Understanding the options is key to a permanent, weatherproof seal.
Each type of sealant has a specific purpose. Using the wrong one can lead to cracking, poor adhesion, or a seal that fails in the first season. This table breaks down the best choices for the job.
| Sealant/Filler Type | Best For | Flexibility | Paintable? | Key Feature |
|---|---|---|---|---|
| Exterior Silicone Caulk | Small holes (< 1/4″), vinyl siding, around existing wires | High | No (unless specified) | Excellent waterproofing and flexibility. |
| Polyurethane Caulk | Gaps in siding, stucco, and masonry | High | Yes | Extremely durable and adhesive. |
| Exterior Spackle/Epoxy Putty | Medium holes (1/4″ to 1/2″) in wood or composite | Low | Yes | Creates a hard, sandable, and seamless patch. |
| Mortar Repair Sealant | Holes in brick, block, or stone | Medium | Yes (color matching is key) | Textured to blend with masonry surfaces. |
| Stucco Patch | Holes in stucco or EIFS walls | Low | Yes | Can be textured to match the existing finish. |
Step-by-Step Guide: Sealing Cable Holes Like a Pro
With the right material in hand, you’re ready to tackle the job. Following these steps will ensure you create a clean, durable, and virtually invisible repair that permanently protects your home.
Step 1: Safety and Preparation
First, ensure the cable is fully disconnected and there is no electricity running through it. If you are unsure, consult a qualified electrician. Gather your tools: a utility knife, caulk gun or putty knife, wire brush, cleaning cloth, rubbing alcohol, gloves, and safety glasses.
Step 2: Clean and Prep the Hole
A clean surface is non-negotiable for a lasting bond. Use your utility knife to carefully cut away any old, cracked caulk. Remove the old cable if it’s no longer in use. Use a wire brush to scrub away any loose debris, dust, or paint flakes from inside and around the hole.
Finally, wipe the area with a cloth dampened with rubbing alcohol to remove any residual grime or oils. Allow it to dry completely before proceeding.
Step 3: Use a Backer for Larger Holes
For holes wider than a pencil, don’t just pump them full of sealant. This is wasteful and often results in a sunken, ineffective patch. A pro trick is to use a filler material first.
You can gently push a small piece of foam backer rod into the opening, leaving a recess for the sealant. For extra pest deterrence, you can also use a small wad of steel wool, as rodents and insects hate chewing through it.
Step 4: Applying Your Chosen Filler
Now it’s time to seal the opening. The application technique varies slightly depending on your chosen material. No matter what you use, the goal is to force the material deep into the opening for a complete seal.
For caulk or sealant in a tube, cut the nozzle at a 45-degree angle to a size that matches the hole. Puncture the inner seal, then apply steady pressure to force the sealant all the way into the opening until it’s slightly overfilled.
Step 5: Tooling for a Flawless Finish
Immediately after applying the sealant, you need to smooth it for a professional finish. This “tooling” process also ensures the material makes full contact with the edges of the hole. For caulk, you can wet your finger and run it smoothly over the bead.
For epoxy putty or stucco patch, use a flexible putty knife to smooth the material flush with the surrounding wall. Remove any excess product from the wall before it begins to cure.
Step 6: Curing, Sanding, and Painting
Patience is key. Refer to the product’s packaging for specific cure times, which can range from a few hours to a full day. Do not disturb the patch while it cures.
Once fully cured, sandable fillers like epoxy putty can be lightly sanded to be perfectly flush. Finally, use a small brush to apply a dab of your home’s exterior paint over the patch to make it disappear completely.
Tackling Different Exterior Wall Types
Not all walls are the same. The material of your home’s exterior will dictate the best product and technique for a seamless repair.
Filling Holes in Vinyl, Wood, or Fiber Cement Siding
For these materials, flexibility is paramount as siding expands and contracts with temperature changes. A high-quality, paintable polyurethane or elastomeric caulk is the best choice. These products will stretch and move with the siding, preventing the seal from cracking and failing over time.
Patching Holes in Stucco
Stucco requires a different approach. Using caulk will leave an obvious smooth spot that doesn’t match the wall’s texture. You must use a dedicated acrylic stucco patch compound.
After filling the hole, you can replicate the surrounding texture. While the patch is still wet, use a stiff-bristled brush or a damp sponge to dab at the surface, blending it into the existing stucco finish.
Sealing Gaps in Brick or Masonry
For brick and mortar, the ideal solution is a textured mortar repair sealant that comes in a caulking tube. These products are designed to mimic the color and texture of real mortar. After applying, you can use a small trowel or the back of a spoon to shape the sealant to match the surrounding mortar joints.
Common Mistakes to Avoid (And What to Do Instead)
A few common errors can undermine your hard work. Knowing what to watch out for ensures your repair lasts for years.
Mistake 1: Using Interior Products Outdoors
This is the most frequent and fatal flaw in exterior repairs. While you may wonder is spackle toxic for indoor projects, its real danger outdoors is its complete lack of durability. Interior spackle and drywall compound will absorb moisture, crumble, and fall out within months, leaving the hole exposed once again.
Mistake 2: Forgetting to Clean the Area
Dust, cobwebs, and loose paint create a barrier between the sealant and the wall. The new material will stick to the grime, not the structure, leading to premature failure. Always start with a thoroughly clean and dry surface.
Mistake 3: Creating a Divot or a Bulge
It can be tempting to simply smear filler over the hole. Aim to leave the filler slightly overfilled, then tool it down to be perfectly flush with the wall surface. A sunken (concave) patch can trap water, while a bulging (convex) one is just plain ugly.
Complex projects can sometimes lead to unexpected wall penetrations. For instance, if you decide to move your washer and dryer, new holes for vents and plumbing will need to be properly sealed from the start.
A Proactive Approach for Future Installations
You can prevent this problem from happening again. The next time you have a new cable or wire installed, insist that the technician uses a proper wall bushing or feed-through grommet. These are inexpensive plastic or rubber inserts that line the drilled hole.
These devices create a clean, weatherproof, and stable entry point. They protect the cable from chafing against sharp siding or masonry and provide a much better seal against the elements, ensuring you won’t have to deal with another ugly, open hole in the future.
Protect Your Home’s First Line of Defense
Sealing old cable holes is one of the quickest, cheapest, and most effective DIY projects you can do to protect your home. It’s a small task with a huge impact, safeguarding your property from pests, preventing costly water damage, and improving your home’s energy efficiency.
Take a few minutes this weekend to walk around your home’s exterior. Find those forgotten holes from old installations and seal them for good. Your home—and your wallet—will thank you for it.