Faux Wood Paneling 70s: Don’t Rip It Out! Here’s How to Fix It
That wall of dark, grooved faux wood paneling, a hallmark of 1970s design, can feel like a decor dilemma. It often makes rooms feel smaller, darker, and hopelessly trapped in a bygone era. The immediate impulse for many homeowners is a costly and messy tear-out, but that’s not your only option.
The core problem with 70s paneling isn’t always the paneling itself, but rather our modern disconnect with its aesthetic. Understanding what you have and how to work with it can unlock surprising design potential. This guide will explore how to transform this dated feature into a stylish, modern asset.
You'll Learn About
Understanding the Infamous Paneling: More Than Just “Fake Wood”
Before you can devise a plan, it’s critical to understand the material you’re dealing with. The term “faux wood paneling” from the 70s covers a range of products, each with its own unique characteristics that affect how you should treat it. Ignoring this can lead to renovation failures, like peeling paint or wallpaper that won’t stick.
Many homes from this period used thin sheets of plywood or hardboard with a photorealistic wood grain paper laminated on top. This is often the trickiest type to work with, as the surface is non-porous and can be prone to peeling if not prepped correctly. A deeper understanding of its construction is the first step toward a successful update.
Types of 70s Faux Paneling
Most 70s-era faux paneling falls into two main categories: printed hardboard and vinyl-clad plywood. Printed hardboard is essentially a composite wood product with a wood-grain image printed directly onto its surface, often sealed with a thin, glossy topcoat. This type is notoriously resistant to paint adhesion without proper priming.
Vinyl-clad plywood, on the other hand, features a thin layer of wood-patterned vinyl over a plywood backing. While slightly more durable, it presents similar challenges for painting and refinishing. The key to a lasting finish on either type is breaking the slick, non-porous surface barrier to allow primer and paint to grip effectively.
The Great Debate: To Remove or To Remodel?
Removing paneling can seem like the only way to truly modernize a space. However, this process often reveals underlying wall issues, such as damaged drywall or crumbling plaster, which can significantly increase the scope and cost of your project. Before you grab the pry bar, weigh the pros and cons carefully.
Remodeling the existing paneling is a far more budget-friendly approach that minimizes mess and unforeseen repairs. With the right techniques, you can completely change the look and feel of the room without the intensive labor of demolition. This approach also preserves some of the original character, which is becoming a sought-after feature in retro-inspired design.
The Modern Makeover: Your Action Plan for Paneling
Transforming your 70s paneling begins with one crucial step: thorough preparation. A clean, properly prepped surface is the foundation for any successful update, whether you choose to paint, wallpaper, or embrace the retro vibe. Skimping on this stage will almost certainly lead to a disappointing result.
Your goal is to create a surface that new finishes can adhere to permanently. This involves meticulous cleaning to remove decades of grime, followed by strategic sanding and priming. These steps are non-negotiable for achieving a professional, long-lasting look.
Step 1: The Deep Clean
Over the years, faux wood paneling accumulates dust, oils, and residues that can prevent paint from sticking. Start by washing the walls with a solution of trisodium phosphate (TSP) or a strong degreasing cleaner. This will cut through the grime and create a clean slate for the next steps.
Pay special attention to the grooves, where dirt loves to hide. Use a soft brush to gently scrub these areas. After cleaning, rinse the walls thoroughly with clean water and allow them to dry completely before proceeding.
Step 2: Sanding for Success
The glossy finish on most 70s paneling is the primary enemy of good paint adhesion. A light sanding, or “scuffing,” of the entire surface is essential to dull the sheen and create a microscopic texture for the primer to grip. Use a fine-grit sandpaper (150- to 220-grit) and be careful not to sand through the thin wood-grain layer.
After sanding, wipe down the walls with a tack cloth or a damp rag to remove all the dust. This ensures your primer and paint go on smoothly without any gritty imperfections. This small step makes a huge difference in the final quality.
Step 3: The Power of the Right Primer
Do not skip the priming step. A high-quality, stain-blocking, bonding primer is your best friend when dealing with faux wood paneling. Look for a shellac-based or oil-based primer, as these are specifically designed to adhere to slick, non-porous surfaces and prevent any of the old color from bleeding through.
Apply a thin, even coat of primer to the entire wall, including the grooves. Using a brush for the grooves and a roller for the flat surfaces works best. Let the primer dry completely according to the manufacturer’s instructions, which may take up to 24 hours.
Choosing Your Transformation Strategy
Once your walls are cleaned, sanded, and primed, you’re ready for the fun part: the transformation. You have several compelling options, from a simple coat of paint to more creative solutions that can turn your dated walls into a stunning feature. The right choice depends on your style, budget, and the overall aesthetic you want to achieve.
Whether you’re aiming for a bright, modern look or a moody, dramatic space, the paneling can serve as a unique textural backdrop. Consider how the grooves and lines can play into your final design. A little creativity can go a long way.
Solution 1: The Transformative Power of Paint
Painting is the most popular and effective way to update faux wood paneling. A fresh coat of paint can instantly brighten a room and make the paneling’s grooves add a subtle, shiplap-like texture. For a modern farmhouse or coastal vibe, a crisp white or soft off-white is a classic choice.
For a more dramatic and sophisticated look, consider a dark, moody color like charcoal gray, deep navy, or forest green. These colors can turn the paneled wall into a chic accent, especially when paired with modern furniture and metallic accents. Always apply at least two coats of high-quality acrylic latex paint for the best coverage and durability.
Solution 2: Whitewashing for a Rustic Charm
If you like the wood grain but want to lighten the room, whitewashing is an excellent option. This technique involves applying a thinned-down white paint to the paneling, allowing some of the wood grain to show through. The result is a soft, rustic look that feels both fresh and full of character.
To create a whitewash, mix one part white latex paint with one part water. Brush the mixture onto a small section of the wall and immediately wipe most of it off with a clean, dry rag. The amount of paint you leave on will determine the opacity of the finish, so experiment until you find the look you love.
Solution 3: Covering with Wallpaper or Fabric
For those who want to completely hide the paneling and its grooves, wallpaper is a fantastic solution. However, you cannot apply wallpaper directly to the slick paneling. You must first prime the walls and then apply a thick, paintable wall liner.
The wall liner creates a smooth, continuous surface that covers the grooves and provides the perfect base for wallpaper. Once the liner is installed, you can hang any wallpaper you choose, from a bold pattern to a subtle texture. This method offers endless design possibilities and completely erases the 70s vibe.
| Update Method | Average Cost (DIY) | Difficulty Level | Best For |
|---|---|---|---|
| Painting | $100 – $300 | Easy to Moderate | Quickly brightening a room and adding subtle texture. |
| Whitewashing | $75 – $200 | Moderate | Creating a rustic, coastal, or shabby-chic look. |
| Wallpaper over Liner | $250 – $600+ | Moderate to Hard | Completely hiding grooves and introducing bold patterns. |
| Embracing Retro | $50 – $150 | Easy | Leaning into a vintage aesthetic with curated decor. |
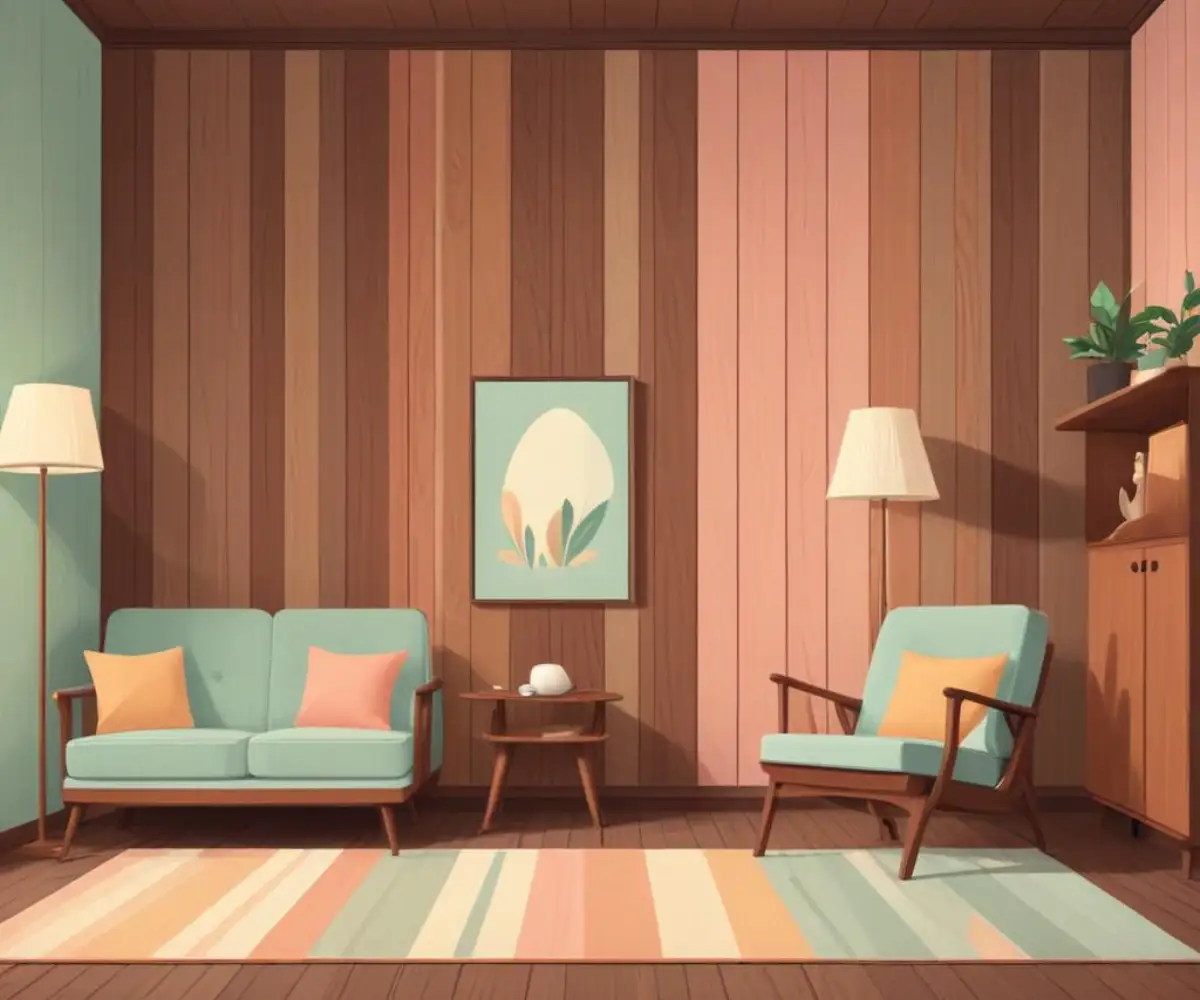
Embracing the Retro: Making 70s Paneling Work for You
Believe it or not, 70s design is making a comeback. Instead of fighting the paneling, you might choose to lean into its retro charm. The key to making this work is to balance the dark wood with bright, modern elements to avoid a dated, museum-like feel.
Pair the paneling with light-colored furniture, vibrant textiles, and plenty of lighting. A large, light-colored area rug can break up the visual weight of the wood. Once the walls are updated, consider new window treatments; comparing options like Select Blinds vs Hunter Douglas can help you find the perfect match to complete the room’s transformation. Adding modern art and live plants can also create a stylish contrast that feels intentional and chic.
Finishing Touches and Room Prep
A successful project involves attention to detail. Before painting, ensure your room is fully prepped. This might include addressing minor repairs, like a stubborn radiator knob that won’t turn, to ensure your workspace is clear and functional. These small fixes prevent bigger headaches later.
If you decide the retro look is for you and want to add more of this classic feature or need to replace a damaged section, you might wonder where to find authentic materials. Our guide on where to buy 70s wood paneling provides a comprehensive list of sources for both vintage and reproduction panels. This can help you fully commit to a cohesive and stylishly retro interior design scheme.
A Modern Approach to a Vintage Problem
Faux wood paneling from the 70s doesn’t have to be a design curse. With proper preparation and a creative approach, it can become a unique and stylish feature in your home. Whether you choose to paint it, whitewash it, or embrace its retro roots, you have plenty of options that don’t involve a costly demolition.
By understanding the material and following a methodical approach, you can successfully update your paneled walls and create a space that reflects your personal style. The key is to see the paneling not as a problem, but as an opportunity for a dramatic and budget-friendly transformation.