False Wall for Shower Pipes: Your Ultimate Guide to a Flawless Finish
Exposed shower pipes can disrupt the clean, seamless look of a modern bathroom. They create visual clutter, collect dust and grime, and can detract from an otherwise beautiful tile job.
This isn’t just an aesthetic issue; it’s a design challenge that leaves many homeowners feeling frustrated. The solution is simpler and more elegant than you might imagine: a false wall.
Building a false wall, also known as a furring wall or a chase wall, is the professional way to conceal plumbing. It creates a perfectly smooth surface ready for tile, transforming your shower into a sleek, high-end space.
You'll Learn About
Why You Should Hide Shower Pipes: It’s More Than Just Looks
Concealing plumbing goes beyond simple aesthetics. While hiding unsightly pipes is the primary motivation, a false wall offers several other significant benefits for your home and comfort.
Firstly, it provides a major acoustic advantage. Water running through pipes, especially in older homes, can be surprisingly loud. A properly constructed false wall, especially with added insulation, can dramatically dampen this noise, leading to a quieter and more peaceful home environment.
Furthermore, a false wall offers a unique design opportunity. The added depth can be used to create a built-in shower niche or shelf. This turns a practical necessity into a high-end feature, perfect for storing shampoos and soaps without the clutter of a shower caddy.
What Exactly Is a False Wall?
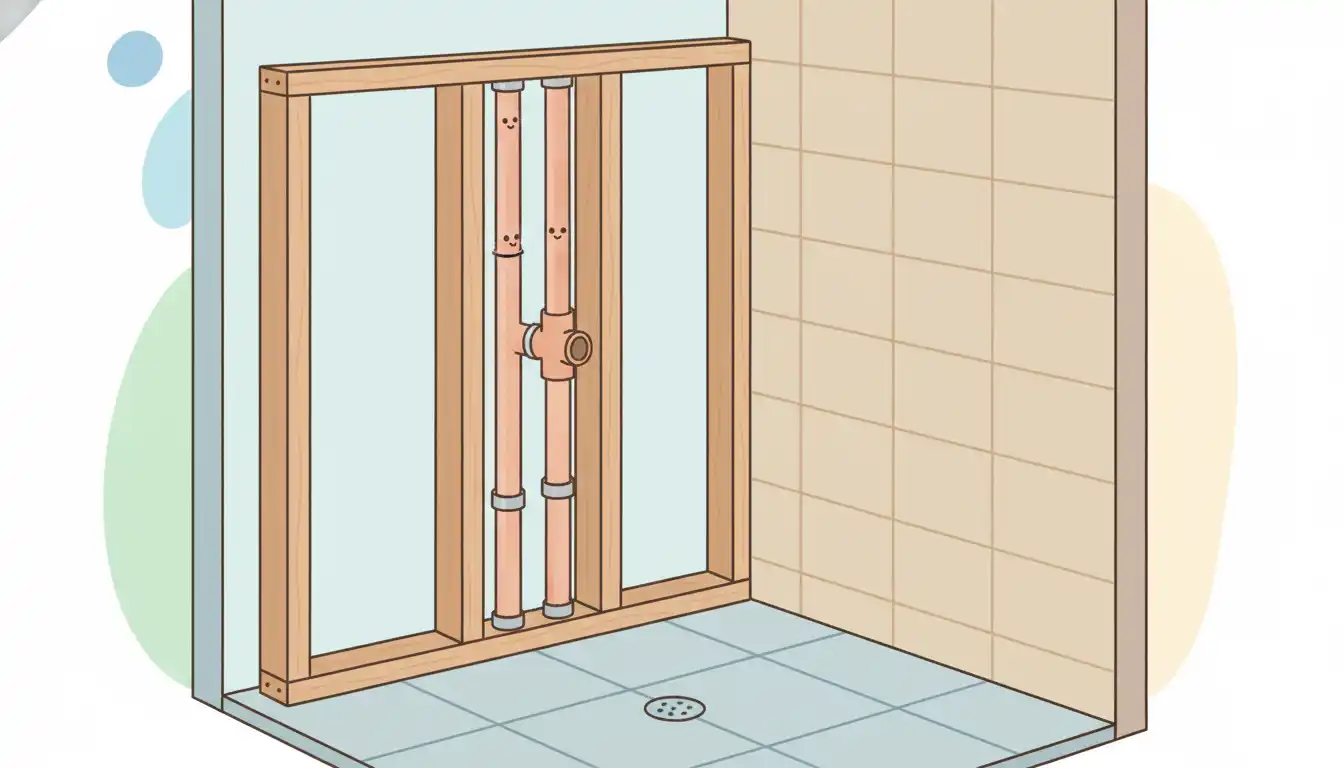
A false wall is a secondary, non-load-bearing wall built directly in front of an existing one. Its sole purpose is to create a cavity to house plumbing, electrical wiring, or other utilities.
Think of it as a slim stud frame covered with a water-resistant substrate. This construction advances the wall surface just enough to hide the pipes completely, typically by a few inches, resulting in a clean, uninterrupted wall surface.
This technique is used by professional builders and remodelers to solve a wide range of design and utility challenges, ensuring a polished and intentional finish in any bathroom renovation.
Planning Your Project: The Blueprint for Success
Before you pick up a single tool, careful planning is essential. Proper preparation ensures your project runs smoothly and meets all safety and durability requirements for a wet environment like a shower.
First, assess the space and the pipes. Measure the depth of the pipes from the existing wall studs to determine the minimum depth of your new wall frame. Always add at least an inch of clearance around the pipes to prevent noise from vibrations and to allow for easy installation.
It’s also a wise time to consider local building codes. While a simple non-load-bearing wall may not always require a permit, any project involving plumbing or electrical modifications often does. Understanding regulations, such as those related to unpermitted electrical work, highlights the importance of ensuring all aspects of your renovation are compliant and safe.
Choosing the Right Materials
The materials you choose are critical to the longevity of your shower wall. This is a high-moisture area, and using standard materials like regular drywall will lead to mold, rot, and catastrophic failure.
For framing, you can use either pressure-treated wood studs or metal studs. Metal studs are an excellent choice as they are perfectly straight and impervious to moisture and rot. For the wall surface, a cement backer board is the industry standard for tile applications in a shower.
Finally, a robust waterproofing strategy is non-negotiable. This involves applying a liquid or sheet membrane over the entire surface of the backer board and all seams before tiling. This creates an impassable barrier, protecting your wall cavity from any water intrusion.
| Material | Primary Use | Pros | Cons |
|---|---|---|---|
| Pressure-Treated Wood Studs | Framing | Easy to work with; strong and durable; moisture resistant. | Can warp if not stored properly; chemicals can be corrosive to some fasteners. |
| Metal Studs | Framing | Perfectly straight; impervious to water, mold, and pests. | Requires different cutting tools (tin snips); can be less rigid than wood. |
| Cement Backer Board | Wall Surface (Substrate) | Extremely durable; will not rot or degrade with water exposure; excellent tile adhesion. | Heavy and can be difficult to cut; dusty when cut. |
| Liquid Waterproofing Membrane | Waterproofing | Easy to apply with a roller or brush; creates a seamless barrier. | Requires multiple coats and proper drying time; thickness must be consistent. |
| Sheet Waterproofing Membrane | Waterproofing | Consistent thickness; can be tiled on immediately after installation. | More expensive; requires careful overlapping of seams to ensure a perfect seal. |
How to Build a False Wall for Shower Pipes: A Step-by-Step Guide
With your planning complete and materials in hand, you are ready to start construction. Follow these steps methodically for a professional and durable result that will stand the test of time.
This process transforms your shower from a space with exposed, distracting pipes to a clean and seamless canvas, ready for the finishing touches that will define your bathroom’s style.
Step 1: Frame the New Wall
The foundation of your false wall is its frame. Start by cutting a bottom plate (sole plate) and a top plate from your chosen stud material to the desired length of the wall.
Lay them on the floor and mark the locations for your vertical studs, typically every 16 inches on center. Ensure your layout provides ample clearance around all plumbing pipes. Assemble the frame on the floor before lifting it into place.
Step 2: Secure the Frame
Position the assembled frame in your shower, pressing it against the existing wall. Use a level to ensure it is perfectly plumb (vertically straight) before securing it.
Fasten the top plate into the ceiling joists and the sole plate into the subfloor using appropriate screws. Finally, secure the end stud of your new frame to the studs of the existing wall to create a rigid and stable structure.
Step 3: Plan for Future Access
This step is often overlooked but is critically important. Before you close up the wall, think about future access to shut-off valves or cleanouts. Framing an opening for a plumbing access panel is a professional touch that you will be grateful for if a leak ever occurs.
You can buy pre-made access panels that sit flush with the tile or create a custom removable panel. This small bit of foresight can save you from having to tear out a brand-new tile wall down the road.
Step 4: Install the Cement Backer Board
With the frame secure, it’s time to install the wall surface. Cut your cement backer board to size using a utility knife and a straight edge or a specialized shear.
Attach the backer board to the studs using corrosion-resistant screws designed for this purpose. Drive the screws so they are slightly below the surface of the board, ensuring a flat plane for your waterproofing membrane and tile.
Step 5: Waterproofing: The Most Critical Step
Do not skip this step. A waterproof barrier is essential for preventing water from reaching the wall cavity and causing mold and structural damage. Apply your chosen liquid or sheet membrane according to the manufacturer’s instructions.
Pay special attention to all seams, corners, and screw heads. Apply seam tape to all joints in the backer board before applying the membrane to prevent cracks from forming later. The goal is to create a monolithic, waterproof shell.
Step 6: Finish the Wall
Once the waterproofing membrane has fully cured, you are ready for the final, transformative step: tiling. You can now tile directly onto the waterproofed surface just as you would any other shower wall.
After the tile and grout have been installed and sealed, your project is complete. You will have successfully hidden your shower pipes inside a durable, waterproof, and beautiful new wall, achieving a truly professional finish.
Level Up: Turn Your False Wall into a Custom Shower Niche
The space created by your false wall is a golden opportunity for a functional upgrade. Instead of building a simple flat wall, you can easily frame a recessed shower niche within the new stud cavity.
A built-in niche provides a sleek, integrated storage solution for soaps and bottles, eliminating the need for aftermarket shower caddies. It’s a high-impact design feature that adds significant value and a custom look to your bathroom. Simply frame a box between two studs within your new wall before installing the backer board and be sure to waterproof it meticulously.
This approach takes a problem—exposed pipes—and turns it into one of your bathroom’s best features. It’s an intelligent use of space that separates a standard renovation from a truly thoughtful one, much like adding the right trim for a tongue and groove ceiling can elevate a room’s entire design.
Common Mistakes to Avoid at All Costs
Building a false wall in a shower is a straightforward project, but a few key mistakes can lead to major problems. Avoiding these common pitfalls is essential for a successful and long-lasting installation.
The most severe error is inadequate waterproofing. Even a tiny gap or pinhole in the membrane can allow water to penetrate the wall cavity, leading to hidden mold growth and rot that can compromise your home’s structure. Be meticulous and thorough during this stage.
Another frequent mistake is using the wrong materials. Never use standard or even moisture-resistant “greenboard” drywall as a tile substrate in a shower. It will degrade over time when exposed to moisture. Stick to cement backer board or other approved tile substrates for wet areas.
Finally, don’t forget to allow enough clearance around the pipes. Pipes that are touching the framing can cause rattling noises and may not have enough room for insulation. Proper planning prevents these easily avoidable annoyances.
Frequently Asked Questions (FAQ)
Here are answers to some of the most common questions homeowners have when considering a false wall for their shower pipes.
How much space will a false wall take up?
The final depth depends on your plumbing, but a false wall typically adds between 3 to 5 inches to the wall’s thickness. This is a small price to pay for the immense visual and functional improvement it provides.
Can I build a false wall myself?
Yes, this is a very manageable project for a homeowner with basic framing and tiling skills. The key is to be precise in your measurements and extremely thorough with the waterproofing stage. Owning the right tools, whether for this project or for maintaining outdoor equipment like an Ariens ST 2+2, is part of being a prepared DIYer.
Do I need a permit to build a false wall?
This depends on your local municipality. If you are only building the wall and not altering the plumbing itself, a permit may not be required. However, if you are moving pipes or adding new electrical components, you will almost certainly need one. Always check with your local building department before starting work.
A Clean Solution for a Modern Bathroom
A false wall is more than just a cover-up for ugly pipes; it is a fundamental component of high-quality bathroom construction. It solves an aesthetic problem while offering acoustic benefits and opportunities for custom features like built-in niches.
By following a careful process of planning, using the right materials, and focusing on meticulous waterproofing, you can achieve a flawless, professional result. This project will dramatically elevate the look and feel of your shower, turning a cluttered and unfinished space into a clean, quiet, and beautiful retreat.