Failed Your HERS Test? Don’t Panic—Here’s Your Ultimate Fix-It Guide
That sinking feeling after a certified rater tells you your home failed its Home Energy Rating System (HERS) test is something many homeowners experience. But it’s not a verdict on your home’s quality; it’s a roadmap for improvement. A failed HERS test simply means your home isn’t meeting specific energy efficiency standards, often required for new construction, renovations, or HVAC replacements.
This result is an opportunity to create a more comfortable, cost-effective, and environmentally friendly living space. Understanding why your home failed and how to address the issues is the first step toward turning that failure into a major win for your household budget and comfort. Think of it less as a failure and more as a detailed diagnostic report for your home’s performance.
You'll Learn About
What is a HERS Test and Why Does It Matter?
A HERS test is a comprehensive assessment of your home’s energy efficiency, conducted by a certified HERS Rater. This professional inspector evaluates various components of your house to see how well it contains conditioned air and how efficiently its systems operate. Key areas of inspection typically include your HVAC system, ductwork, insulation, windows, doors, and overall building airtightness.
The process often involves a blower door test, which depressurizes the house to identify air leaks, and a duct blaster test to measure leakage in your HVAC ductwork. The final result is a HERS Index Score. A lower score is better, indicating a more energy-efficient home. A standard new home built to 2006 energy codes is the baseline with a score of 100.
Passing a HERS test is often a mandatory step to close out building permits, especially in states with stringent energy codes like California’s Title 24. A good score can also increase your home’s resale value, lead to lower utility bills, and ensure a more comfortable indoor environment by eliminating drafts and temperature inconsistencies.
The Heart of the Matter: Understanding the Blower Door Test
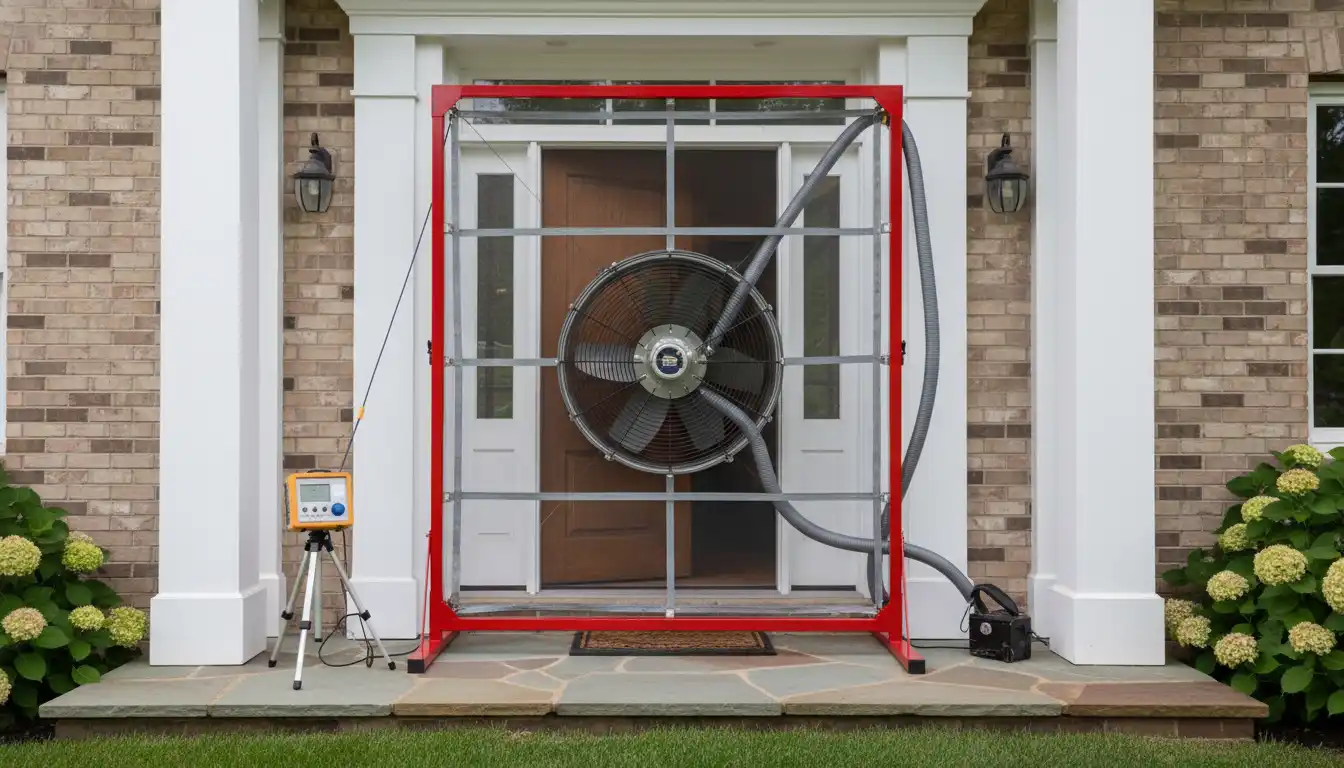
One of the most critical components of a HERS rating is the blower door test. This diagnostic tool is the primary method for measuring your home’s airtightness. A powerful, calibrated fan is mounted into the frame of an exterior door to pull air out of the house, lowering the air pressure inside.
The higher outside air pressure then flows in through all unsealed cracks and openings, revealing the sources of energy loss. The rater uses the fan’s measurements to determine an “Air Changes per Hour” (ACH) value, which quantifies how leaky your home is. This single test is often the biggest hurdle for homeowners to pass their HERS inspection.
The Most Common Culprits Behind a Failed HERS Test
When a home fails its HERS test, the cause can almost always be traced back to a few key areas. These are the weak points in a home’s “building envelope”—the physical barrier between the conditioned interior and the unconditioned exterior. Identifying these problem spots is the first step toward an effective solution.
Think of your home as a bubble. Any hole in that bubble compromises its integrity. A HERS test is designed to find every one of those holes, no matter how small.
Problem 1: The Building Envelope Air Leaks
Air leakage is the number one reason for failing a blower door test. These leaks are often found in predictable, yet easily overlooked, places throughout the home’s structure. Conditioned air escapes, and unconditioned air enters, forcing your HVAC system to work much harder than necessary.
These are not just the obvious gaps under doors. Leaks hide in wall cavities, attic floors, and around foundational elements, silently draining your energy budget month after month. The cumulative effect of dozens of tiny leaks can be as significant as leaving a window open all year long.
Common Leakage Hotspots:
- Recessed Lighting: Older-style recessed “can” lights in ceilings are notoriously leaky, creating a direct path for air to travel into the attic.
- Attic Access Hatches: Without proper weatherstripping and insulation, the attic hatch is essentially a huge hole in your ceiling.
- Rim Joists: The area in the basement or crawlspace where the foundation meets the wooden frame of the house is a major source of air infiltration.
- Plumbing and Electrical Penetrations: Gaps around pipes, wires, and vents that pass through walls, floors, and ceilings are prime spots for air leaks.
- Windows and Doors: Worn or missing weatherstripping and improper caulking around frames create significant drafts.
Problem 2: Leaky and Inefficient Ductwork
Your ductwork is the circulatory system for your home’s heating and cooling. If it’s leaky, you’re paying to heat and cool your attic, crawlspace, or the spaces inside your walls. The HERS rater performs a “duct blaster” test to pressurize the duct system and measure the extent of any leaks.
Even small leaks in the duct system can have a massive impact. It is estimated that the typical home loses 20 to 30 percent of the air that moves through the duct system due to leaks, holes, and poor connections. This forces your HVAC system to run longer and harder, increasing wear and tear and spiking your energy bills.
Problem 3: Insufficient or Poorly Installed Insulation
Insulation’s job is to resist the flow of heat. A failed HERS test can indicate that your home’s insulation is not performing as it should. This might not be about the amount of insulation, but rather its quality of installation.
Gaps, voids, and compressed insulation create thermal bridges, which are pathways for heat to bypass the insulation entirely. A certified HERS rater will perform a visual inspection, particularly in the attic, to check for consistent depth and proper coverage, especially around eaves and corners.
Your Action Plan: A Step-by-Step Guide to Passing the Retest
Failing the test is disappointing, but the path forward is clear. The detailed report from your HERS rater is your guide. Focus your efforts on the areas identified in the report for the most significant impact and the highest chance of passing your retest.
A systematic approach is key. Tackle the easiest and most cost-effective fixes first to build momentum. Many of the necessary repairs are well within the capabilities of a determined DIYer.
Step 1: Become an Air Leak Detective
The most effective way to find leaks is to have the rater show you the problem areas while the blower door fan is running. You can often feel the drafts with your hands. For a DIY approach, you can use a smoke pencil or incense stick on a windy day to see where the air is moving near common leak points.
Focus your sealing efforts on the “top plate” and “bottom plate” of your walls. This means sealing all penetrations in the attic floor and in the subfloor of your basement or crawlspace. Use high-quality caulk for smaller gaps and expanding foam sealant for larger openings around pipes and wiring.
Don’t forget the attached garage. The wall between the garage and the house is a critical air barrier. Ensuring your garage is sealed properly is vital, which involves checking everything from the drywall to the hardware on the main door, like the condition of its appliance garage hinges, to ensure a tight fit.
Step 2: Seal Your Ductwork Thoroughly
If your ductwork failed, this is a non-negotiable fix. Access the ducts in your attic, crawlspace, or basement. Visually inspect every connection, seam, and joint. Even if they look connected, they can still leak air.
Use mastic sealant or foil tape specifically designed for HVAC use to seal all seams and connections. Do not use standard “duct tape,” as the adhesive will dry out and fail over time. Paint the mastic on generously over every connection point, including where the ducts connect to the main unit and where the boots connect to the floor, wall, or ceiling vents.
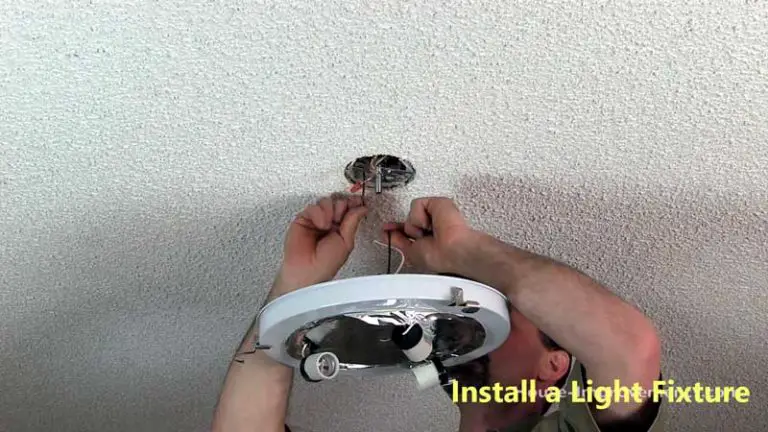
Step 3: Upgrade and Perfect Your Insulation
Look in your attic. Is the insulation level and evenly distributed? Can you see the tops of the ceiling joists? If so, you likely need more insulation. The goal is to create a thick, continuous blanket with no gaps.
Pay special attention to areas around soffit vents, ensuring there are baffles to prevent insulation from blocking airflow while still covering the top plate of the wall. Also, ensure the attic access panel is insulated with a piece of rigid foam board and weatherstripped to create an airtight seal.
| Problem Area | DIY Solution | Professional Solution | Estimated Impact on HERS Score |
|---|---|---|---|
| Building Envelope Leaks | Caulk and weatherstrip windows/doors. Use expanding foam for gaps around pipes and wiring. Seal attic air leaks. | Professional air sealing service using diagnostic tools like blower doors and infrared cameras. | High (10-30 points) |
| Duct Leakage | Seal all accessible duct seams and joints with mastic sealant or foil tape. | Professional duct sealing (Aeroseal process) that seals the system from the inside. | High (10-25 points) |
| Insufficient Insulation | Add blown-in insulation to the attic to achieve recommended R-values. Insulate rim joists. | Full insulation upgrade, including blown-in for attics and dense-packing for walls. | Medium (5-15 points) |
| Inefficient Appliances | Replace old appliances with ENERGY STAR certified models as they wear out. | Strategic replacement of major systems like HVAC and water heaters with high-efficiency units. | Low to Medium (2-10 points) |
Step 4: Consider Your Home’s Systems and Appliances
While not always a direct cause of failure, inefficient systems contribute to a higher HERS score. Your home’s energy use is a holistic calculation. High-consumption appliances add to the overall energy load, which is factored into the rating.
When it’s time to replace a major appliance, choosing an ENERGY STAR certified model can make a difference. This applies to everything from your furnace to your refrigerator. If you find your Liebherr ice maker not working, it might be a sign that the appliance is aging and losing efficiency, contributing to your home’s overall energy consumption.
Even your choice of washing machine matters. When shopping for replacements, considering the most efficient options is a smart long-term strategy. Exploring options like those on the secondary market requires diligence, but resources on how to navigate marketplace washers can help you find an energy-efficient gem.
Beyond the Fixes: The Long-Term Value of a Low HERS Score
Passing your HERS test is more than just a requirement to get a certificate of occupancy. It’s an investment in the long-term health and value of your home. The improvements made to pass the test will pay dividends for years to come.
You will enjoy a home that is less drafty, more comfortable in every season, and has better indoor air quality because uncontrolled air leaks are sealed. Most importantly, you will see a tangible reduction in your monthly energy bills. A home that has transformed a failed HERS test into a passing score is a high-performance machine, operating at peak efficiency.
This efficiency is a powerful selling point. As energy costs continue to rise, a documented low HERS score becomes an increasingly valuable asset, proving to potential buyers that your home is not only beautiful but also smart and affordable to operate.