Exterior French Door Trim: Stop Rot & Boost Curb Appeal
That elegant trim around your exterior French doors does more than just frame a beautiful view. It’s your home’s first line of defense against weather, moisture, and pests, playing a crucial role in both curb appeal and structural integrity. When this critical barrier fails, it’s not just an eyesore; it’s an open invitation for serious problems.
Neglected or damaged trim can lead to costly water damage, energy loss, and even pest infestations. Understanding the causes of failure and how to properly select, install, and maintain your trim is essential for protecting your investment and keeping your home looking its best.
You'll Learn About
Why Your Exterior French Door Trim Is More Than Just a Frame
Think of your exterior trim as the guardian of your French doors. Its most obvious job is aesthetic—creating clean lines and adding architectural character that boosts your home’s curb appeal. The right trim can transform a simple doorway into a grand entrance.
Beyond its good looks, trim serves a vital protective function. It seals the gap between the door frame and your home’s siding, blocking out rain, wind, and snow. A properly installed and sealed trim prevents drafts, which helps maintain your home’s energy efficiency and keeps heating and cooling costs down.
The Silent Killers: Common Problems with Exterior Trim
Exterior trim faces a constant battle with the elements. Over time, even the most durable materials can fail if not properly maintained, leading to issues that can compromise your home’s structure.
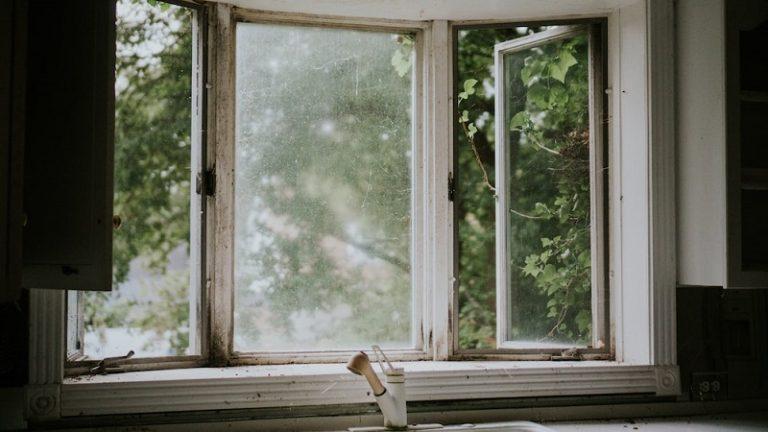
Problem #1: Wood Rot and Water Damage
The number one enemy of exterior wood trim is moisture. Small cracks in the paint or gaps in the caulking can allow water to seep in, creating the perfect environment for wood rot and mold growth. This not only destroys the trim itself but can spread to the door frame and surrounding wall structure, leading to extensive and expensive repairs.
Problem #2: Pest Infestations
Damaged or rotting wood trim is an open invitation for insects like termites and carpenter ants. These pests can quickly move from the trim into your home’s framing, causing widespread structural damage that often goes unnoticed until it becomes a major problem.
Problem #3: Peeling Paint and Fading Style
Constant exposure to sun, rain, and temperature fluctuations takes a toll on your trim’s finish. Peeling, cracking, or fading paint is more than just a cosmetic issue; it’s a sign that the protective barrier has been breached, leaving the underlying material vulnerable to moisture and decay.
An outdated trim style can also significantly date your home’s appearance. What was fashionable a decade ago may now detract from your home’s overall aesthetic, making an update a powerful way to refresh your curb appeal.
Problem #4: Energy Loss from Poor Seals
Gaps between the trim and the door frame or siding create pathways for air leakage. These drafts can make your home less comfortable and force your HVAC system to work harder, resulting in higher energy bills year-round. Resealing or replacing failing trim is a simple way to improve energy efficiency.
Choosing Your Armor: The Best Materials for Exterior French Door Trim
Selecting the right material for your exterior trim is crucial for long-term performance and durability. The best choice depends on your climate, budget, and desired level of maintenance. Consider the pros and cons of each option to find the perfect fit for your home.
| Material | Pros | Cons | Best For |
|---|---|---|---|
| Wood | Classic, natural look; highly customizable with paint or stain. | Requires regular maintenance; susceptible to rot and pests. | Historic homes and homeowners who prefer a traditional aesthetic. |
| PVC (Vinyl) | Low maintenance; resistant to moisture, rot, and insects; durable. | Can expand/contract with temperature changes; higher initial cost. | Wet climates and homeowners seeking a long-lasting, low-upkeep solution. |
| Composite | Durable and stable; resists moisture and rot; often made from recycled materials. | Can be more expensive; limited style options compared to wood. | Modern homes and eco-conscious homeowners. |
| Fiber Cement | Extremely durable; resistant to fire, insects, and rot; holds paint well. | Heavy and can be difficult to install; requires special tools. | Homeowners prioritizing maximum durability and fire resistance. |
Wood Trim: The Classic Choice
Wood offers a timeless, traditional look that is hard to replicate. It can be painted or stained to match any style and is easily shaped for custom designs. However, wood requires consistent maintenance, including regular painting and sealing, to protect it from moisture and prevent rot.
PVC Trim: The Low-Maintenance Champion
PVC trim is a synthetic plastic material that is impervious to moisture, rot, and insects. It’s an excellent long-term investment for homeowners who want durability without the hassle of frequent upkeep. While the initial cost may be higher than wood, its longevity and low maintenance can lead to significant savings over time.
Composite & Fiber Cement: The Durable Hybrids
Composite trim, made from a mix of wood fibers and plastic, and fiber cement trim offer the best of both worlds. They provide the look of wood with enhanced durability and resistance to the elements. These materials are a great choice for harsh climates where wood might quickly fail.
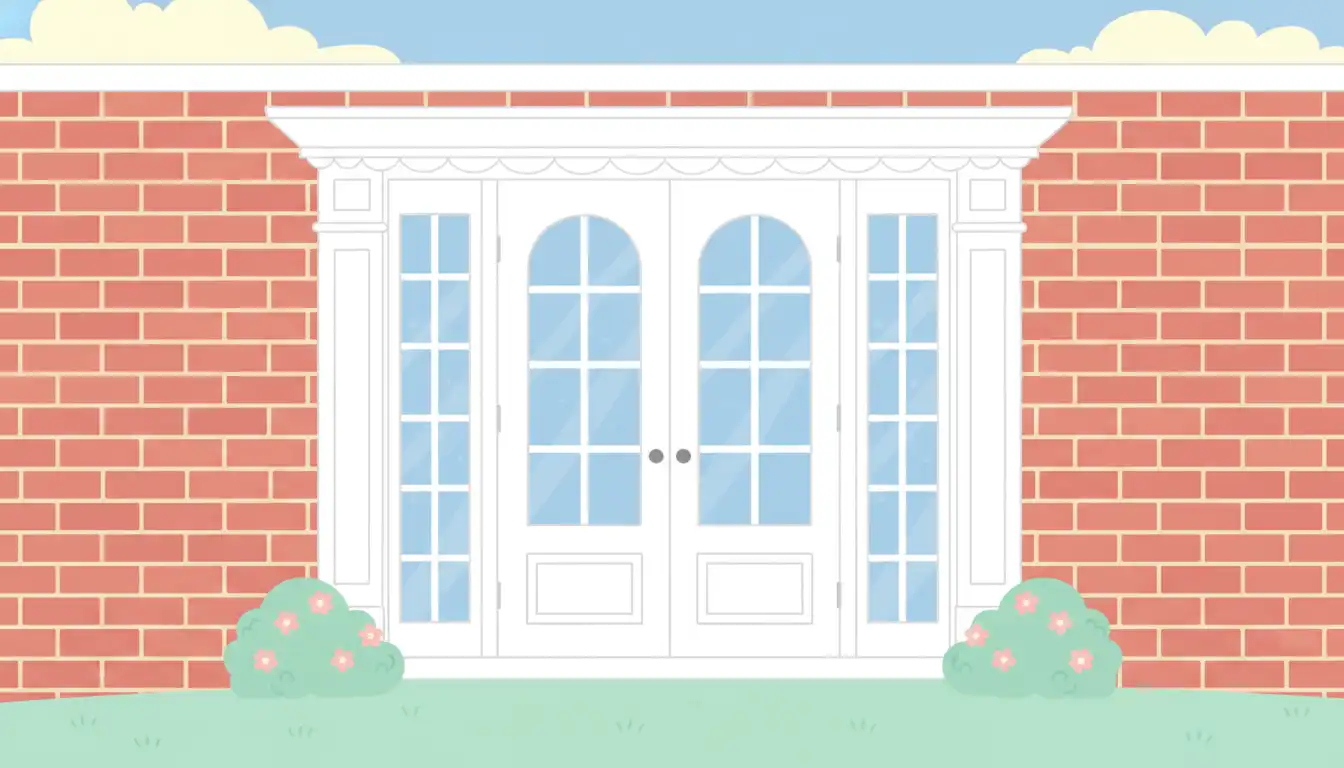
A Style That Speaks: Matching Trim to Your Home’s Architecture
The style of your trim should complement your home’s architectural design. From simple and modern to ornate and traditional, the right trim enhances your home’s character and creates a cohesive look.
Modern and Minimalist
For modern or contemporary homes, choose a simple, flat-stock trim with clean lines. A mitered corner, where the two pieces meet at a 45-degree angle, creates a sleek and seamless frame around the door.
Colonial and Traditional
Colonial or traditional homes benefit from more detailed trim profiles. Consider a butted casing, where a thicker header piece sits on top of the side casings, creating a layered, substantial look that adds depth and character.
Craftsman and Rustic
Craftsman-style homes are known for their robust and straightforward design. Thick, flat boards with a simple, overhanging header or shelf reflect the style’s emphasis on natural materials and handcrafted quality.
The Ultimate Fix: A Step-by-Step Guide to Replacing Your Trim
Replacing exterior door trim is a manageable DIY project that can dramatically improve your home’s look and protection. Following these steps ensures a professional, weather-tight finish.
Step 1: Safety and Preparation
Before you begin, gather your tools: a pry bar, hammer, utility knife, measuring tape, and a miter saw. Wear safety glasses to protect your eyes from debris. Clear the area around the door to give yourself plenty of room to work.
Step 2: Removing the Old Trim
Use a utility knife to carefully score the caulk lines along the edges of the old trim. This will prevent damage to the siding and door frame. Gently work a pry bar behind the trim and carefully pull it away from the wall.
Step 3: Inspecting and Repairing the Door Frame
This is the most critical step. Once the old trim is removed, thoroughly inspect the underlying door frame and sheathing for any signs of water damage or rot. Many homeowners make the mistake of simply covering up existing problems, but this will only lead to more significant issues later. If you find soft or discolored wood, you must remove the rotted material and repair the area before proceeding.
Step 4: Measuring and Cutting the New Trim
Measure the height of the sides and the width of the top of the door frame. Cut your new trim pieces to size using a miter saw for clean, accurate cuts. For a standard frame, the top corners will be cut at a 45-degree angle.
Step 5: Installation and Fastening
Apply a bead of construction adhesive to the back of each trim piece. Position the side pieces first, then the top piece. Secure the trim to the frame using galvanized finishing nails, which are resistant to rust.
Step 6: Sealing and Finishing for a Weatherproof Barrier
This final step is essential for protecting your work. Apply a high-quality, exterior-grade silicone caulk to all seams—where the trim meets the siding and where it meets the door frame. Once the caulk is dry, paint the trim with a durable exterior paint to provide a final layer of protection against the elements.
Avoiding Future Disasters: Long-Term Maintenance Tips
Proper maintenance is key to extending the life of your new trim and preventing future problems. A little proactive care can save you from costly repairs down the road.
Inspect your trim at least twice a year, paying close attention to the caulk lines and paint. Look for any cracks, gaps, or signs of peeling. If you have an older door, you may also want to check for issues like a need for french door plastic insert replacement to ensure the entire unit is properly sealed.
Re-caulk any gaps immediately to prevent water intrusion. Touch up any chipped or peeling paint to maintain a continuous protective seal. Regular cleaning with mild soap and water can also prevent dirt and mildew buildup, keeping your entryway looking fresh and inviting.
Frequently Asked Questions About Exterior French Door Trim
Here are answers to some common questions homeowners have about their exterior door trim.
What is the best material for exterior trim in a wet climate?
In wet or humid climates, PVC is the superior choice for exterior trim. Unlike wood, it does not absorb moisture, making it completely resistant to rot, mold, and insect damage. Its durability ensures a long-lasting, low-maintenance solution that stands up to constant exposure to rain and humidity.
How much does it cost to replace exterior door trim?
The cost to replace exterior door trim can vary widely based on material and labor rates. On average, materials can range from $1 to $10 per linear foot. Professional installation typically costs between $125 and $175 per door, with labor accounting for a significant portion of the total expense.
Can you install trim over brick?
Yes, you can install trim over brick, but it requires a different approach. The trim must be attached to a wood frame (called a buck) that is first securely fastened to the brick. This ensures a stable and weather-tight installation.
Your exterior French door trim is a small detail that makes a big impact. By choosing the right materials and performing regular maintenance, you can protect your home, boost your curb appeal, and ensure your entryway remains beautiful and secure for years to come. Even small details, like ensuring you don’t have a dangerous step up into your front door, contribute to a safe and welcoming entrance.