Extending Shower Space? Your Ultimate Guide to a Bigger, Better Bathroom
That cramped, elbow-bumping shower stall you tolerate every morning doesn’t have to be permanent. Many homeowners dream of a spacious, spa-like shower but feel constrained by their bathroom’s current footprint. Extending a shower is one of the most impactful upgrades you can make, transforming a purely functional space into a luxurious retreat.
This project is more than just a simple fixture swap; it involves careful planning around plumbing, structure, and waterproofing. However, with the right approach, you can create a shower that adds daily comfort and significant value to your home. This guide will walk you through the problems you might face and the expert solutions required for a successful shower extension.
You'll Learn About
Why Extend Your Shower? The Benefits Beyond Extra Elbow Room
The primary motivation for extending a shower is gaining more space, but the advantages go much deeper. A larger shower enclosure opens up a world of possibilities for comfort, accessibility, and modern design features that smaller stalls simply cannot accommodate.
Upgrading to a larger shower can dramatically improve your daily routine, providing a more relaxing and open feeling. It also allows for the integration of luxury features like built-in benches, multiple shower heads, and even steam systems, turning your bathroom into a personal spa. Furthermore, a spacious, well-designed shower is a major selling point that boosts your home’s overall market value.
Creating a More Accessible Space
One of the most significant benefits of a shower extension is the ability to incorporate universal design principles. As homeowners plan to age in place, accessibility becomes crucial. A larger footprint allows for a curbless, or zero-entry, shower floor which eliminates tripping hazards.
This design is not only safer for those with mobility challenges but also creates a sleek, seamless look in the bathroom. There’s also ample room to add a comfortable bench and strategically placed grab bars, ensuring the shower is safe and usable for everyone, regardless of age or physical ability.
Before You Begin: Critical Planning for Your Shower Expansion
Jumping into demolition without a solid plan is a recipe for disaster and budget overruns. Before a single tile is removed, a thorough assessment of your existing bathroom is essential. This planning phase involves evaluating the layout, understanding potential hidden obstacles, and creating a realistic budget.
Proper planning is the foundation of a successful renovation. It helps you anticipate challenges, make informed decisions about materials and professionals, and ensures the final result matches your vision and functional needs. Skipping this step often leads to costly surprises and compromises down the line.
Assessing Your Bathroom Layout and Potential Space
The first question to answer is: where will the extra space come from? Often, the easiest source is an underutilized adjacent linen closet or by reconfiguring the bathroom’s existing layout, perhaps by removing a bulky, seldom-used bathtub. In some cases, it might be possible to “borrow” a few feet from a neighboring bedroom.
Use painter’s tape on the floor to mark out the proposed new dimensions of your shower. This simple visualization trick helps you understand how the larger shower will impact traffic flow and the placement of other fixtures like the toilet and vanity. Ensure there is still adequate clearance around all elements.
The Unseen Obstacles: Plumbing, Structural, and Electrical Hurdles
What lies behind the walls and under the floor will have the biggest impact on your project’s complexity and cost. The single most challenging aspect of extending a shower is often moving the drain. This is especially true on a concrete slab foundation, which requires jackhammering to access the pipe below. Even with a wood subfloor, rerouting the drain means cutting into joists and ensuring the new pipe has the correct slope for proper drainage.
If your expansion plans involve moving walls, you must first determine if they are load-bearing. Removing or altering a load-bearing wall without proper support can compromise your home’s structural integrity and requires consultation with a structural engineer. Finally, consider electrical needs for new lighting inside the shower or a high-powered fan to handle the increased steam from a larger space. If you’re considering a steam shower, you’ll need a dedicated circuit for the generator, a decision that pits top brands against each other in the Mr Steam vs ThermaSol debate.
Budgeting for Your Bigger Shower: A Realistic Cost Breakdown
Understanding the potential costs is vital before you commit to the project. While a final price depends heavily on your location, material choices, and labor rates, a detailed budget will help you manage expenses. Be sure to include a contingency fund of 15-20% to cover unexpected issues that may arise during demolition.
Below is a table outlining the typical cost ranges for the key components of a shower extension project. This breakdown will help you allocate your budget effectively and identify areas where you might save or decide to splurge.
| Item/Phase | Average Cost Range (USD) | Key Considerations |
|---|---|---|
| Demolition | $400 – $1,500 | Includes removal of old shower, tile, and drywall. DIY can save money here. |
| Framing & Structural | $700 – $2,500 | Cost increases significantly if a load-bearing wall is moved. |
| Plumbing Rough-In | $1,000 – $3,000+ | Moving a drain on a concrete slab is at the higher end of this range. |
| Waterproofing System | $500 – $1,200 | Crucial step. Includes membrane, backer board, and sealant. Do not cut corners here. |
| Tile & Installation | $1,500 – $5,000+ | Highly variable based on tile material (ceramic, porcelain, natural stone) and complexity. |
| Glass Enclosure/Door | $800 – $3,000 | Frameless doors and custom glass sizes are more expensive. |
| Fixtures (Valve, Head) | $400 – $2,000+ | Costs rise for multiple shower heads, body sprays, or thermostatic valves. |
| Labor (General) | $3,000 – $8,000 | Represents a significant portion of the budget. Varies by region and contractor. |
The Step-by-Step Process of Extending a Shower
Once planning is complete, the physical work begins. A shower extension is a multi-stage process that requires precision at every step, from demolition to the final bead of caulk. Understanding the sequence of events is crucial for homeowners managing the project or for those who want to be informed when working with a contractor.
Each phase builds upon the last, and mistakes made in early stages can cause major problems later. This is especially true for framing and waterproofing, which form the invisible backbone of a durable, leak-free shower.
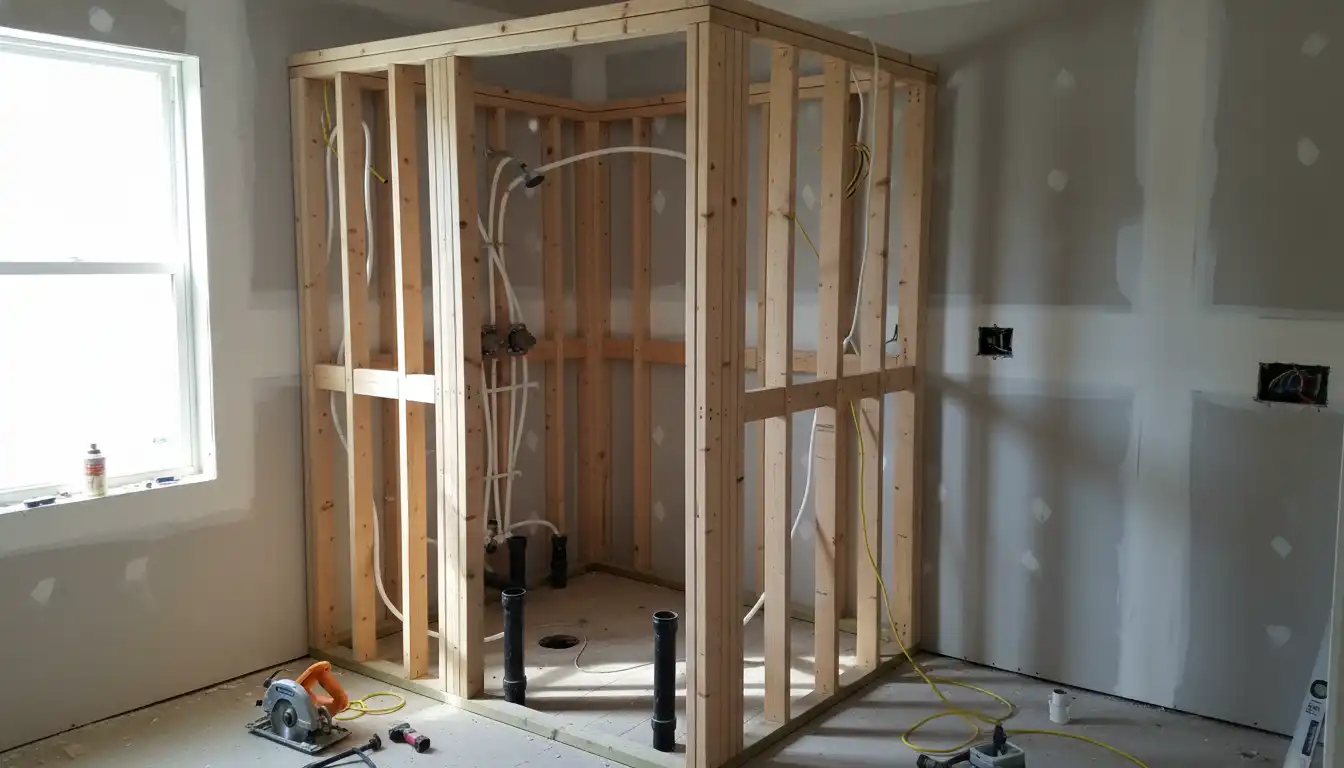
Step 1: Demolition and Framing
The project starts with the careful demolition of the existing shower stall, taking it down to the bare wall studs. This is when any unforeseen issues, like hidden water damage or plumbing rerouting challenges, will be discovered. After the area is cleared, new walls are framed to define the expanded shower’s footprint.
Framing must be perfectly plumb and square. This ensures that the backer board, tile, and glass door will all fit correctly. During this phase, blocking (extra horizontal wood studs) should be installed where future grab bars or a bench might be mounted, even if you don’t plan to install them immediately.
Step 2: Plumbing and Electrical Rough-In
With the walls open, it’s time for licensed plumbers and electricians to work their magic. This is when the shower drain is moved to its new location and the supply lines for the new valve and shower heads are installed. If you’re adding features like multiple body sprays, a dedicated plumbing loop for multiple shower heads may be necessary to ensure adequate water pressure.
Any new electrical wiring for in-shower lighting or exhaust fans is also run at this stage. All electrical components used inside a shower must be rated for wet locations to comply with safety codes.
Step 3: Waterproofing: The Most Critical Stage
A failed waterproofing system is the number one cause of shower failures. This is not the place to cut corners. The process begins by installing a cement backer board or a foam-based board system over the studs. All seams between boards are then taped and sealed with thin-set mortar.
Next, a liquid-applied or sheet-based waterproof membrane is installed over the entire surface, including the shower pan, walls, and curb. This creates a continuous, sealed box that prevents any water from ever reaching the structural framing of your home. Proper waterproofing is a complete system, from the drain flange up to the shower head.
Step 4: Tile, Grout, and Fixture Installation
After the waterproofing membrane has fully cured, it’s time for the tile. Whether you’ve chosen classic subway tile or large-format porcelain, a skilled tile setter will ensure clean lines and proper adhesion. Once the tile is set, it’s grouted and, after curing, the grout lines are sealed to protect against stains and mildew.
The final step is installing the fixtures—the shower head(s), handle, and any other accessories. The glass enclosure or door is then measured and installed, and the perimeter is sealed with silicone caulk. For a truly grand statement, extending the glass with a shower door to ceiling can make the entire bathroom feel larger and more open.
Design Ideas for Your New, Larger Shower
With more space to work with, you can incorporate design elements and features that elevate your shower from basic to breathtaking. A larger canvas allows for more creativity in materials, lighting, and functionality, giving you the power to create a truly personalized oasis.
Think about how you want the space to feel. Do you want a bright, airy retreat or a cozy, spa-like steam room? Consider built-in storage, seating, and how different textures and colors will work together to achieve your desired aesthetic.
Luxury Features to Consider
A spacious shower is the perfect place for luxury upgrades. A built-in bench, either tiled or topped with a solid surface slab, provides a comfortable spot for relaxing or shaving. Multiple water sources, such as a ceiling-mounted rain shower head combined with a handheld sprayer and body jets, create an immersive hydrotherapy experience.
For the ultimate in luxury, consider adding a steam shower system. These systems turn your shower into a private steam room, offering health benefits and deep relaxation. It’s a high-end feature that adds significant “wow” factor and value.
Material Choices and Lighting
Large-format tiles are an excellent choice for an extended shower, as they minimize grout lines and create a clean, expansive look. Natural stone can provide a unique, organic feel, but requires more maintenance than porcelain or ceramic tile. When considering unique features, be cautious; for instance, a wood window in shower requires specialized waterproofing to prevent rot.
Don’t overlook the importance of lighting. A large shower can feel like a dark cave without proper illumination. Installing one or two waterproof recessed LED lights in the shower ceiling will make the space feel brighter, safer, and more inviting.
Common Mistakes to Avoid at All Costs
An ambitious project like a shower extension has several potential pitfalls. Being aware of the most common mistakes can help you navigate the process more smoothly and avoid costly rework. These errors often stem from a lack of planning or underestimating the technical skill required for certain tasks.
From structural missteps to finishing flaws, these issues can compromise the longevity and safety of your new shower. Pay close attention to these key areas to ensure your investment is built to last.
Underestimating the Drain Relocation
As mentioned, moving the drain is often the hardest part of the job. Homeowners frequently underestimate the work involved, especially on a concrete slab. It’s a dusty, labor-intensive process that absolutely must be done correctly to ensure proper drainage and prevent leaks. This task is best left to a licensed plumber.
Improper Waterproofing
This cannot be stressed enough: even a tiny gap or pinhole in the waterproofing membrane can lead to a slow leak that causes catastrophic damage over time. Always use a complete waterproofing system from a reputable brand and follow the manufacturer’s instructions to the letter. If you hire a contractor, ask detailed questions about their waterproofing methods.
Forgetting Ventilation and Future Needs
A bigger shower produces more steam, which can lead to moisture problems and mold growth if your bathroom isn’t properly ventilated. Ensure your exhaust fan is correctly sized for the new, larger volume of the room. Additionally, think about the future. Installing wood blocking in the walls for future grab bars costs very little during construction but makes adding them later much easier and more secure.
By carefully planning your project, hiring qualified professionals for critical tasks like plumbing and waterproofing, and paying attention to the details, you can successfully extend your shower. The result will be a beautiful, functional, and valuable addition to your home that you’ll enjoy for years to come.