Dangers of Exposed Garage Ceiling Insulation: Fix It Before It’s a Hazard!
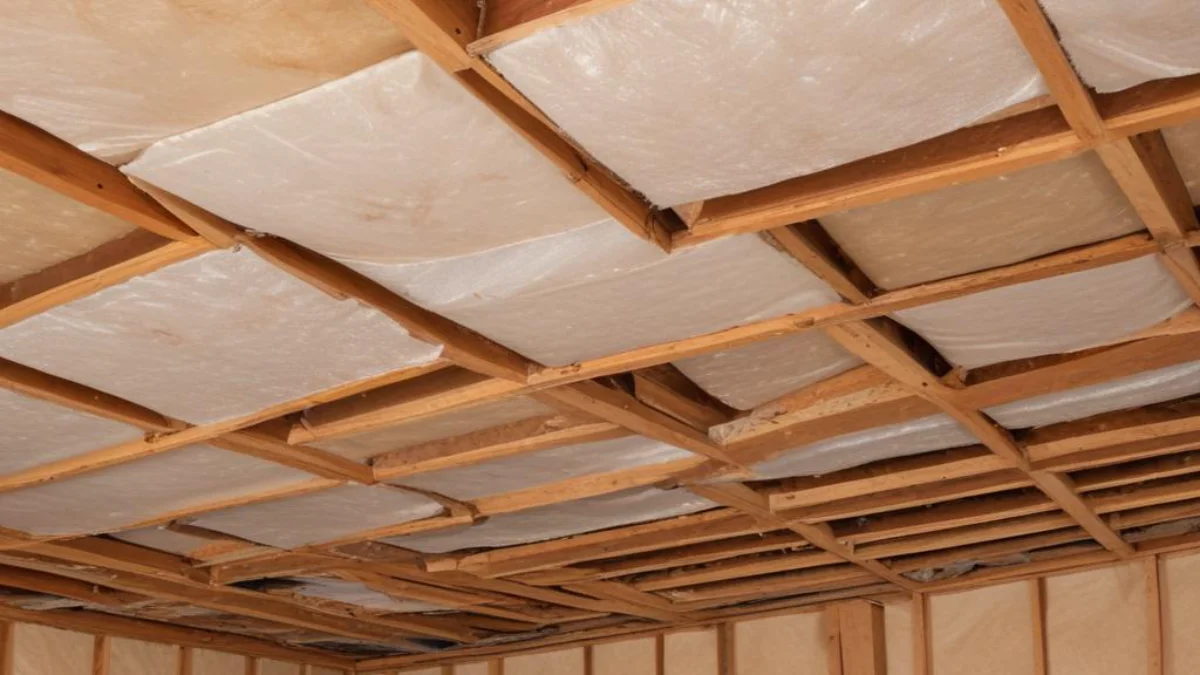
You glance up at your garage ceiling and see it: a sea of pink, yellow, or white fluff nestled between the joists. While you might feel accomplished for getting insulation up there, leaving it exposed is a major problem waiting to happen. It’s more than just an eyesore; it’s a potential safety risk and an invitation for pests and moisture damage.
Many homeowners install insulation to make their garage more comfortable or to regulate the temperature in the rooms above, but they often stop there. Leaving insulation exposed can undermine your efforts and create a host of new issues you didn’t bargain for.
You'll Learn About
Why Your Exposed Garage Insulation is a Ticking Time Bomb
That fluffy insulation might seem harmless, but its exposed state presents several serious problems. Understanding these risks is the first step toward finding the right solution for your garage.
Fire Safety Concerns
Perhaps the most critical issue is fire safety. While many insulation types are treated with fire retardants, they are not fireproof. The paper or foil facing on many batt insulation products is combustible. If a fire starts in your garage—a place often filled with flammable liquids like gasoline and paint—this exposed facing can act as fuel, helping the fire spread rapidly to the rest of your home. Building codes in many areas require a thermal barrier, like drywall, to cover insulation in an attached garage for this very reason.
Moisture and Mold Growth
Garages are often damp environments. Exposed insulation can absorb moisture from the air, from leaks, or from condensation. Wet insulation is ineffective and becomes a breeding ground for mold and mildew. Not only can this cause unpleasant odors and health issues, but it can also lead to the rotting of your ceiling joists and structural damage over time.
Pest Infestations
To insects, rodents, and other pests, exposed insulation looks like the perfect place to build a cozy nest. They can easily burrow into fiberglass or cellulose, tearing it apart and reducing its insulating properties. Dealing with an infestation is not only a hassle but can also be costly. If you suspect a problem, learning how to get rid of mice becomes a critical next step.
Reduced Effectiveness and Air Quality
Insulation works by trapping air, but when it’s exposed, it’s susceptible to air movement, which can reduce its R-value and overall effectiveness. Furthermore, fibers from materials like fiberglass can become airborne. Inhaling these microscopic fibers can cause respiratory irritation and other health concerns for your family. This is especially problematic if your garage is used as a workshop, gym, or play area.
Your Action Plan: Covering Exposed Garage Ceiling Insulation
Now that you understand the risks, it’s time to take action. Covering your exposed garage ceiling insulation is a crucial project that enhances safety, durability, and the overall usability of your space. Here are the most effective solutions, from DIY-friendly options to professional installations.
The Gold Standard: Drywall (Gypsum Board)
Without a doubt, installing drywall is the best and most common solution for covering exposed garage ceiling insulation. It is the go-to material for creating a proper thermal and fire barrier. For garages, especially those attached to a living space, Type X fire-rated drywall is often required by building codes to provide an extra layer of fire resistance.
Installing drywall creates a finished, clean look, seals the insulation, and protects it from damage. While it can be a DIY project, hanging ceiling drywall is physically demanding, so you may consider hiring a professional. Once installed, you can tape, mud, and paint it to match the rest of your home.
A Practical Alternative: Plywood or OSB Sheathing
If you’re looking for a more durable and utilitarian finish, plywood or Oriented Strand Board (OSB) are excellent choices. These materials are robust and can withstand bumps and dings better than drywall. This makes them ideal for a garage that doubles as a workshop.
Sheathing the ceiling with plywood or OSB also provides a convenient surface for mounting hooks, shelves, or lighting. While it provides a finished look, check with your local building codes to ensure it meets fire safety requirements in your area, as some jurisdictions may still require a layer of drywall underneath. For those looking for extra storage space, this solution pairs well with learning if is it ok to put plywood over attic insulation to maximize overhead areas.
Quick and Easy Solutions for a Utilitarian Space
If you’re not concerned with a perfectly polished look and want a faster, more budget-friendly option, there are other materials you can use. Keep in mind that these may not offer the same level of fire protection as drywall.
- Plastic Panels: Lightweight and moisture-resistant, plastic or PVC ceiling panels are easy to install and clean. They are a good option for garages prone to dampness.
- Metal Panels: Corrugated steel or aluminum panels offer a rugged, industrial aesthetic and are extremely durable.
Choosing the Right Insulation for an Unfinished Ceiling
If you’re starting from scratch, selecting the right type of insulation is key. The best choice depends on your budget, climate, and how you plan to finish the ceiling.
| Insulation Type | Pros | Cons | Best For |
|---|---|---|---|
| Fiberglass Batts | Affordable, easy for DIY installation. | Can lose effectiveness if compressed; requires a vapor barrier. | Standard unfinished ceilings with plans to cover. |
| Mineral Wool Batts | Excellent fire resistance, good soundproofing, moisture-resistant. | More expensive than fiberglass. | Garages below living spaces or workshops. |
| Spray Foam | Creates a superior air seal, high R-value, acts as a moisture barrier. | Expensive, requires professional installation. | Irregularly shaped ceilings or for maximum energy efficiency. |
| Rigid Foam Board | High R-value per inch, moisture resistant, adds structural strength. | Must be covered by a fire barrier like drywall. | Ceilings where space is limited. |
A Note on Vapor Barriers
A vapor barrier is a crucial component of your garage ceiling insulation system, especially in colder climates or if there is a living space above. It prevents moisture from migrating from the warm garage into the colder attic or floor space above, where it can condense and cause mold and rot. Kraft-faced insulation has a paper vapor barrier attached. If you use unfaced insulation, you will need to install a separate polyethylene vapor barrier before covering the ceiling.
Creative Solutions for Homeowners
Exposed insulation, whether in the attic, basement, or garage, can be both unsightly and inefficient. Not only does it impact the aesthetic appeal of your home, but it can also pose some risks—ranging from dust accumulation to moisture infiltration. Fortunately, there are various creative ways to cover and protect exposed insulation while improving both the look and functionality of your home.
1. Plywood or MDF Panels
A simple yet effective way to cover exposed insulation is by using plywood or MDF (Medium Density Fiberboard) panels. These materials are easy to install and relatively inexpensive. They offer a clean, smooth surface that can be painted or stained to match the rest of your home’s decor.
Plywood or MDF is a great option for areas like basements, garages, or even in your attic if you’re looking to create additional storage space. They also act as an additional moisture barrier, which helps protect the insulation from water damage.
Pros:
-
Affordable and readily available
-
Easy to install with basic tools
-
Can be customized with paint or finish
Cons:
-
Can be heavy, requiring proper support
-
May trap moisture if not ventilated properly
2. Fabric or Textile Panels
For a more decorative touch, consider using fabric or textile panels to cover your exposed insulation. This solution works well in spaces like attics, basements, or home theaters, where aesthetics are important but function cannot be compromised.
You can stretch fabric over the insulation and secure it using a frame or tension rods. Heavy-duty canvas or felt are excellent options for insulating spaces where visual appeal is crucial. The fabric helps to create a neat, clean appearance, and it can be removed and washed as needed.
Pros:
-
Aesthetic appeal for spaces like home theaters or playrooms
-
Softens noise and improves acoustics
-
Easy to replace or change out as trends evolve
Cons:
-
May not offer as much protection as rigid materials
-
Can attract dust and require regular cleaning
3. Drywall or Sheetrock
One of the most common and professional solutions for covering exposed insulation is to install drywall or sheetrock over the insulation. This method provides a strong barrier against moisture, dust, and debris while also enhancing the appearance of the room. Drywall is a great option for areas where insulation is exposed in more visible, frequently used rooms.
Not only does drywall provide an aesthetic upgrade, but it also improves soundproofing and helps regulate indoor temperatures. Additionally, drywall can be painted and finished to fit your interior design scheme, making it a versatile option.
Pros:
-
Provides a clean, finished look
-
Offers excellent protection against moisture
-
Adds an extra layer of soundproofing
Cons:
-
Requires more effort and tools to install
-
Not as easy to remove if repairs are needed
4. Wooden Slats or Beadboard
Wooden slats or beadboard are a creative and rustic alternative to more traditional covering methods. They’re especially popular for unfinished attics, basements, or garages. These materials provide a natural, textured appearance that works well in farmhouse-style or industrial-themed spaces.
Wooden slats can be installed horizontally or vertically to create a visually appealing and functional barrier over exposed insulation. Additionally, they allow for proper ventilation, which helps maintain the integrity of the insulation underneath.
Pros:
-
Stylish and unique appearance
-
Allows for airflow to prevent moisture buildup
-
Can be painted or stained for added customization
Cons:
-
Installation can be time-consuming
-
Wood may need regular maintenance to prevent damage
5. Foam Board Insulation Panels
If you want an added layer of insulation along with a protective cover, foam board panels are an excellent choice. These panels are rigid and easy to cut, making them ideal for covering large, exposed areas. The added insulation layer can help improve energy efficiency, while the foam provides a sturdy barrier against moisture and external elements.
You can either install foam boards on their own or cover them with another material like drywall or plywood for a more polished look. This dual-purpose approach is particularly useful in areas like basements, where both moisture control and insulation are crucial.
Pros:
-
Adds an extra layer of insulation
-
Moisture-resistant and durable
-
Lightweight and easy to cut to size
Cons:
-
May not have the same aesthetic appeal as other methods
-
Can be difficult to paint or finish without additional materials
6. Decorative Ceiling Tiles
If you’re dealing with exposed insulation in areas like a basement or attic where the ceiling is visible, decorative ceiling tiles can be a great solution. These tiles come in various materials, such as PVC, foam, and metal, and can be glued directly over the insulation.
Not only do these tiles add a finished look to the space, but they can also help with soundproofing and temperature regulation. Many decorative ceiling tiles are designed to be lightweight and easy to install, making them an ideal DIY solution.
Pros:
-
Adds an instant visual upgrade to any room
-
Available in many styles and finishes
-
Lightweight and easy to install
Cons:
-
Not suitable for areas with high moisture levels
-
Can require replacement over time if damaged
7. Furring Strips and Insulation Covers
For an easy and effective DIY solution, furring strips can be used to cover exposed insulation. These strips are typically made of wood and are installed perpendicular to the ceiling or walls. After securing the strips, you can attach insulation covers or even fabric to create a clean look.
Furring strips allow for a small gap between the insulation and the covering, which can help with ventilation and prevent moisture buildup. This method is both cost-effective and highly customizable.
Pros:
-
Simple, inexpensive solution
-
Offers ventilation for insulation
-
Can be customized with fabric or other materials
Cons:
-
Requires some DIY skill for installation
-
May not provide a polished look in all spaces
Final Thoughts on Securing Your Garage
Leaving your garage ceiling insulation exposed is a risk you shouldn’t take. It compromises your home’s safety, energy efficiency, and structural integrity. By choosing the right covering—whether it’s drywall, plywood, or another suitable material—you can protect your investment and turn your garage into a safer, more functional space.
Don’t forget that a well-insulated and finished garage also involves sealing air leaks. Pay attention to gaps around doors and windows. Learning the basics of how to fix gaps on the side of a door can significantly improve your garage’s overall insulation performance and comfort.