Drywall Over Protruding Pipe: Your Ultimate Guide to a Flawless Finish
There’s nothing more frustrating during a renovation than a rogue pipe sticking out from the wall framing. It’s a common problem that can bring any drywall project to a screeching halt. This seemingly small issue can create a major headache, leaving you wondering how to achieve a smooth, professional-looking wall surface.
This guide will walk you through the causes of this issue and provide detailed, actionable solutions. Whether you’re a seasoned DIYer or a first-timer, you’ll learn how to properly install drywall over a protruding pipe for a flawless finish.
You'll Learn About
Why Pipes Protrude and Why It’s a Problem
Pipes may protrude past the studs for several reasons. Sometimes, plumbing vent pipes or drain lines must be routed in a specific way that doesn’t align perfectly with standard wall depths. In older homes, renovations might expose plumbing that wasn’t originally intended to be hidden within a standard wall cavity.
Attempting to simply force a sheet of drywall over a protruding pipe is a recipe for disaster. This can lead to cracked drywall, bowed walls, and an unprofessional, wavy finish. Ignoring the protrusion will ultimately create more work and frustration down the line.
Solutions for Installing Drywall Over Protruding Pipes
Fortunately, there are several effective methods for tackling this common issue. The best approach depends on the size of the pipe and how far it protrudes. Here are the most common and effective solutions.
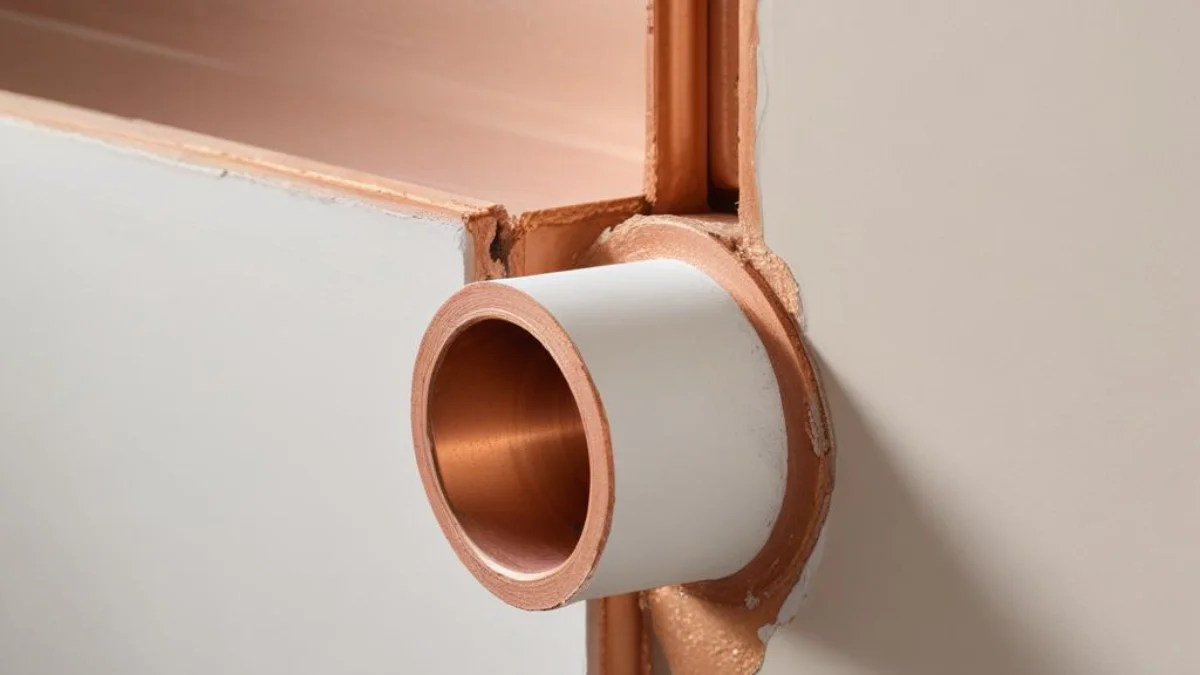
Solution 1: The “Cut and Patch” Method for Single Pipes
For a single, smaller pipe, the most straightforward approach is to cut a hole in the drywall panel, fit it over the pipe, and then patch the opening. This method is ideal when the pipe sticks out just slightly past the stud.
Step 1: Precise Measurement is Key. First, hold the drywall sheet against the wall in the exact position it will be installed. Measure from the floor up to the center of the pipe and from the nearest wall or stud to the center of the pipe. Transfer these measurements to your drywall sheet. A common mistake is measuring from the wrong reference point, so double-check your numbers.
Step 2: Cutting the Hole. For smaller pipes, a hole saw attached to a drill is the perfect tool for creating a clean, circular cutout. For larger pipes or irregular shapes, a drywall jab saw or keyhole saw offers more control. Always aim to make the hole just slightly larger than the pipe to allow for a little wiggle room.
Step 3: Creating a Split Panel. If you cannot slide the drywall over the pipe (for instance, if there are shut-off valves attached), you’ll need to cut a line from the hole to the edge of the drywall panel. This creates two pieces that you can fit around the pipe. You will then secure both pieces to the studs and tape and mud the seam as you would any other drywall joint.
Solution 2: Building a “Box” or Soffit for Larger Pipes or Groups of Pipes
When you have multiple pipes or a large drainpipe to conceal, building a small frame around them is the best solution. This technique, often called “boxing in” or building a soffit, creates a clean, intentional bump-out that looks much better than a series of awkward patches.
Step 1: Frame the Box. Build a simple frame around the pipes using 2x4s or metal studs. This frame will attach to the existing wall studs, the floor, and the ceiling if necessary. Ensure your new framing provides a solid surface for attaching the drywall.
Step 2: Attach the Drywall. Cut pieces of drywall to fit the front and sides of your new frame. Attach them with drywall screws just as you would on a regular wall. You will need to treat the outside corner with a corner bead for a sharp, durable edge.
Solution 3: Furring Out the Entire Wall
If a pipe protrudes only slightly (e.g., half an inch) or if you want a completely flat wall surface without any bump-outs, you can “fur out” the entire wall. This involves adding thin strips of wood (furring strips) to all the studs on that wall to increase its depth.
Step 1: Attach Furring Strips. Cut furring strips to the same thickness as the pipe’s protrusion. Attach these strips vertically to the face of each existing stud with screws. This effectively brings the entire wall surface forward, creating enough space to clear the pipe.
Step 2: Hang Drywall as Usual. With the furring strips in place, you can now hang your drywall over the entire wall. The pipe will be comfortably hidden behind the new, deeper wall cavity. This method provides the most seamless and professional finish but requires more material and effort.
Essential Tools and Materials
Having the right tools for the job is crucial for a smooth installation. Before you begin, gather the necessary supplies to avoid interruptions.
| Tool/Material | Purpose |
|---|---|
| Tape Measure | For accurate measurements of pipe location. |
| Pencil | For marking measurements on the drywall. |
| Drywall Utility Knife | For scoring and making straight cuts in drywall. |
| Drywall Jab Saw / Keyhole Saw | For cutting holes and curves for pipes. |
| Hole Saw Kit | For drilling clean, perfectly round holes for smaller pipes. |
| Drywall Screws & Drill | To securely fasten drywall panels to the studs. |
| Joint Compound (Mud) | To tape and finish seams and cover screw holes. |
| Drywall Tape (Mesh or Paper) | To reinforce the joints between drywall panels. |
| Putty Knives | For applying and smoothing joint compound. |
Finishing Touches for a Professional Look
Once the drywall is installed around the pipe, the finishing process is what truly creates a seamless look. This involves taping, mudding, and sanding to perfection.
Taping and Mudding
Apply a thin layer of joint compound over the seams and screw holes. Place drywall tape over the wet compound and press it in firmly with a putty knife. For areas around pipes, flexible mesh tape can be easier to work with. Apply additional coats of mud, feathering the edges with each layer to create a smooth transition.
Sanding and Priming
Once the final coat of mud is completely dry, sand the entire area with fine-grit sandpaper until it is smooth to the touch. Be careful not to sand through the paper surface of the drywall. After sanding, wipe away all the dust and apply a coat of drywall primer before painting.
Sealing the Gap
To prevent drafts and pests, it’s important to seal the small gap between the pipe and the drywall. Use a flexible, paintable caulk or a small amount of spray foam insulation for this purpose. This final step ensures a truly airtight and finished installation.
Common Problems and How to Avoid Them
Even with careful planning, issues can arise. A frequent problem is a washing machine drain pipe leaking in wall, which can damage your new drywall. Always check for leaks before closing up a wall.
Another issue can be an AC drain pipe facing up, which indicates an improper installation that should be corrected before you proceed with drywall. Finally, when working with threaded pipes, knowing how to clean pipe dope from fittings ensures a better seal and cleaner workspace.
How Can I Block a Pipe Behind Drywall Without Changing the Plumbing?
When working on a home improvement project, particularly when dealing with walls, one common issue many homeowners encounter is having a pipe that runs directly behind the drywall.
This can be problematic if you are trying to install new drywall or even tile a wall, and you don’t want to disturb the pipe. Whether you are renovating a bathroom or kitchen, you might face the dilemma of how to handle a pipe that protrudes into the wall cavity, potentially interfering with your plans.
One common solution is to block or cover the pipe without changing the plumbing itself. So, how can you block a pipe behind drywall while avoiding significant alterations to the plumbing system?
The Problem
In many cases, plumbing pipes run along walls, especially in older homes where plumbing may not be as neatly tucked away in the walls. When planning to put up new drywall or cover the wall with other materials (like tile or panels), the pipe can obstruct the process.
The most straightforward solution might seem to be cutting into the drywall and repositioning the pipe, but that could be costly and complicated, especially if the pipe is a key part of the home’s plumbing system.
So, the question becomes: How can I deal with the pipe without changing the plumbing itself, and without compromising the integrity of the wall or the functionality of the pipe?
Potential Solutions
Here are a few solutions that might help you work around the pipe while keeping things simple and cost-effective:
1. Build the Wall Out to Clear the Pipe
One of the easiest and least invasive ways to handle a protruding pipe is by building the wall out slightly to make room for the pipe. This method doesn’t require any changes to the pipe itself, and it’s a straightforward way to create space for drywall or other finishing materials.
-
How to Do It: You would simply add framing material to extend the wall by the width of the pipe. Typically, you can use thin lumber or even furring strips to extend the framing. Once the wall is built out, you can install drywall over the new framing. If the pipe is near the surface, this will allow you to drywall over it without leaving a bump or an awkward gap in the wall.
-
What to Consider: The added wall thickness may reduce your interior space slightly, but it can be a small tradeoff for not having to relocate the pipe. Additionally, it’s important to ensure that you still have adequate clearance around the pipe for future maintenance or repairs.
2. Use Thinner Cement Backer Board for Tiling
If you are tiling over the area and want to avoid disturbing the pipe, you might consider using a thinner cement backer board in the area where the pipe protrudes. Cement backer board is commonly used as a surface for tiles, particularly in high-moisture areas like bathrooms and kitchens.
-
How to Do It: Instead of using regular drywall, you can install a thinner backer board material over the pipe area. The thinner backer board, combined with the wall being built out just enough, should clear the pipe and provide a solid surface for your tile.
-
What to Consider: Cement backer board is more rigid and durable than drywall, which makes it a great option for high-moisture areas. However, it can be more difficult to work with, requiring more precise cuts and potentially more effort to install compared to traditional drywall.
3. Install a Surface-Mounted Box or Cover
If the pipe is near or on the surface of the drywall, you can install a surface-mounted cover or box that hides the pipe from view. This is a good option if the pipe cannot be easily recessed into the wall or if building out the wall isn’t feasible.
-
How to Do It: A surface-mounted box or cover can be used to enclose the pipe, making it less noticeable and creating a clean finish on the wall. These covers come in different materials, including PVC, metal, or drywall, and can be painted to blend seamlessly with the surrounding wall. If necessary, you can install a custom-made box to cover the pipe and prevent any visible obstruction.
-
What to Consider: This solution is most useful for pipes that are positioned on the surface of the drywall, such as in exposed areas. While it doesn’t require moving or altering the pipe, it might be less aesthetically pleasing than completely covering it with drywall or tiling. However, with proper design, the box can blend into the wall and look intentional.
4. Leave an Access Panel for Future Maintenance
If the pipe is an important part of the plumbing system, such as a shut-off valve or a pipe that might need maintenance, you can leave an access panel in the wall. This will allow you to cover the wall while still leaving access to the pipe in case repairs are needed in the future.
-
How to Do It: Install the drywall as usual, but cut an access panel around the pipe that can be opened when necessary. These panels come in a variety of materials, including plastic or metal, and can be installed discreetly into the drywall. For areas that will be tiled, you can install a removable access panel that can be covered with tile for a clean look when not in use.
-
What to Consider: This solution is ideal for pipes that might require regular access. It ensures the pipe remains functional and accessible, but it also adds some complexity to the wall design.
When to Call a Professional
While handling drywall around a single pipe is a manageable DIY project, some situations are best left to the professionals. If you are dealing with complex plumbing layouts, multiple large pipes, or if the pipes are related to gas lines, it’s wise to consult a licensed plumber or contractor.
Furthermore, if you are not comfortable with framing or the precision required for a clean finish, hiring a professional drywall installer can save you time and ensure a high-quality result. Your safety and the structural integrity of your home should always be the top priority.