Does Trex Make End Caps? The Surprising Truth You Need to Know
You’ve invested in beautiful, long-lasting Trex decking. The color is perfect, the wood grain is convincing, and you’re imagining years of low-maintenance enjoyment. Then you see it: the raw, exposed ends of the deck boards. Suddenly, your premium outdoor living space looks unfinished, cheap, and vulnerable. This jarring contrast is a common problem that leaves many homeowners frustrated and searching for a simple solution.
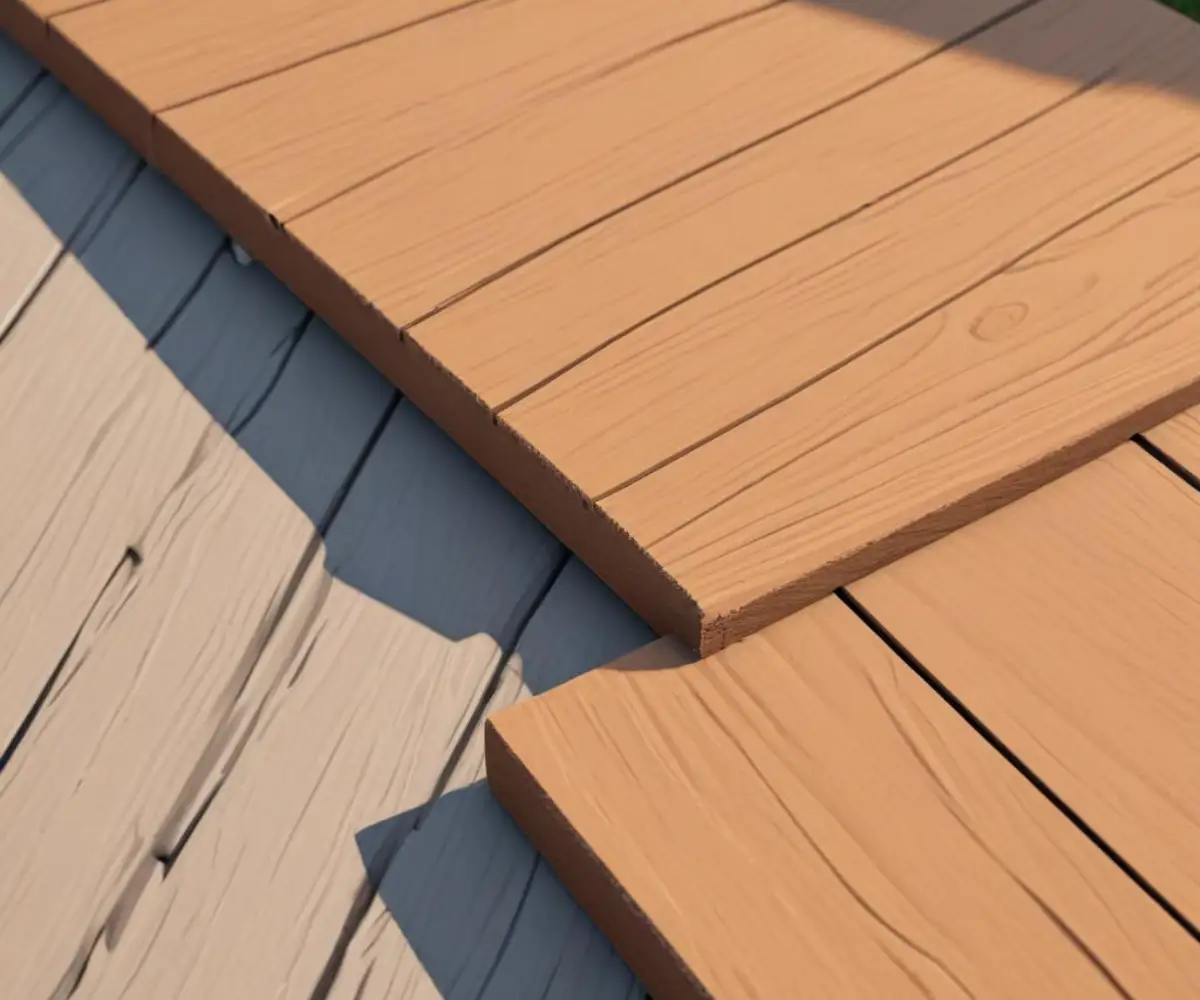
The exposed inner core of composite decking isn’t just an eyesore. These ends can become collection points for dirt, moisture, and debris, which can compromise the integrity of the board over time. Leaving them unfinished detracts from the high-end aesthetic you paid for and can even impact your deck’s longevity. Many people instinctively search for “Trex end caps,” assuming a simple plastic plug exists. The reality, however, is more nuanced and leads to a far superior finish.
You'll Learn About
The Straight Answer: Understanding Trex’s Finishing Philosophy
Let’s address the core question directly: Trex does not manufacture or sell traditional, slide-in plastic end caps for its main decking lines. This is a deliberate design choice. While some other composite decking brands, particularly those with hollow boards, offer simple caps, Trex has engineered its solid-core boards to be finished with more integrated and professional methods. These methods provide a cleaner look and superior protection compared to a simple cap that could potentially pop off or fade differently over time.
The primary reason Trex forgoes simple caps is that their boards are designed for a premium, seamless finish. A plastic cap on the end of a high-performance board can look like an afterthought. Instead, Trex advocates for finishing techniques that make the edges of your deck a deliberate and attractive part of the overall design. The two main methods they recommend are using fascia boards and implementing a picture frame border. Both solutions create a polished, high-end look that simple caps cannot replicate.
The Official Trex Solution: Fascia Boards and Picture Framing
The most popular and manufacturer-recommended way to finish Trex deck ends is by using matching fascia boards. Fascia boards are thinner, wider boards designed to cover the rim joists and hide the deck’s substructure. When installed flush with the top of the decking, a fascia board creates a crisp, clean edge that perfectly conceals the cut ends of the main deck boards. This gives your deck a solid, monolithic appearance.
An even more elegant solution is to create a “picture frame” border. This technique involves installing one or more rows of deck boards around the perimeter of your deck, perpendicular to the main decking. This not only hides all the cut ends of the interior boards but also adds a stunning design element. You can use the same color for a subtle, cohesive look or a contrasting color to create a bold, dramatic frame that makes your deck truly stand out. Picture framing is the hallmark of a professionally designed and installed deck.
Why Exposed Ends Are a Bigger Problem Than You Think
Leaving the cut ends of your composite deck boards exposed is more than just a cosmetic issue. While Trex boards are incredibly durable and resistant to the elements, the exposed core is the most vulnerable part of the board. Constant exposure to moisture and temperature fluctuations can lead to issues over the long term. Debris can also become embedded in the rough texture of the core, leading to staining or mildew growth.
Furthermore, from a design perspective, nothing screams “DIY” more than an unfinished edge. A properly finished deck edge demonstrates attention to detail and a commitment to quality. It’s the difference between a good-looking deck and a great-looking one. Taking the extra step to finish the edges properly protects your investment and elevates the entire look of your outdoor space, ensuring it adds maximum value to your home.
Alternative Solutions: Third-Party Caps and Other Techniques
While Trex doesn’t make them, the market has responded with third-party end caps designed to fit various composite decking profiles. These are typically plastic or silicone caps that can be glued or press-fit into the ends of the boards. While they can be a quick and easy fix, they come with a significant list of potential drawbacks. Color matching is a major concern, as it’s nearly impossible for a third-party manufacturer to perfectly match the specific hues and subtle variations of Trex’s color palette.
These caps can also fail over time. The adhesive can break down under sun and moisture, causing the caps to loosen and fall out. They are often made from a different material than the decking itself, meaning they will expand, contract, and fade at a different rate. In many cases, using non-approved accessories like third-party caps can also void your Trex warranty, which is a significant risk for a long-term investment. Just as you’d carefully compare flooring options like Malibu Wide Plank vs. Lifeproof for quality and warranty, you should be equally cautious about the accessories you use on your deck.
Creative Finishing Techniques for the Advanced DIYer
For those looking for a truly custom and high-end finish, there are more advanced techniques to consider. One such method involves creating your own returns. This is done by cutting a small piece from a scrap board at a 45-degree angle and gluing it onto the end of the deck board. This creates a “self-capped” end with a perfect grain and color match because it’s made from the decking material itself. While this is a labor-intensive process, the result is a seamless, professional finish that is superior to any plastic cap.
Another technique, though less common for scalloped-bottom boards, is to use a router to create a finished edge profile, such as a round-over or chamfer. This can soften the edge and give it a clean look without adding any other materials. However, this is best suited for solid-profile boards and requires a steady hand and the right router bit to achieve a clean result. The final appearance is a crucial detail, much like the subtle differences in paint finishes when you compare PPG Diamond vs. Timeless paint.
Comparing Your Deck Edge Finishing Options
Choosing the right finishing method depends on your budget, aesthetic goals, and desired level of durability. To help you decide, here is a comparison of the most common options.
| Finishing Method | Aesthetic Appeal | Durability & Protection | Relative Cost | Color Match |
|---|---|---|---|---|
| Trex Fascia Board | Excellent – Clean & Seamless | Excellent – Fully Protected | Moderate | Perfect |
| Picture Frame Border | Superior – High-End Design | Excellent – Fully Protected | High | Perfect |
| Third-Party End Caps | Fair – Can look cheap | Poor to Fair – Can fail | Low | Poor to Fair |
| DIY “Return” Pieces | Superior – Custom & Seamless | Good – Depends on adhesive | Low (High Labor) | Perfect |
| Leaving Ends Exposed | Poor – Unfinished Look | Poor – Vulnerable to damage | None | N/A |
Step-by-Step Guide: Installing a Trex Fascia Border
For most homeowners, using Trex fascia is the ideal balance of cost, ease of installation, and professional results. Here’s a simplified guide to getting it done right.
Step 1: Measure and Cut Your Fascia
Measure the length of the deck perimeter you need to cover. Cut the fascia boards to length using a miter saw for clean, precise cuts. For corners, you can either butt them together for a simple joint or miter them at 45-degree angles for a more polished, professional corner.
Step 2: Choose the Right Fasteners
Do not use standard deck screws for fascia. Trex fascia is thinner and requires specific fascia screws that are designed to accommodate its expansion and contraction. These systems often include a pre-drilling tool to create an oversized hole, allowing the board to move slightly with temperature changes without buckling or putting stress on the screw head.
Step 3: Attach the Fascia
Position the fascia board so its top edge is flush with the surface of the deck boards. Pre-drill your holes according to the fascia screw system instructions. Fasten the board to the rim joist, ensuring the screws are driven snug but not over-tightened. Proper spacing of the screws, typically every 12-18 inches, is crucial for a secure and lasting installation.
Common Mistakes to Avoid at All Costs
Finishing your deck edges may seem straightforward, but a few common errors can ruin the final look and performance. The most frequent mistake is using the wrong screws. Standard deck screws don’t allow for the natural movement of the fascia board, which can lead to unsightly buckling, warping, or even cracked boards. Always use the manufacturer-recommended fascia fastening system.
Another pitfall is improper gapping. Composite materials expand and contract with temperature, and failing to leave adequate gaps at the ends of boards and at corner joints can cause problems down the line. Finally, don’t be tempted by cheap, mismatched third-party caps. The initial savings are not worth the risk of a failed product and a voided warranty. The texture and finish you choose are as important as the color, much like when selecting a wall finish such as Thistle Multi-Finish, where the final texture defines the room.
Conclusion: The Best Finish is an Integrated Finish
So, does Trex make end caps? The answer is no, and for good reason. Instead of offering a simple, often inadequate plug, Trex provides a system of integrated finishing options that protect your investment and elevate the look of your deck. Using fascia boards or creating a picture frame border are the superior methods for achieving a durable, professional, and aesthetically pleasing result.
By treating the edges of your deck as a key design element rather than an afterthought, you ensure a cohesive and high-end look that will last for decades. These methods not only provide the best protection for your deck boards but also complete the premium look that led you to choose Trex in the first place.