Tile Under Bathroom Cabinets? The #1 Mistake You Can’t Afford to Make
Cutting corners in a bathroom remodel can cost you dearly. Skipping tile under the cabinets might seem like a small savings, but it opens the door to expensive issues down the road.
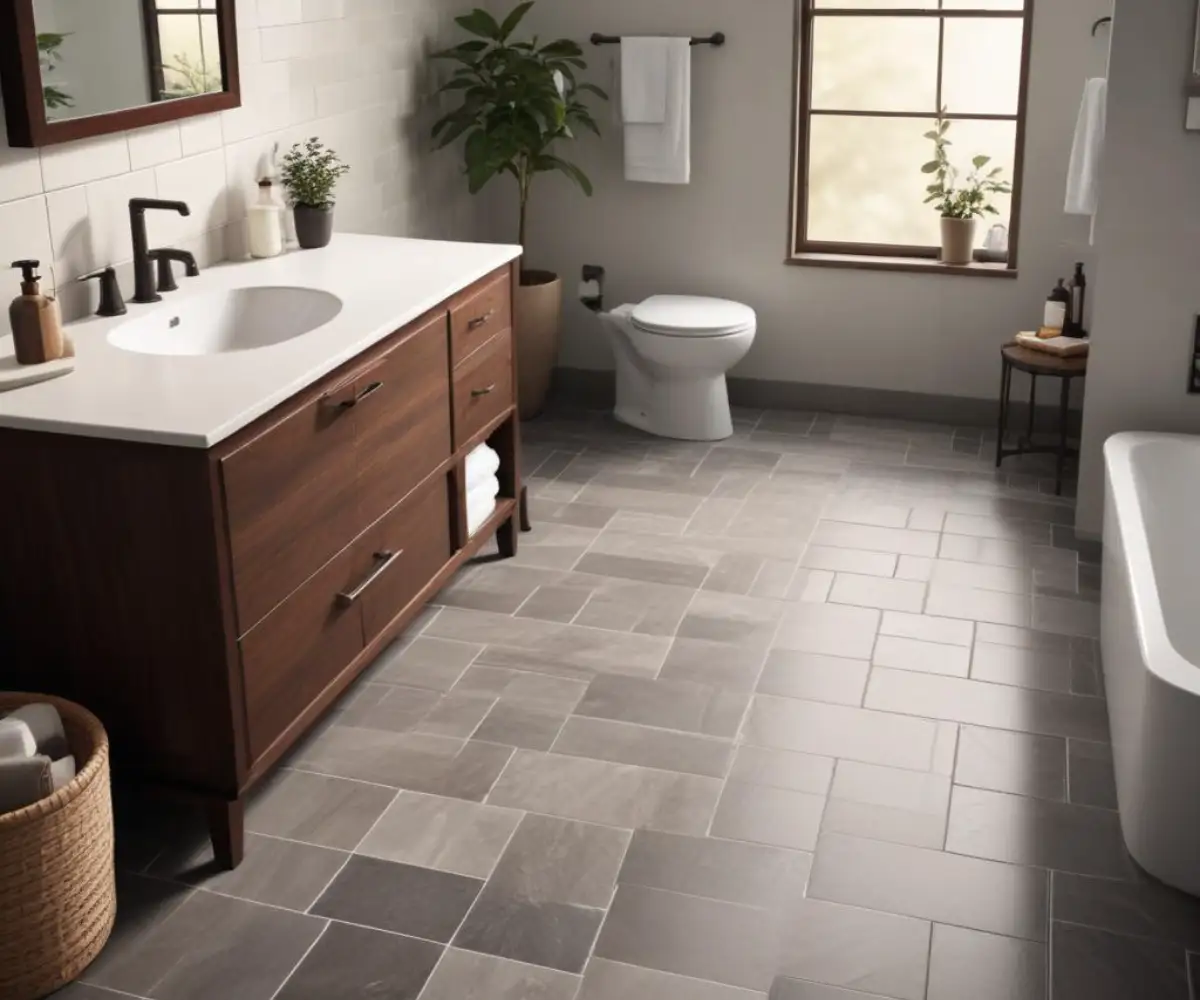
Properly tiling the entire floor ensures durability, flexibility, and protection against water damage. It’s a simple step that ensures your remodel stands the test of time.
You'll Learn About
Why This Simple Choice Sparks So Much Debate in Remodeling
The question of whether to tile under bathroom cabinets seems simple on the surface. Yet, it’s one of the most hotly contested topics among DIY enthusiasts and even professional contractors. One side argues for saving time and a small amount of money, while the other advocates for a method that ensures longevity, flexibility, and superior protection for your home.
This decision is far more than a minor detail. The choice you make impacts your bathroom’s durability against water damage, your freedom for future upgrades, and the overall professional finish of your project. Making the wrong call can lead to costly repairs and significant headaches down the road.
The Case for Tiling AFTER Installing Cabinets: The “Money-Saving” Myth
The primary argument for installing the vanity first and tiling around it is cost. The logic is straightforward: why pay for expensive tile and spend time installing it in an area that will be completely hidden by a cabinet? This approach can save a box or two of tile and a few hours of labor.
For remodelers on a razor-thin budget, this can seem like a practical corner to cut. However, this short-term gain often leads to significant long-term pain. What appears to be a savvy cost-saving measure is, in reality, a gamble against the future of your bathroom.
The Hidden Risks You’re Ignoring
Opting to tile around your cabinets introduces several critical vulnerabilities. These aren’t just cosmetic issues; they can compromise the structural integrity of your bathroom floor and limit your future design options.
The Future Remodel Nightmare is a scenario many homeowners don’t consider. Bathroom styles change, and the vanity you love today might be something you want to replace in five or ten years. If your new vanity has a different footprint—perhaps you switch from a large cabinet to a pedestal sink or a smaller, modern design—you will be left with an ugly, untiled patch of subfloor.
This situation leaves you with only two choices: find a new vanity that has the exact same or larger footprint, severely limiting your options, or tear out the entire floor and start from scratch. The money you “saved” initially is instantly erased by the cost of a complete floor replacement.
Water Damage Vulnerability is perhaps the most serious risk. The bathroom is a wet environment. A small leak from a supply line, a drain pipe, or even water splashed from the sink can easily find its way to the edge of the vanity. If there’s no tile underneath, that water will seep directly onto the raw wood or concrete subfloor, where it becomes trapped under the cabinet.
This trapped moisture is a perfect breeding ground for mold and mildew, leading to musty odors and potential health hazards. Over time, it will cause the subfloor to rot and decay, a far more expensive problem to fix than simply laying a few extra tiles. Managing moisture is critical everywhere in a bathroom, from the floor to the walls; some people even try quick fixes like using Flex Seal in the shower, but a proper waterproof foundation is always the best defense.
Uneven Surfaces and Instability can also plague a vanity installed on an unfinished floor. The cabinet rests on the subfloor, while the floor tile is installed around it at a higher level. This height difference creates a lip and a potential gap, making it harder to get the vanity perfectly level and stable. It often requires shimming, which can create pressure points and an installation that feels less solid.
The Professional Standard: Why You MUST Tile Under Your Bathroom Cabinets
The consensus among high-end builders and experienced tile setters is clear: tile the entire bathroom floor before installing the vanity. This method is the hallmark of a quality, professional-grade installation. While it requires a slightly higher upfront investment in materials and labor, the long-term benefits are undeniable.
Treating the floor as a single, continuous surface before any fixtures are placed on it creates a more robust, waterproof, and future-proof room. It simplifies the installation process and eliminates the risks associated with tiling around cabinets.
The Long-Term Benefits of a Continuous Tiled Surface
Tiling the entire floor is an investment in peace of mind. It addresses the core weaknesses of the alternative method, providing a comprehensive solution that protects your home and your wallet over the long term.
Total Waterproofing is the most significant advantage. A continuous layer of tile and grout, especially when installed over a waterproofing or decoupling membrane, creates a sealed, water-resistant barrier across the entire subfloor. Water from a potential leak will pool on top of the tile, where it can be easily discovered and cleaned up, rather than disappearing under a cabinet to cause hidden damage. This is the same principle behind building a completely waterproof shower system, where every component works together.
Ultimate Design Freedom is another key benefit. When the entire floor is tiled, the vanity simply sits on top of the finished surface. This means that in the future, you can change your vanity to any style or size you wish. Whether you want to switch to a freestanding vanity, a wall-mounted “floating” vanity, or twin pedestal sinks, the floor is ready for it. You will never be trapped by the footprint of your original cabinet.
Flawless Installation and Stability are easier to achieve with a fully tiled floor. The vanity is placed on a flat, level, and continuous surface, making it simple to position and secure. There is no need for excessive shimming or worrying about height discrepancies between the cabinet base and the surrounding floor, resulting in a cleaner, more professional look and a rock-solid installation.
For Floating Vanities, tiling underneath is absolutely essential. A floating vanity is mounted to the wall, leaving the floor beneath it completely visible. Not tiling this area is simply not an option from an aesthetic standpoint. Furthermore, it ensures the entire visible floor has a continuous, waterproof surface, which is critical in a bathroom.
| Feature | Tiling Underneath (Recommended) | Tiling Around |
|---|---|---|
| Initial Cost | Slightly higher (more tile and labor) | Lower (less tile and labor) |
| Long-Term Cost | Lower (avoids future floor replacement) | Potentially very high (risk of floor replacement) |
| Water Protection | Excellent (continuous sealed surface) | Poor (seams at cabinet base allow water intrusion) |
| Future Flexibility | Total freedom to change vanity size/style | Extremely limited by original vanity footprint |
| Installation Quality | Provides a flat, stable base for the vanity | Can create leveling and stability issues |
| Professional Standard | Yes, this is the industry best practice | No, this is considered a shortcut |
The Hidden Factor: Subfloor Integrity and Decoupling Membranes
The discussion often stops at tile, but the real issue is the integrity of the entire flooring system. Modern tiling best practices involve more than just thin-set mortar and tile. They often include a crack isolation or decoupling membrane installed directly onto the subfloor.
These membranes are a crucial innovation. They create an uncoupling layer that absorbs stress from subfloor movement, preventing that movement from transferring to the tile and causing cracks. Crucially, they also act as a waterproof barrier, providing a final line of defense for the subfloor. A continuous, unbroken membrane is key to ensuring a bathroom floor lasts for decades without issues.
When you tile the entire floor first, you can install this membrane across the whole surface, from wall to wall. This creates a single, monolithic protective layer. If you install the cabinet first, you are forced to cut the membrane at the cabinet’s base, creating a massive seam right where water is most likely to gather. This fundamentally compromises the waterproofing and crack isolation a membrane is designed to provide.
Step-by-Step: The Correct Order of Operations
To ensure a durable, professional, and long-lasting bathroom renovation, follow the proper sequence of events. Rushing ahead or completing steps out of order is what leads to failure and costly repairs. Adhering to the correct workflow is just as important as using the right materials.
This systematic approach guarantees that each layer of the bathroom is built on a solid, properly prepared foundation. It’s a method that protects the structure of your home and ensures the visible, finished elements look perfect and perform flawlessly for years to come.
The Pro Remodeler’s Workflow
1. Prepare the Subfloor: Ensure the subfloor is clean, level, and structurally sound. Address any squeaks, damage, or uneven spots before proceeding.
2. Install Underlayment/Membrane: Install your chosen cement backer board or decoupling membrane over the entire subfloor according to the manufacturer’s instructions.
3. Tile the Entire Floor: Lay your tile across the entire bathroom floor, maintaining consistent grout lines from wall to wall.
4. Grout and Seal: Grout all the tile joints and, if required for your tile and grout type, apply a sealer to the entire surface for added protection.
5. Install Bathroom Vanity: Carefully place and secure your cabinets or vanity directly on top of the finished tile floor.
6. Install Fixtures: Install the toilet, baseboards, and any other fixtures after the vanity is in place.
Your Final Verdict: An Investment in Your Home’s Future
While skipping the tile under your bathroom cabinets might save you a hundred dollars today, it’s a shortcut that exposes your home to thousands of dollars in potential future repairs. The risk of water damage, mold growth, subfloor rot, and the extreme limitation it places on future renovations simply isn’t worth the minor initial savings.
Tiling the entire floor first is a non-negotiable step for a high-quality bathroom remodel. It is the only method that provides a truly waterproof, stable, and flexible foundation for the rest of your bathroom. It’s the difference between a job that is merely done and a job that is done right.