Do I Need Gravel for Solid Drain Pipe? The Surprising Truth
You’re ready to tackle that drainage project. You’ve got your solid drain pipe, a shovel, and a clear plan to move water from point A to point B. But a nagging question stops you in your tracks: do I really need to add gravel? It’s a common point of confusion. After all, solid pipe isn’t designed to collect water from the ground like perforated pipe is, so what’s the purpose of the extra material and labor?
Many homeowners assume gravel is only necessary for French drains, where water needs to enter the pipe through perforations. This misunderstanding often leads to improper installation, creating bigger headaches down the road. The truth is, skipping the gravel on your solid drain pipe installation can lead to premature failure and costly repairs.
This article will demystify the role of gravel in solid drain pipe installations. We’ll explore the critical functions it serves and provide a clear, step-by-step guide to ensure your drainage system is built to last. You’ll learn why this extra step is not just a recommendation but a crucial component of a durable, effective water management solution.
You'll Learn About
Why Gravel is Essential, Even for Solid Pipes
While it’s true that solid pipe doesn’t collect groundwater, the pipe itself still needs a stable and protective environment to function correctly. Simply burying a solid pipe directly in the soil exposes it to a host of problems. The primary purpose of gravel bedding and backfill is not for water collection, but for structural integrity and longevity.
Think of the gravel as a carefully engineered foundation for your drainage system. It provides a consistent, supportive base that protects the pipe from the immense pressures of the surrounding earth. Without it, you’re leaving your drainage project vulnerable to failure from the moment it’s buried.
The Critical Role of Pipe Bedding and Support
Proper pipe bedding is fundamental to any underground pipe installation. The International Plumbing Code (IPC) and International Residential Code (IRC) both mandate that pipes must have solid and continuous load-bearing support. Placing a pipe directly on uneven, unprepared soil creates stress points that can lead to cracks, breaks, or sagging over time.
A layer of gravel, known as bedding, creates a uniform cradle for the pipe to rest in. This even distribution of support is especially important for plastic pipes like PVC or corrugated triple-wall, which are more flexible and susceptible to deformation than older, more rigid materials like vitrified clay. Gravel allows for precise slope adjustments and ensures the pipe maintains its grade, which is critical for gravity-fed drainage to work effectively.
Without this stable base, the pipe can shift as the ground settles, creating low spots or “bellies” in the line. These bellies disrupt the flow of water, leading to standing water within the pipe, sediment buildup, and eventual clogs that are difficult and expensive to clear.
Protecting Against Crushing and Punctures
Underground pipes are subjected to immense pressure from the weight of the soil above, as well as any surface loads from foot traffic, lawnmowers, or even vehicles. If you have a drainage system in a high-traffic area, understanding how to protect a drive over drain pipe is crucial for its survival.
Backfilling a trench with native soil, especially if it contains rocks, clumps of clay, or other debris, can be disastrous. Sharp objects can puncture the pipe, and uneven compaction can create pressure points that lead to crushing. Surrounding the solid pipe with a layer of smooth, rounded gravel like pea gravel acts as a protective shield. This embedment material distributes the load evenly around the entire circumference of the pipe, preventing localized stress and protecting it from damage during and after backfilling.
Step-by-Step Guide to Installing Solid Drain Pipe with Gravel
Now that you understand the “why,” let’s get into the “how.” Following these steps will ensure your solid drain pipe is installed correctly, providing you with a reliable, long-lasting drainage solution. Proper installation is key, whether you are running a simple downspout extension or figuring out how to daylight a drain pipe at a lower elevation.
Step 1: Trench Excavation and Preparation
First, dig your trench. It should be wide enough to allow for at least 3-6 inches of gravel on each side of the pipe. The depth will depend on your required slope and any local code requirements regarding frost lines. The standard slope for drainage pipes is a minimum of 1%, which translates to a one-foot drop for every 100 feet of pipe.
Once the trench is dug, it’s crucial to ensure the bottom is smooth and free of large rocks or debris. If you encounter unstable or rocky soil, you may need to over-excavate and add a thicker base of compacted granular material. A solid foundation is the first step to a successful installation.
Step 2: Laying the Gravel Bedding
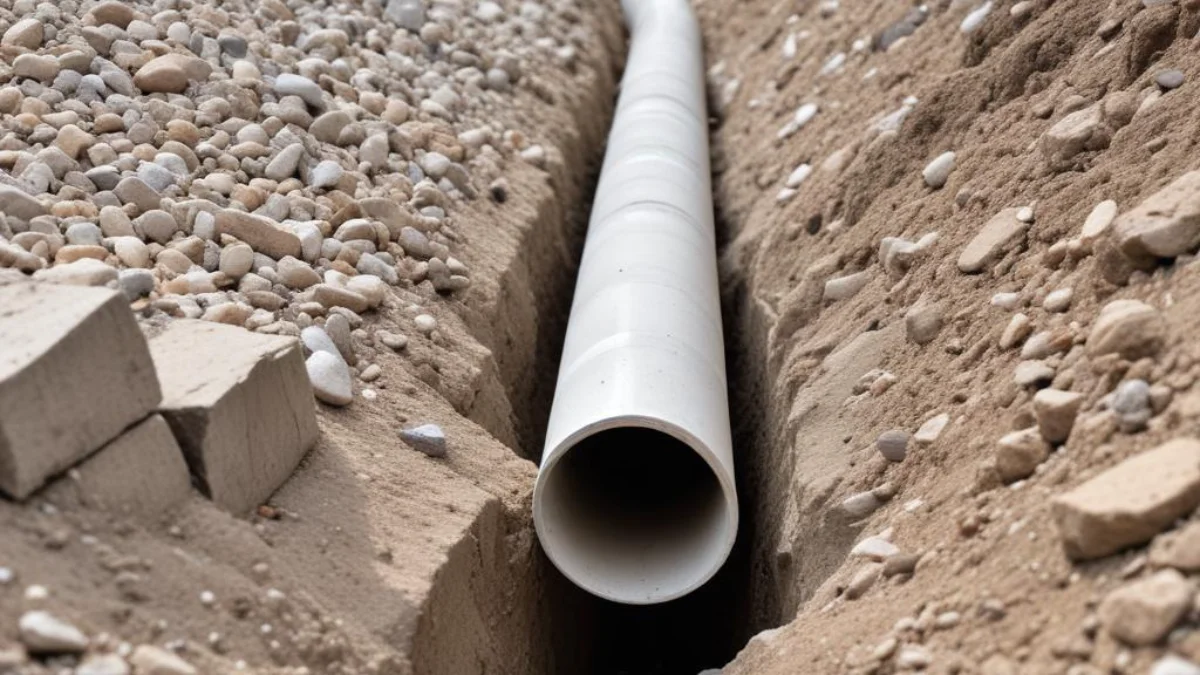
With the trench prepared, it’s time to add the first layer of gravel. Place a 3-4 inch layer of clean, washed gravel at the bottom of the trench. Common choices include pea gravel or #57 crushed stone. The gravel should be spread evenly to create a stable and uniform base for the pipe.
This bedding layer is what allows you to fine-tune the pipe’s slope. It provides a consistent surface that fully supports the pipe’s barrel, preventing the sags and bellies that occur when a pipe is laid directly on soil.
Step 3: Placing and Connecting the Solid Pipe
Carefully lay your solid drain pipe onto the gravel bed. Ensure the sections are connected securely according to the manufacturer’s instructions. If you’re using bell-end pipe, the bell should always face uphill to prevent leaks at the joints.
Check the slope frequently with a level as you lay the pipe. You can make small adjustments by adding or removing gravel beneath the pipe to maintain a consistent, positive grade. Once the pipe is in place, you are one step closer to solving your drainage issues and can avoid complex interior problems, like needing to learn how to drywall over protruding pipe due to water damage.
Step 4: Encasing the Pipe with Gravel (Haunching and Backfill)
Once the pipe is positioned correctly, you need to add more gravel to surround it. This process is often called haunching. Carefully add gravel to the sides of the pipe, filling the area from the bedding up to the pipe’s midline. Gently compact this gravel to ensure there are no voids under the sides of the pipe, as this area is critical for providing side support and preventing the pipe from shifting.
Continue adding gravel until it covers the top of the pipe by at least 3 inches. This gravel casing protects the pipe from all sides and provides a secondary drainage path in the event of a leak. After the pipe is fully encased, you can backfill the rest of the trench with the excavated soil.
Choosing the Right Materials for the Job
Selecting the appropriate type of gravel and pipe is just as important as the installation technique. The materials you choose will directly impact the performance and lifespan of your drainage system.
Types of Gravel and Their Uses
Not all gravel is created equal. For drain pipe installation, you want a material that provides good support and drainage without being sharp enough to damage the pipe. The most common and recommended options are:
- Pea Gravel: Small, rounded stones that are easy to work with and provide excellent, uniform support. Its smooth shape minimizes the risk of puncturing the pipe.
- Crushed Stone (#57): Angular stones that lock together well, providing superior stability. It’s a great choice for the base layer, especially in softer soils.
Avoid using materials like sand or native soil with sharp rocks for bedding and initial backfill. Sand can be difficult to compact properly and may not provide adequate support, while rocky soil can easily damage the pipe.
| Material | Primary Use | Pros | Cons |
|---|---|---|---|
| Pea Gravel | Bedding & Backfill | Excellent uniform support, easy to work with, won’t puncture pipe. | Can be less stable than angular stone on its own. |
| Crushed Stone (#57) | Base Layer & Backfill | Excellent stability, stones interlock for a firm base. | Can have sharp edges; ensure it’s clean and washed. |
| Sand | Bedding (in some cases) | Easy to grade for slope. | Can settle unevenly if not compacted, may not provide enough support. |
| Native Soil | Final Backfill Only | Cost-effective (free). | Unsuitable for bedding/initial backfill due to rocks, debris, and poor compaction. |
The Final Verdict on Gravel and Solid Drain Pipe
So, do you need gravel for solid drain pipe installation? The answer is an unequivocal yes. While the pipe itself doesn’t collect water from the ground, the gravel bedding and surround are not optional accessories; they are integral components for a stable, durable, and effective drainage system.
By providing a solid foundation, protecting the pipe from crushing and punctures, and ensuring a consistent slope, gravel is the key to preventing sags, clogs, and premature failure. Taking the time and effort to install it correctly will save you from the far greater expense and hassle of digging up and replacing a failed drain line in the future. Protect your investment and do it right the first time.