Do French Drains Work in Clay Soil? The Ultimate Success Guide
A waterlogged yard, soggy patches that never seem to dry, and the creeping fear of water damage to your foundation—these are the telltale signs of a drainage nightmare. If your property is built on clay soil, these problems are likely all too familiar. The dense, tightly packed particles of clay hold water with a vengeance, turning your lawn into a swamp after every downpour.
Many homeowners wonder if a French drain, a trusted solution for drainage problems, can possibly work in such stubborn conditions. The short answer is a resounding yes, but with a major caveat: it must be designed and installed with the unique challenges of clay soil in mind. A standard installation will fail, but a correctly engineered system will triumph.
This guide will walk you through the science behind why clay soil is so problematic and provide a detailed, step-by-step blueprint for installing a French drain that not only works but lasts for decades, protecting your home and reclaiming your yard.
You'll Learn About
The Core Problem: Why Clay Soil and Water Don’t Mix
Understanding why clay soil is such a challenge is the first step toward defeating it. Unlike sandy or loamy soils with large particles and ample air pockets, clay soil is composed of microscopic, plate-like particles. These particles stick together, creating a dense, heavy medium with extremely low permeability.
When it rains, water struggles to seep downward. Instead, it pools on the surface or moves laterally, often heading directly for the lowest point—your home’s foundation. This is why properties with clay soil are highly susceptible to soft ground around the foundation, basement flooding, and persistent yard sogginess.
The primary risk of a poorly designed French drain in clay is clogging. The fine silt and clay particles can easily wash into the drainage gravel, filling the voids that are meant to channel water. Once clogged, the system is rendered useless, and you’re back to square one.
The Non-Negotiable Components for Success in Clay
To overcome the challenges of clay, a French drain system needs more than just a pipe and some gravel. It requires a meticulous approach that focuses on filtration, water volume capacity, and flow. The three most critical elements are a wider trench, the correct type of gravel, and, most importantly, a high-quality geotextile fabric.
Think of the system as a “burrito drain.” The geotextile fabric is the tortilla, wrapping the entire system to prevent the “filling”—the gravel and pipe—from becoming contaminated by the surrounding clay soil. Without this protective layer, failure is not a matter of if, but when.
Designing Your French Drain for Clay Soil: A Blueprint for Success
A successful French drain in clay soil is all about the details. From the dimensions of the trench to the type of pipe you use, every choice matters. Cutting corners on design or materials will lead to a system that clogs and fails, wasting both time and money.
Step 1: Strategic Planning and Layout
First, identify the source and path of the water. Observe your yard during a heavy rain to see where water pools and how it flows. The goal is to intercept this water before it reaches problem areas. Your trench should start at the highest point of the water issue and slope consistently downhill to a safe discharge point.
A proper slope is non-negotiable for ensuring water flows freely through the pipe. The standard minimum slope is 1%, which translates to a one-inch drop for every 10 feet of length. For dense clay soils, aiming for a slightly steeper slope, like 2%, can provide extra insurance against sluggish flow.
Step 2: Excavating the Right-Sized Trench
In clay soil, a standard narrow trench is insufficient. You need to create a larger channel to accommodate more drainage aggregate, which provides a bigger area for water to collect and flow. A trench that is 12 to 18 inches wide and 18 to 24 inches deep is typically recommended. This extra width and depth create a more robust drainage field that is less prone to being overwhelmed.
If you’re dealing with water from a higher elevation, you may need a specialized approach. Handling runoff from a hill often requires careful planning, a topic explored further in our guide on installing a French drain for uphill water.
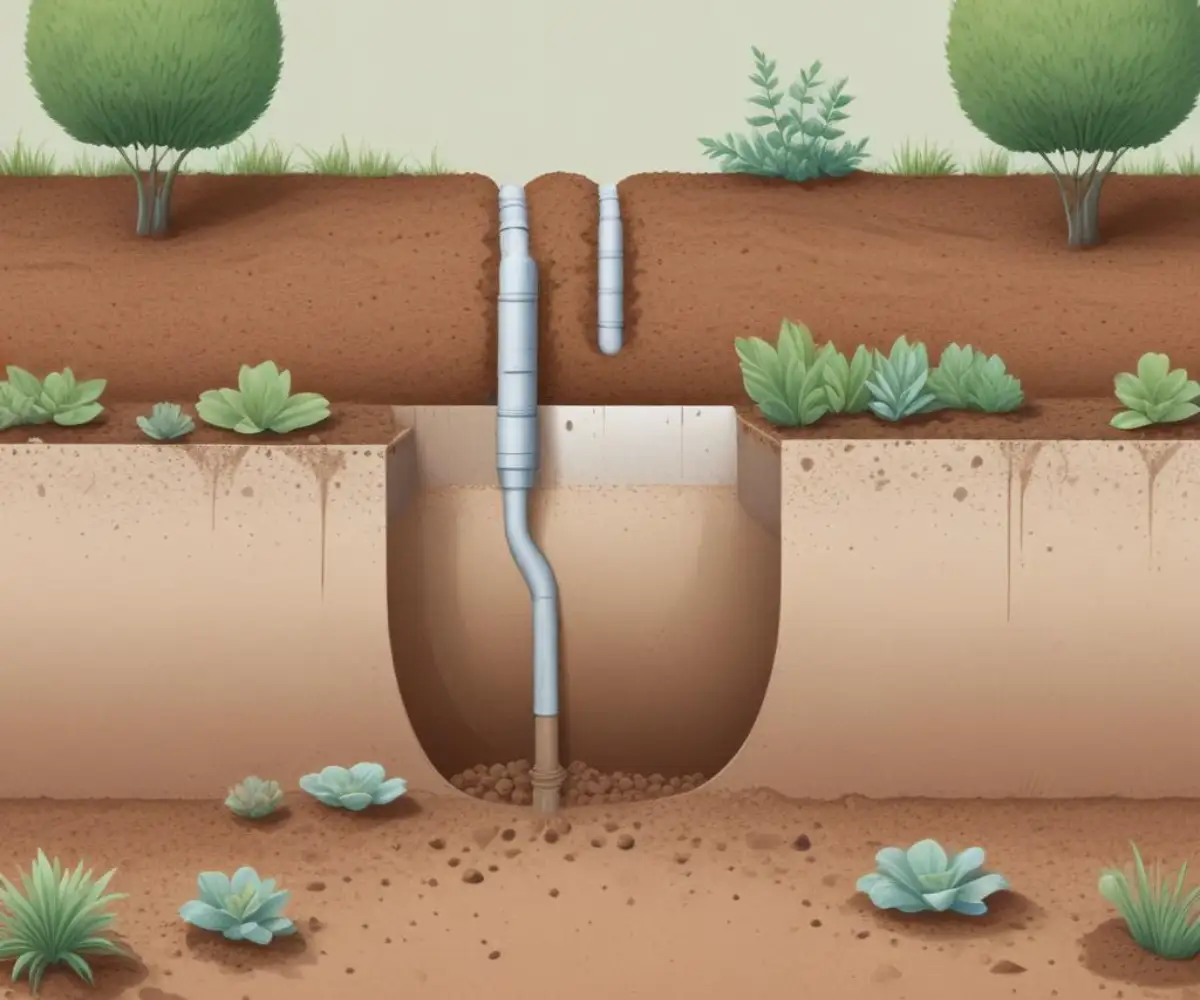
Step 3: The Geotextile Fabric Liner – Your System’s Protector
This is the most crucial step for clay soil installations. Use a non-woven geotextile filter fabric to line the entire trench, including the bottom and sides. This fabric is permeable, allowing water to pass through but preventing fine clay and silt particles from entering and clogging the gravel aggregate.
Leave enough excess fabric on both sides of the trench so that you can fold it over the top of the gravel once the trench is filled, completely encapsulating the system. This creates the “burrito” that protects the drain from all angles.
Choosing the Right Materials: The Foundation of a Lasting Drain
The materials you place inside the trench are just as important as the trench itself. The right combination of gravel and pipe will ensure your drain functions efficiently for years, while the wrong choices can lead to clogs and premature failure.
The Great Gravel Debate: Size and Type Matter
The type of gravel you use is critical for creating void space for water to flow. Washed, angular gravel, typically in the 3/4-inch to 1.5-inch range, is the best choice. The angular shapes of crushed stone interlock to form a stable matrix with large voids, maximizing water flow.
Avoid using pea gravel or other small, rounded stones. The small size and shape of these materials mean they have less void space and can be easily clogged by clay particles. Furthermore, ensure the gravel is “washed” to remove any dust or fine particles that could contribute to clogging.
The following table breaks down the pros and cons of common aggregate choices for French drains in clay soil.
| Gravel Type | Typical Size | Pros for Clay Soil | Cons for Clay Soil |
|---|---|---|---|
| Washed Crushed Stone (Granite, Bluestone) | 3/4″ – 1.5″ | Excellent void space, angular shapes interlock for stability, promotes high water flow. Highly Recommended. | Can be more expensive than other options. |
| River Rock (Rounded) | 1″ – 2″ | Good void space, aesthetically pleasing if exposed. | Rounded shape can shift over time, less stable than angular stone. |
| RC-57 (Smaller Crushed Stone) | 1/2″ – 3/4″ | Good drainage capability. | Smaller size makes it more susceptible to clogging if geotextile fabric is not used correctly. |
| Pea Gravel | 1/8″ – 3/8″ | Inexpensive and widely available. | Not Recommended. Too small, compacts easily, and clogs very quickly with clay particles. |
Perforated Pipe: The Heart of the System
A perforated pipe lies at the bottom of the trench and serves as the main conduit for carrying water away. Both rigid PVC and flexible corrugated pipes can be used, but rigid PVC is often preferred for its strength and smooth interior, which resists sediment buildup. If you do use a corrugated pipe, be sure it has a high crush rating to withstand the weight of the gravel and soil.
When placing the pipe, ensure the perforation holes are facing downwards. This allows water that pools at the bottom of the trench to enter the pipe and be carried away efficiently. Placing the holes up would require the water level to rise above the pipe before it could enter, leaving the trench perpetually saturated.
Step-by-Step Installation Guide for a Bulletproof French Drain
With your design finalized and materials on hand, it’s time to build. Follow these steps meticulously to ensure a successful installation.
1. Line the Trench with Fabric
Carefully lay the non-woven geotextile fabric into the excavated trench, pressing it against the bottom and sides. Ensure you have at least 12 inches of excess fabric on each side to wrap over the top later.
2. Add a Gravel Base
Pour a 2- to 3-inch layer of your chosen washed, angular gravel into the bottom of the fabric-lined trench. This creates a stable bed for the perforated pipe to rest on.
3. Position the Perforated Pipe
Lay the perforated pipe on top of the gravel base, ensuring the holes are facing down. Double-check that you have maintained a consistent downhill slope toward your designated outlet.
4. Backfill with Gravel
Carefully surround and cover the pipe with more gravel, filling the trench to within 4 to 6 inches of the ground surface. This large volume of gravel is what gives your system the capacity to handle heavy water flow in slow-draining clay.
5. Wrap the System (Complete the Burrito)
Fold the excess geotextile fabric from both sides over the top of the gravel. Overlap the edges by at least 6 inches to create a secure seal that prevents any soil from entering the gravel from above.
6. Finish with Topsoil and Sod
Cover the wrapped gravel with a layer of coarse sand or topsoil, followed by sod or grass seed to blend the drain into your landscape. Avoid putting the excavated clay back on top of the drain, as this would impede surface water from reaching the system.
Considering Alternatives and Advanced Solutions
While a properly built French drain is highly effective, it’s worth knowing about other drainage solutions that can work in tandem with or as an alternative to a traditional system, especially for specific problems.
For very localized soggy spots, a vertical French drain, which is more like a small dry well, can be an effective fix. For homeowners seeking innovative materials, it’s worth investigating newer technologies. Some wonder, does HydroBlox really work as a substitute for traditional gravel and pipe systems? It is an option that some are exploring for specific drainage challenges.
The verdict is clear: French drains absolutely work in clay soil, but they demand a more robust and thoughtful approach than in other soil types. By widening the trench, using washed angular gravel, and meticulously wrapping the entire system in high-quality non-woven geotextile fabric, you can create a drainage solution that conquers even the most stubborn clay and protects your property for the long haul.