Acrylic Bathtub Insulation: Stop Cold Baths With This Secret
There is nothing more disappointing than a hot bath that turns lukewarm in minutes. You carefully set the temperature, add your favorite salts, and settle in for a long soak, only to find yourself shivering moments later.
This common frustration often points to a single culprit hiding in plain sight: your acrylic bathtub. Its material properties and the hollow space beneath it are actively working against your comfort.
You'll Learn About
Why Your Acrylic Bathtub Gets Cold So Quickly
Acrylic is a popular bathtub material because it’s lightweight, affordable, and warm to the touch initially. However, it lacks the dense thermal mass of materials like cast iron, meaning it cannot hold heat for extended periods.
The real problem is the large, empty void between the tub shell and the floor. This air gap acts as a cooling chamber, constantly drawing warmth away from the water and the tub’s surface, drastically shortening your relaxation time.
The Transformative Benefits of Bathtub Insulation
Adding insulation is a simple, low-cost upgrade that fundamentally changes your bathing experience. It’s a non-negotiable step for anyone who enjoys a genuinely long, hot soak. The benefits go far beyond just temperature.
Uninterrupted Soaking Bliss and Energy Savings
The primary benefit is superior heat retention. Insulating the underside of your acrylic tub creates a thermal barrier, trapping the heat in the water and the tub material itself. This means your bath stays hotter for significantly longer, eliminating the need to constantly top it off with more hot water.
This simple act not only enhances your comfort but also saves you money. By reducing the need to add hot water, you lower your water heating costs, making it an eco-friendly and budget-conscious home improvement.
A Quieter, More Serene Bathroom Experience
Acrylic tubs can be noisy. The sound of water filling the tub, creaks from shifting weight, and other vibrations can echo through the hollow structure, creating a less than peaceful environment.
Insulation acts as an excellent sound-dampening material. It absorbs these vibrations, making the tub significantly quieter. This small change contributes to a more serene, spa-like atmosphere in your bathroom.
The Feel of a High-End, Solid Bathtub
One of the most overlooked benefits of insulating an acrylic tub is the improvement in its structural feel. The hollow, lightweight nature of acrylic can sometimes make it feel flimsy or less substantial underfoot.
Packing the void with insulation adds density and rigidity to the entire structure. This makes the tub feel more solid, stable, and luxurious, mimicking the robust feel of more expensive cast iron or stone resin models. While many homeowners seek out premium tubs, and our Victoria Albert bathtub reviews can guide you on high-end options, insulation can elevate the feel of a standard acrylic model dramatically.
Choosing Your Method: The Best Insulation for Acrylic Tubs
There are several effective methods for insulating your tub, each with its own advantages. Choosing the right one depends on your budget, DIY comfort level, and the specific access you have to the tub surround.
The most crucial factor is ensuring you select a moisture-resistant insulation. The bathroom is a high-humidity environment, and using the wrong material could lead to mold and mildew issues down the line.
| Insulation Type | Relative Cost | Ease of Installation | Key Advantage | Potential Downside |
|---|---|---|---|---|
| Closed-Cell Spray Foam | Moderate | Easy to Moderate | Complete, seamless coverage | Can be messy; permanent |
| Rigid Foam Boards (XPS/Polyiso) | Low | Moderate | High R-value per inch; clean install | Requires careful cutting and fitting |
| Rockwool or Fiberglass Batts | Low | Easy | Excellent soundproofing | Must be kept dry (potential for moisture retention) |
| Foam-in-Place Pourable Foam | High | Difficult | Fills every possible void | Can expand too forcefully if not used correctly |
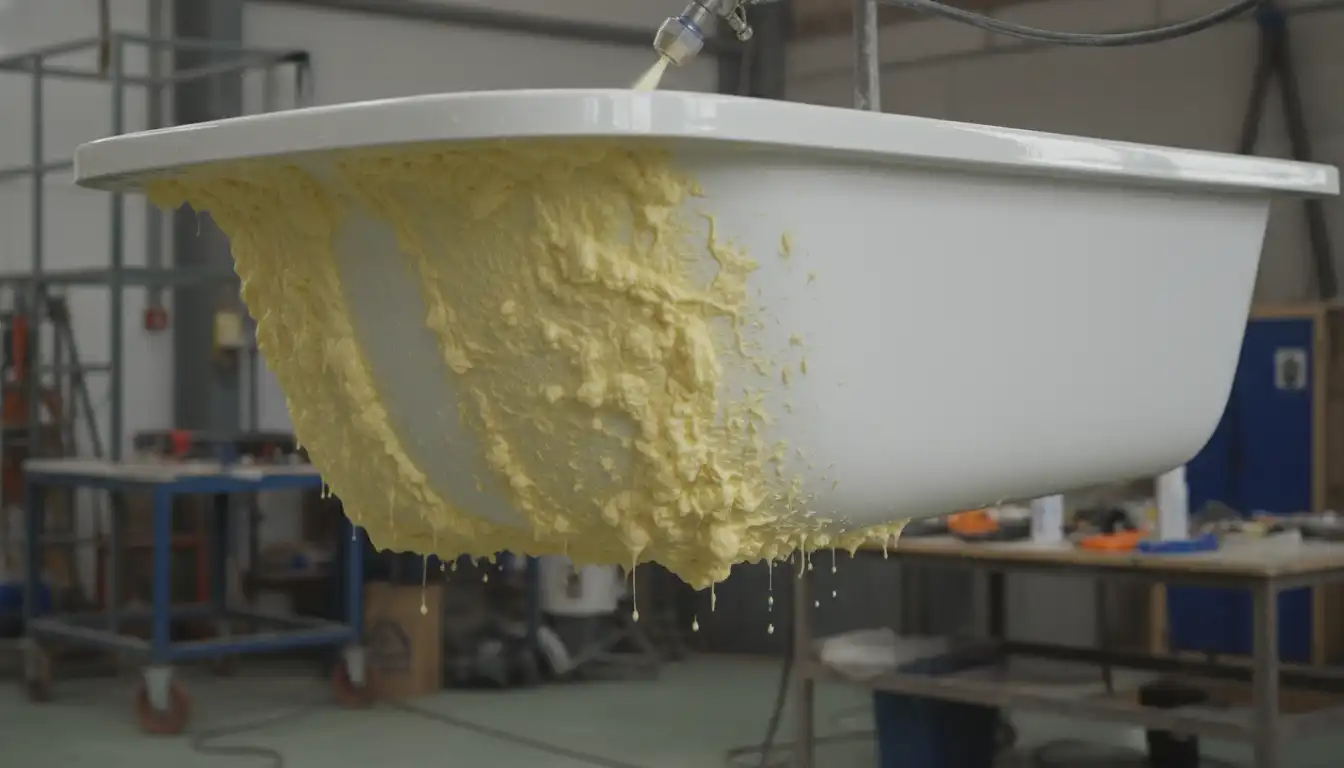
The Professional’s Choice: Spray Foam Insulation
For the most complete and effective thermal barrier, closed-cell spray foam is the top choice. It expands to fill every crack and crevice, creating a seamless, airtight seal around the tub that offers exceptional insulation and adds significant structural rigidity.
Kits are available at most home improvement stores. The key is to apply thin, even layers, as the foam will expand significantly. Always wear gloves, eye protection, and a mask, and ensure the area is well-ventilated during application.
The DIY-Friendly Route: Rigid Foam Boards
Rigid foam boards, such as XPS (Extruded Polystyrene), are an excellent, less messy alternative. These boards are easy to cut with a utility knife and can be wedged into place or secured with a construction adhesive rated for foam.
The goal is to cover as much of the underside of the tub and the surrounding wall cavities as possible. Use aluminum foil tape to seal the seams between boards, creating a continuous barrier against heat loss.
The Classic Approach: Rockwool or Fiberglass Batts
Using traditional insulation like Rockwool or fiberglass batts is another effective and inexpensive option. These materials are excellent for both thermal and acoustic insulation. Rockwool has the added benefit of being highly fire and moisture resistant.
When using batts, gently pack them into the void around the tub. Do not compress them, as this reduces their insulating effectiveness. It is critical to ensure the batts do not get wet, so addressing any plumbing issues first, like a bathroom faucet leaking from the center hole, is a mandatory prerequisite.
Step-by-Step Guide: How to Insulate Your Bathtub
Insulating your tub is a straightforward project you can likely complete in an afternoon. Proper preparation is the most important part of the process.
Step 1: Safety and Preparation
First, ensure you have clear access to the underside and sides of the bathtub. This may require removing an access panel or, for a new installation, insulating before the final surround is installed.
Thoroughly clean the exterior of the tub shell to ensure it is free of dust and debris, which will help adhesives and spray foam stick properly. Put on your safety gear, including gloves and safety glasses.
Step 2: Applying Your Chosen Insulation
For spray foam, apply a thin, even coat approximately 1-2 inches thick across the entire underside of the tub, avoiding direct contact with plumbing pipes and the drain assembly. For foam boards, cut pieces to fit snugly against the tub’s contours and between the framing studs.
If using batts, cut pieces and place them in the cavities, ensuring they fill the space without being compacted. No matter the method, be careful to leave the motor access area of a jetted tub completely clear.
Step 3: Finishing and Curing
Allow the insulation materials to cure as directed by the manufacturer. For spray foam, this can take several hours. Once cured, you can replace the access panel or complete the installation of your tub surround.
Now, the only thing left to do is run a bath and enjoy the dramatically improved comfort and heat retention. This is just one step towards a more comfortable and efficient home. Improving appliances, which we touch on in our Kucht range review, is another key part of that strategy.
Common Insulation Mistakes to Avoid
While this is a simple project, a few common mistakes can cause major headaches. Avoiding them ensures you get all the benefits without any of the drawbacks.
The most critical error is blocking access to plumbing. Always leave a clear path to the drain, overflow, and any faucet connections. Create a “box” around these components with foam board if necessary, but never encase them in permanent spray foam.
Another issue is using the wrong type of foam. Only use low-pressure or “minimally expanding” spray foam. High-expansion foam can exert enough force to crack the acrylic shell of the tub, causing irreparable damage.
Frequently Asked Questions
Do acrylic bathtubs need to be insulated?
While acrylic itself is a good insulator that retains heat well, adding extra insulation is a popular and recommended upgrade. Doing so maximizes heat retention, keeping your bathwater warmer for a longer period. This enhancement leads to a more comfortable and energy-efficient bathing experience.
What are the benefits of insulating an acrylic tub?
The primary benefit of insulating an acrylic bathtub is prolonged heat retention in the water. This means you can enjoy a longer, more comfortable soak without needing to add more hot water. Consequently, you can save on both water and energy costs over time.
Do some acrylic bathtubs already come with insulation?
Yes, some higher-end acrylic bathtubs are manufactured with built-in insulation layers or feature a double-walled construction for enhanced thermal properties. If you are purchasing a new tub, it is worth checking if it already includes insulation. For existing tubs, adding insulation is a straightforward way to improve their performance.
What kind of insulation is best for an acrylic bathtub?
Several types of insulation are effective for acrylic tubs. Spray foam insulation can be applied directly to the back of the tub, while fiberglass or rock wool batts are also common choices to place around the tub’s exterior. The best option may depend on the accessibility of the space around your tub.
Can I insulate my acrylic bathtub myself?
Insulating an acrylic bathtub can be a DIY-friendly project, particularly if you have access to the area around and underneath the tub, such as with an alcove installation. Materials like fiberglass batts can be cut to size and fitted into the surrounding cavity. For safety, always wear protective gear like gloves and a mask when handling insulation.
Is it difficult to insulate a freestanding acrylic tub?
Insulating a freestanding tub can be more challenging because the exterior is exposed. However, many freestanding acrylic tubs feature a double-skinned or two-piece construction, which provides good insulation. If you are considering a freestanding model, inquire about its insulating properties before you buy.
Is Insulating Your Acrylic Tub Worth It? The Final Verdict
Absolutely. For a minimal investment of time and money, insulating your acrylic bathtub is one of the highest-impact upgrades you can make to your bathroom. It directly solves the problem of rapid heat loss, turning a frustratingly short bath into a long, luxurious soak.
The added benefits of sound dampening and increased structural solidity elevate the feel of your entire bathroom. It’s a simple DIY project that delivers immediate, tangible results every single time you turn the tap.