DIY Shower Rod Cover: Your #1 Hack for a Luxury Bathroom Look
Transform your bathroom into a spa-like retreat with one simple DIY trick: a shower rod cover. This budget-friendly hack instantly elevates your space, hiding that plain metal rod and replacing it with a polished, custom look. Whether you choose fabric, faux wood, or a sleek wrap, the result is a touch of luxury that makes your bathroom feel designer-inspired without the hefty price tag.
Easy to install and endlessly customizable, this project is perfect for renters and homeowners alike. Ready to upgrade your daily routine? Let’s dive into how a shower rod cover can redefine your bathroom style.
That Ugly Shower Rod? It’s Secretly Ruining Your Bathroom’s Style
You’ve spent time and money choosing the perfect tiles, a stylish vanity, and plush towels. Yet, a small, overlooked detail is undermining your entire effort: the humble shower rod. It’s often a standard-issue, uninspired metal tube that might be scratched, slightly rusted, or simply clashing with your carefully chosen fixtures.
This single element can make an otherwise beautiful bathroom feel cheap or unfinished. The problem isn’t just aesthetic; it’s about the final 10% of design that elevates a space from functional to fabulous. Ignoring it is like wearing worn-out shoes with a brand-new suit.
Why That Simple Metal Rod Is a Bigger Problem Than You Think
Most homes come with one of two types of shower rods: a spring-loaded tension rod or a fixed, wall-mounted rod. While functional, their design is often an afterthought. Tension rods, in particular, can look temporary and often feature rubber ends that yellow over time. Wall-mounted rods, while sturdier, are frequently made from basic chrome or plastic that easily shows water spots and wear.
Beyond looks, these rods present other issues. The scraping sound of metal curtain rings against a metal rod is a grating experience. Furthermore, constant exposure to steam and moisture can lead to rust and corrosion, which not only looks bad but can also stain your shower curtain.
For renters, this problem is magnified. You’re often stuck with the hardware provided, unable to drill new holes or make permanent changes. A DIY shower rod cover becomes the perfect solution—a non-destructive, reversible upgrade that adds a massive dose of personal style.
Choosing Your Materials: The Foundation of a Flawless Finish
The beauty of a DIY cover lies in its versatility. You can tailor it to your exact decor style, from modern minimalist to rustic farmhouse. Before you start, understanding your material options is key to achieving a durable and professional-looking result.
Each material offers a different aesthetic, level of difficulty, and durability. Consider not just the look you want, but also the moisture level in your bathroom and how much time you want to spend on the project. The right material can transform your rod from an eyesore into a statement piece.
Below is a breakdown of the most popular and effective materials for this project. This will help you weigh the pros and cons to select the perfect choice for your bathroom sanctuary.
| Material | Avg. Cost | Difficulty Level | Best For… |
|---|---|---|---|
| Fabric | $10 – $30 | Easy to Moderate | Custom patterns and textures; curved rods. |
| Spray Paint | $8 – $15 | Easy | A quick, sleek, and modern color change. |
| Vinyl / Contact Paper | $10 – $20 | Easy | No-sew patterns like wood grain or marble. |
| Rope or Twine | $15 – $25 | Moderate | Nautical, rustic, or bohemian styles. |
| PVC Pipe Sleeve | $10 – $20 | Moderate | A durable, high-end, custom-rod look. |
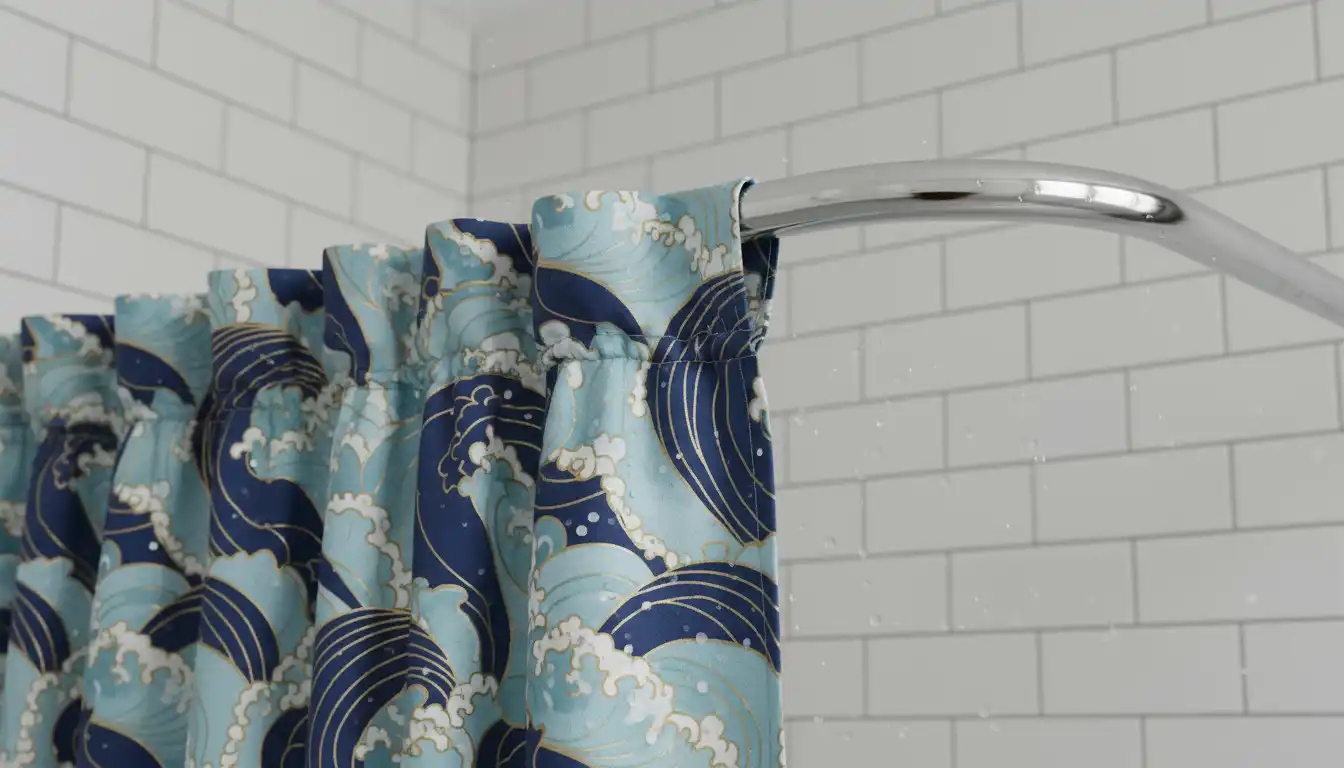
Step-by-Step Guide: Creating the Classic Fabric Shower Rod Cover
A fabric cover is the most popular DIY option for a reason: it offers limitless design possibilities. You can choose a fabric that matches your shower curtain, window treatments, or towels for a cohesive, decorator-level look. This method works perfectly for both straight and curved rods.
This process is straightforward, even for those with minimal sewing skills. A no-sew alternative using iron-on hem tape makes it accessible to everyone. The result is a soft, elegant finish that also helps to muffle the sound of sliding curtain rings.
Step 1: Get Your Measurements Right
Precision is key. First, measure the full length of your shower rod from one wall to the other. Next, measure the circumference of the rod by wrapping a flexible measuring tape around it. Write these two numbers down.
For your fabric dimensions, add 1 inch to the circumference for seam allowance. For the length, no additions are necessary. So, if your rod is 60 inches long with a 3-inch circumference, you will need a fabric piece that is 60 inches long and 4 inches wide.
Step 2: Choose and Prepare Your Fabric
Select a fabric that can handle a humid environment. Outdoor fabric, marine vinyl, or laminated cotton are excellent choices as they are designed to resist moisture and mildew. If you choose a standard cotton or linen, consider treating it with a waterproofing spray.
Always pre-wash and dry your fabric before cutting. This prevents any shrinking or warping after your cover is complete, ensuring a perfect fit for years to come.
Step 3: Cut and Sew Your Fabric Tube
Lay your pre-washed fabric on a flat surface and carefully cut it to the dimensions you calculated in Step 1. Once cut, fold the fabric in half lengthwise with the “right” sides facing each other. Pin along the long edge to hold it in place.
Using a sewing machine, stitch along this long edge with a half-inch seam allowance, creating a long tube. If you’re using a no-sew method, apply iron-on hem tape or a strong fabric glue along this edge and press firmly according to the product’s instructions.
Step 4: Turn and Finish
Turn the fabric tube right-side out. This can be the trickiest part; attaching a safety pin to one end and feeding it through the tube can make the process much easier. Once it’s turned, press the tube flat with an iron, centering the seam on what will be the back or top of your cover.
You don’t need to finish the short ends of the tube. They will be hidden by the wall or the decorative end caps of your shower rod, giving you a clean, professional finish without any extra sewing.
Step 5: Install Your New Cover
This is the satisfying final step. Simply take down your shower rod and slide the new fabric cover over it like a sleeve. Re-install the rod, hang your shower curtain, and admire your instant bathroom upgrade.
Beyond Fabric: 3 More Genius Ways to Disguise Your Shower Rod
If fabric isn’t your style, don’t worry. There are several other innovative and equally effective methods to transform your shower rod from drab to fab. These techniques range from simple color changes to a clever illusion that mimics a high-end custom rod.
Hack 1: The Sleek and Simple Paint Job
Never underestimate the power of paint. A can of spray paint designed for metal or plastic can completely change your rod’s appearance in under an hour. Matte black, brushed nickel, or oil-rubbed bronze can make a standard rod look like a luxury fixture.
The key to a lasting finish is preparation. Remove the rod and clean it thoroughly. Lightly sand it to give the paint something to grip onto, then wipe it down again. Apply a coat of rust-inhibiting primer, let it dry, and then apply two thin, even coats of your chosen color. Finish with a clear sealant for maximum durability against moisture.
Hack 2: The PVC Pipe Sleeve Illusion
This is a game-changing technique that few people talk about, but it delivers an incredibly professional result. It involves using a thin-walled PVC pipe with a slightly larger diameter than your shower rod to act as a solid, high-end sleeve. This method adds visual weight and makes the rod look far more expensive than it is.
Purchase a length of PVC pipe and cut it to the exact length of your shower rod. Use a handsaw or rotary tool to carefully cut the pipe lengthwise down one side. This allows you to snap the PVC sleeve directly over your existing rod without having to remove the wall mounts.
Once it’s on, you can paint the PVC just as you would the metal rod, or even cover it with a wood-grain or marble-effect contact paper for a truly custom look. This is a fantastic way to get a solid, substantial-looking rod on a minimal budget and is one of the best ideas for a budget-friendly bathroom makeover.
Hack 3: The Rustic Rope or Twine Wrap
For a touch of nautical, rustic, or bohemian charm, wrapping your shower rod in rope is a unique and textured solution. Choose a natural jute rope or a polished nylon twine depending on the specific look you want to achieve.
Start at one end, securing the rope with a dab of hot glue or super glue. Tightly wrap the rope around the rod, ensuring each new coil is pressed firmly against the last one with no gaps. When you reach the other end, cut the rope and secure it with another dab of glue for a clean finish.
Keeping Your Custom Rod Looking New
Your beautiful new shower rod cover deserves to be kept in pristine condition. Maintenance is simple and depends on the material you’ve chosen. A little regular care will prevent mildew and ensure your hard work continues to elevate your bathroom’s style.
For fabric covers, take them down every few months and machine wash them on a gentle cycle. For painted, vinyl-wrapped, or PVC-sleeved rods, simply wipe them down with a damp cloth and a mild cleaner weekly. This also helps in keeping the entire shower area pristine, much like a good glass protectant does for your doors. For more ideas on shower maintenance, consider these reviews on protective coatings.
Frequently Asked Questions
Embarking on a new DIY project can bring up a few questions. Here are answers to some of the most common queries about creating a custom shower rod cover.
Can I make a cover for a curved shower rod?
Absolutely. A fabric cover is the ideal solution for a curved rod. The flexible material will easily conform to the shape of the rod without any bunching or creasing. The PVC and rope methods are generally better suited for straight rods.
Will a cover make it harder to slide my shower curtain?
This depends on the material. A snug fabric cover can sometimes add a bit of friction. However, a smooth, painted PVC sleeve or a vinyl-wrapped rod can actually make the curtain rings slide more easily and quietly than on a bare metal rod.
How can I prevent a fabric cover from getting moldy?
Ventilation is your best friend. Always run your bathroom fan during and after a shower. Choosing a moisture-resistant or marine-grade fabric provides the best defense. Regular washing will also keep it fresh and clean.
Is a DIY cover a good idea for a rental property?
It’s a perfect solution for renters. Every method described here is completely reversible and causes no damage to the original fixture. It allows you to customize your space and then easily remove the cover when you move out.
Conclusion: The Simple Upgrade with a Massive Impact
That overlooked shower rod holds the secret to a truly polished bathroom. You don’t need to spend a fortune on high-end fixtures to achieve a luxurious feel. With a little creativity and an afternoon of your time, a DIY shower rod cover can become the finishing touch that ties your entire room together.
Whether you choose a custom fabric print, a sleek painted finish, or the clever PVC sleeve illusion, this project empowers you to take control of the small details that make a big difference. It’s a fast, affordable, and impactful way to transform your bathroom from simply functional to a stylish sanctuary you’ll love.