DIY Outdoor Smoking Shelters: Build Your Personal Haven!
Smoking outdoors at home often means dealing with unpredictable weather, from scorching sun to sudden downpours. It can also lead to lingering smoke bothering family members and neighbors, creating an uncomfortable environment for everyone. The lack of a designated area results in scattered cigarette butts and a constant search for a comfortable, sheltered spot.
A well-planned DIY outdoor smoking shelter solves these problems entirely. It provides a dedicated, comfortable space that protects you from the elements, contains smoke and odors, and keeps your property clean. Building your own allows for complete customization to match your home’s aesthetic and your specific needs.
You'll Learn About
Why a Designated Smoking Shelter Is a Game-Changer
Investing your time in a DIY smoking shelter project offers far more than just a place to smoke. It enhances your daily routine, improves relationships with those you live with, and can even add a touch of functional elegance to your backyard.
Enhance Comfort and Unmatched Convenience
Imagine having a dedicated spot that’s always ready, regardless of the weather. A sturdy roof and partial walls offer immediate protection from rain, snow, and harsh winds. This means no more canceled smoke breaks or huddling under a leaky umbrella.
This designated space becomes your personal retreat. Furnished with a comfortable chair and a small table, it’s a place to relax and decompress in comfort, day or night.
Improve Household Harmony and Air Quality
One of the biggest challenges for smokers living with non-smokers is the issue of secondhand smoke. An outdoor shelter is strategically positioned to direct smoke away from open windows and doors, significantly reducing the amount of odor that enters your home.
This consideration fosters a more peaceful living environment. It shows respect for your family and neighbors, minimizing complaints and creating a more harmonious atmosphere for everyone.
Boost Property Value and Overall Aesthetics
A well-designed and properly constructed smoking shelter is more than just a utility structure; it’s a backyard feature. Using quality materials and a design that complements your home, it can become an attractive and valuable addition to your property.
Furthermore, it centralizes smoking activity, which means cigarette butts and ash are contained in one easy-to-clean location. This simple change helps keep your patio, lawn, and garden areas tidy and free of litter.
Planning Your DIY Smoking Shelter: The Blueprint for Success
Proper planning is the most critical phase of this project. Taking the time to consider location, design, and materials will save you from headaches down the road and ensure the final structure is safe, functional, and exactly what you envisioned.
Location, Location, Location: Where to Build
Choosing the right spot is crucial for both convenience and compliance. Consider the distance from your house—close enough for easy access but far enough to prevent smoke from wafting inside. Pay attention to prevailing wind patterns to help position openings away from your home or neighbors’ properties.
Before you dig, always check local building codes and homeowner’s association (HOA) regulations. Some areas have rules about the size, location, and type of outbuildings you can construct, and a quick check can prevent costly mistakes.
Design and Size: From Simple Lean-To to a Full Enclosure
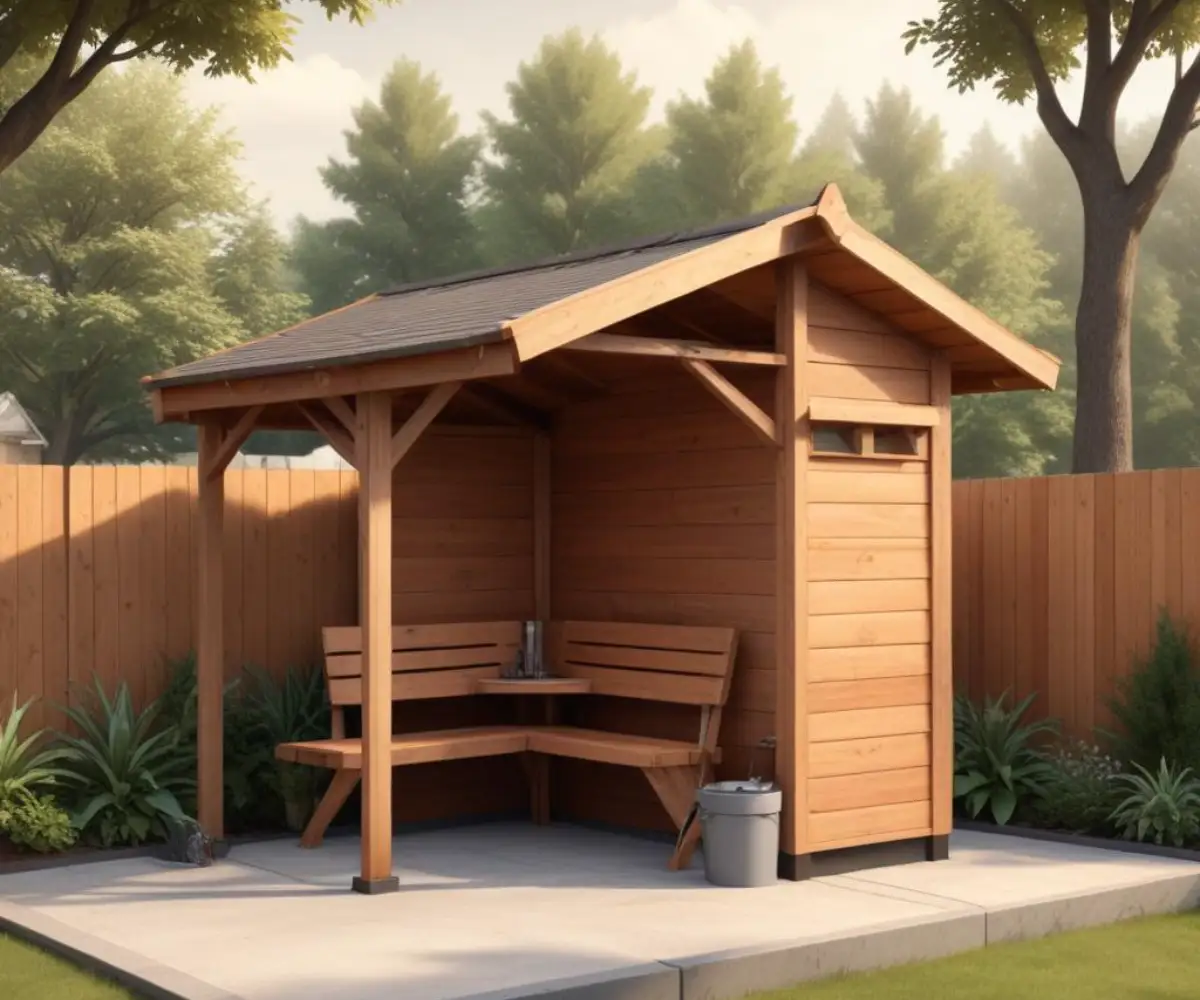
The design of your shelter can range from a simple, three-sided structure to a more elaborate gazebo-style building. A lean-to design, attached to an existing shed or garage, is often the simplest and most cost-effective. A freestanding, three-sided shelter offers more placement flexibility and excellent ventilation.
Consider how many people will use the shelter at once when determining its size. A compact 4×6 foot structure is often sufficient for one or two people, while a larger group might require something closer to 8×8 feet. Ensure you have enough space for comfortable seating and a small table.
Material Selection: Durability Meets Budget
The materials you choose will define the shelter’s look, longevity, and overall cost. Wood is a popular choice for its classic aesthetic and ease of use, but it requires maintenance. Metal and polycarbonate offer a modern look with superior durability and minimal upkeep.
Each material has distinct advantages. Thoughtfully comparing them based on your climate, budget, and desired maintenance level will lead to a structure that serves you well for years. Making sure your materials are well-secured is paramount; you don’t want a situation where a closet wire shelf fell out of wall becomes a larger structural issue for your shelter.
| Material | Average Cost | Durability | Maintenance Level | Best For |
|---|---|---|---|---|
| Pressure-Treated Pine | Low | Good | High (Requires regular sealing) | Budget-friendly, classic wood look. |
| Cedar Wood | Medium | Excellent | Medium (Naturally rot-resistant) | Beautiful finish and natural durability. |
| Aluminum | Medium | Excellent | Very Low (Rust-proof) | Modern look, lightweight, and long-lasting. |
| Steel | High | Superior | Low (If galvanized or coated) | Maximum strength and security. |
| Polycarbonate Panels | Medium | Very Good | Very Low | Roofing and walls; allows light through. |
Step-by-Step Guide: Building Your Outdoor Smoking Shelter
With a solid plan in hand, you’re ready to start building. This guide breaks down the construction process into manageable steps. Remember to always prioritize safety by wearing appropriate gear like gloves and eye protection.
Step 1: Gathering Your Tools and Materials
Before you begin, assemble everything you’ll need. A typical project requires a circular saw, power drill, measuring tape, level, and speed square. Your materials list will be based on your design plans but will generally include lumber for the frame, screws or nails, concrete for footings, and your chosen wall and roofing materials.
Step 2: Preparing the Foundation
A stable and level foundation is non-negotiable for a durable structure. Simple deck blocks are a great option for smaller shelters as they are easy to place and adjust. For a more permanent solution, you can pour a concrete slab or install concrete footings below the frost line.
Regardless of the method, use a level to ensure your base is perfectly flat. This will prevent issues with the frame and ensure the stability of the entire shelter.
Step 3: Assembling the Frame
Start by building the wall frames on the ground, which is easier and safer than assembling them vertically. Construct rectangular frames using your chosen lumber, ensuring the corners are square. Once a wall frame is built, lift it into place on your foundation and secure it with temporary braces.
After all the wall frames are up and braced, connect them at the corners. The final step is to add the top plates that will support the roof structure. Double-check that the entire assembly is level and plumb before moving on.
Step 4: Installing Walls and Roofing
With the frame complete, you can now add the sheathing and roofing. Attach your wall panels—whether they are wood siding, metal sheets, or polycarbonate—directly to the frame. Leave openings for ventilation as dictated by your design.
Next, install the roof rafters. For a simple sloped roof, these will run at an angle from the high side to the low side. Cover the rafters with your chosen roofing material, such as corrugated metal or polycarbonate panels, ensuring a proper overlap to prevent leaks.
Essential Features for the Ultimate Smoking Shelter
A basic structure provides shelter, but a few key additions can transform it into a truly comfortable and functional space. These features address ventilation, comfort, and safety, elevating your DIY project to a professional level.
Ventilation: The Key to a Breathable Space
Effective ventilation is the most important feature of a smoking shelter. A three-sided design inherently provides excellent cross-ventilation. For more enclosed designs, ensure there are gaps at the top and bottom of the walls to allow air to circulate freely.
For an advanced setup, consider installing a roof vent turbine or a small, solar-powered exhaust fan. These active ventilation systems are highly effective at pulling smoke up and out of the shelter, creating a much more pleasant environment inside.
Seating, Lighting, and Power
Comfort is key. Incorporate built-in benches made from leftover lumber for a seamless look, or simply add a couple of weather-resistant chairs. A small table provides a convenient surface for ashtrays and drinks.
For nighttime use, solar-powered LED lights are an easy and eco-friendly solution that requires no wiring. If you desire more power for a heater or charging devices, you may need to run an outdoor-rated extension cord or consult an electrician for a permanent installation. Understanding the basics of how different systems work, even a simple european light switch, can provide context for the complexity of adding permanent power.
Safety and Proper Waste Disposal
Safety should always be a top priority. Equip your shelter with a large, fire-safe ashtray, preferably one with a lid to contain smoldering material. A metal bucket with sand is another excellent option.
It’s also wise to keep a fire extinguisher nearby and accessible. When it comes to cleanup, ensure all waste is disposed of responsibly, much like you would take care in learning how to dispose of bleach water outside to protect the environment.
Maintaining Your DIY Smoking Shelter for Longevity
Your shelter is built, but the work isn’t quite done. Regular maintenance will protect your investment and keep the structure safe and looking great for years to come. A little upkeep goes a long way.
Regular Cleaning and Inspections
On a weekly basis, empty the ashtrays and sweep the floor to keep the space tidy. Periodically, wash down the walls and roof with a mild soap and water solution to remove any residue or grime that has built up.
At least twice a year, conduct a thorough inspection. Check all screws and fasteners to ensure they are tight. Examine the structure for any signs of wear, damage from weather, or rot if you’ve used wood.
Weatherproofing and Seasonal Care
If your shelter is made of wood, it will need to be re-sealed or re-stained every couple of years to protect it from moisture and UV damage. This is also a good time to check for and caulk any gaps that may have formed, which will help keep out wind and rain.
Before winter, clear away any leaves or debris that have accumulated on the roof to prevent moisture buildup and potential damage from the weight of snow and ice. Taking these simple steps ensures your shelter remains a durable and welcoming retreat through every season.