Deck Joist Pulling Away From Ledger? This Is A Code Red Warning
There are few sights more alarming to a homeowner than noticing a gap forming where their deck connects to the house. That small space between a deck joist and the ledger board is not just a cosmetic issue; it’s a critical structural failure in progress. This separation is a primary warning sign that your deck could be at risk of a partial or even catastrophic collapse.
Understanding the gravity of this situation is the first step toward ensuring the safety of your family and guests. A deck is a heavy structure, and its connection to the house is the most critical point. When this connection fails, the consequences can be devastating. This guide will walk you through the causes, dangers, and detailed solutions for fixing a deck joist that’s pulling away from its ledger board.
You'll Learn About
Why Your Deck Joist is Pulling Away: Uncovering the Root Causes
A separating deck joist is always a symptom of a deeper problem. The forces of nature, combined with potential construction oversights, create a perfect storm for failure. Identifying the specific cause is crucial for implementing a lasting repair and preventing a recurrence.
Improper Fasteners: The Number One Culprit
By far, the most common reason for this dangerous separation is the use of incorrect fasteners. For many years, builders used smooth-shank nails to attach joist hangers to the ledger and to attach the ledger itself to the house. Nails are fundamentally weak against the withdrawal forces that a deck constantly exerts.
Over time, the natural expansion and contraction of wood, combined with the weight and movement on the deck, can slowly work these nails loose. Once a nail begins to pull out, it loses almost all its holding power, initiating the separation process. Modern building codes now strictly prohibit using nails for these critical structural connections, requiring specific structural screws or bolts instead.
Water Damage and Wood Rot: The Silent Destroyer
Moisture is the mortal enemy of any wooden structure. If the ledger board—the piece of lumber attached directly to your house—was installed without proper flashing, water can get trapped behind it. Flashing is a thin piece of impervious material (typically metal or vinyl) that directs water away from the wall.
Without it, water seeps into the ledger, the house’s rim joist, and the ends of the deck joists. This constant moisture saturation leads to wood rot. Rotted wood becomes soft and spongy, losing its structural integrity and ability to hold fasteners securely, allowing joists to pull away under load.
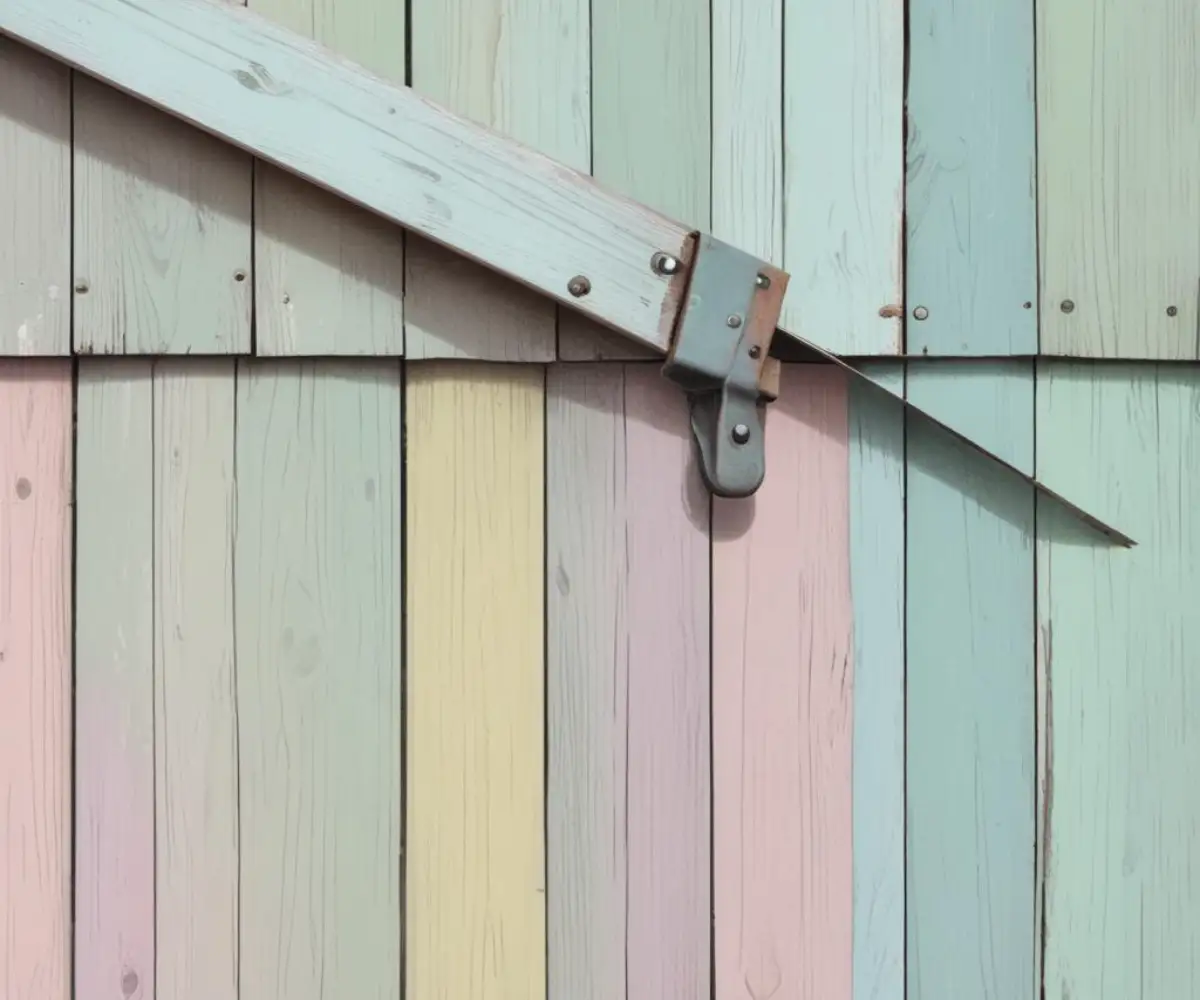
Missing or Incorrectly Installed Joist Hangers
Joist hangers are the metal brackets that create a strong, cradle-like connection between the end of the joist and the face of the ledger board. If these hangers were omitted entirely and the joists were simply “toe-nailed” (nailed in at an angle), the connection is critically weak from the start.
Even if hangers are present, they can be installed incorrectly. Common mistakes include using the wrong type of nails (like roofing nails instead of specified joist hanger nails), or not filling every designated hole in the hanger with a fastener. Each empty hole represents a significant reduction in the hanger’s load-carrying capacity.
The Silent Danger: What Happens if You Ignore a Separating Joist
A small gap can seem insignificant, but it’s a sign of a progressive failure that will only worsen over time. Ignoring it is not an option, as it puts your property and, more importantly, people at serious risk. The leading cause of deck collapse is the failure of the ledger board connection.
As one joist pulls away, the load it was carrying is transferred to the adjacent joists, placing them under greater stress. This can create a domino effect, leading to multiple joist failures and the eventual collapse of a section or the entire deck. A deck collapse can cause severe injuries or even fatalities, making immediate action imperative.
Furthermore, the same water intrusion that causes the joists to separate can also be causing significant damage to the structure of your home. Rot that begins in the ledger board can easily spread to your house’s rim joist and wall sheathing, leading to extensive and costly repairs that go far beyond just the deck.
Your Step-by-Step Inspection Guide: How to Assess the Damage
Before you can plan a repair, you need to understand the full extent of the problem. A thorough inspection is critical. For safety, if your deck is high off the ground or you see widespread signs of rot or separation, it is best to stay off the deck and call a professional inspector or contractor immediately.
The Visual Check
Start with a careful visual inspection from underneath the deck. Use a bright flashlight to get a clear view of the ledger board and each joist connection. Look for visible gaps between the end of the joists and the ledger. Check the joist hangers for signs of rust, bending, or fasteners that have pulled out.
Pay close attention to the ledger board itself. Is it straight, or is it bowing or cracking? Crucially, look for a metal or vinyl flashing strip tucked under the house siding and extending over the top of the ledger board. The absence of proper flashing is a major red flag for hidden water damage.
The Physical Test
If the deck seems reasonably stable, you can perform some gentle physical tests. Try to wiggle the joists near the ledger board. There should be no significant movement or play in the connection. Any looseness indicates a failed connection.
Next, take a screwdriver or an awl and firmly poke the wood in several spots: the ledger board, the end of the joists, and the house’s rim joist if visible. The wood should be solid. If the tool sinks in easily or the wood feels soft and spongy, you have active wood rot that must be addressed.
The Ultimate Repair Guide: Fixing a Deck Joist Pulling Away From the Ledger
Repairing a separating joist is a structural job that requires care and the right materials. If you are not comfortable with this level of work or if the damage involves extensive rot, hiring a qualified professional is the safest choice. For minor to moderate separation on a low-level deck, a skilled DIYer can often perform the repair.
Step 1: Temporarily Support the Deck
Safety is paramount. Before you do anything to the existing connection, you must support the weight of the affected area. Place a solid block on the ground beneath the joist that has pulled away, a few feet from the house. Use a hydraulic bottle jack on top of the block with a 4×4 post extending up to the underside of the joist.
Gently raise the jack just enough to take the weight off the connection at the ledger. The goal is not to lift the deck significantly, but simply to support it and relieve the tension. This prevents the deck from falling while you work.
Step 2: Close the Gap and Secure the Joist
With the joist supported, you can now work to close the gap. In many cases, simply relieving the sagging pressure with the jack will allow the joist to settle back into place. You can use a pry bar or clamps to gently persuade it back into a flush position against the ledger board inside the joist hanger.
Once the joist is flush, it’s time to create a new, much stronger connection. Remove any old nails from the joist hanger flanges. Then, using an impact driver or drill, secure the hanger to the ledger board using 1 ½-inch structural connector screws in every available hole. Next, drive 2 ½-inch or 3-inch structural screws through the angled holes of the hanger into the side of the joist. Using the correct, specified fasteners is not optional; it is the core of a safe repair.
The choice of fasteners is critical for ensuring the long-term stability and safety of your deck. Different fasteners have vastly different properties when it comes to strength and application.
| Fastener Type | Strength & Use Case | Ease of Installation | Relative Cost |
|---|---|---|---|
| Common Nails | Poor withdrawal strength. Prone to backing out over time. Not suitable for structural connections. | Easy (with hammer) | Low |
| Joist Hanger Nails | Thicker shank than common nails, designed for shear strength in hangers. Required for proper hanger installation. | Easy (with hammer) | Low |
| Structural Screws | Excellent withdrawal and shear strength. Specifically engineered for structural connections. The modern standard for deck building. | Moderate (requires drill/impact driver) | Medium |
| Thru-Bolts | The strongest connection. A bolt passes through the ledger and joist end with nuts and washers on each side. More complex to install. | Difficult (requires precise drilling) | High |
Step 3: Addressing Ledger and Flashing Issues
If your inspection revealed that the ledger board itself is soft from rot or is pulling away from the house, the repair becomes much more complex. A rotten ledger board must be replaced, which is a major job that involves supporting the entire deck structure. This is typically beyond the scope of a DIY project and requires professional expertise.
Similarly, if you discovered that proper flashing is missing, it is vital to have it retrofitted. This may involve removing the first few rows of deck boards to gain access to the top of the ledger. A professional can install the correct Z-flashing or peel-and-stick membrane to permanently solve the water intrusion issue.
Prevention is Key: How to Stop This From Ever Happening Again
Once your deck is properly repaired, you can take steps to ensure this dangerous problem never returns. The most effective strategy is proactive maintenance and annual inspections.
Every spring, get under your deck and perform the same visual and physical inspection you did for the repair. Look for any new gaps, corrosion on hangers, or signs of water staining. Catching a problem early can turn a potential disaster into a minor fix.
Also, manage water around your home. Ensure your gutters are clean and downspouts direct water far away from the deck and foundation. Using strong materials, like properly sized 2×8 deck boards for your joists, contributes to a more robust and durable structure from the start.
Frequently Asked Questions (FAQ)
How much of a gap is considered dangerous?
Any visible gap between the end of a deck joist and the ledger board is a sign of a failing connection and should be considered dangerous. There is no “safe” amount of separation. It indicates that the fasteners have failed and the joist is no longer fully supported, demanding immediate attention.
Can I just use more nails to fix the problem?
Absolutely not. Adding more nails is like putting a bandage on a broken bone. Nails were likely the cause of the failure in the first place because they lack the necessary withdrawal strength. The only safe and proper repair involves using modern, code-compliant structural screws or bolts designed specifically for this load-bearing application.
How much does it cost to repair a separating deck joist?
The cost can vary dramatically. If the issue is confined to a single joist with no rot, a DIY repair might only cost $20-$50 for a new joist hanger and the correct structural screws. However, if a professional is needed, or if the ledger board is rotted and needs replacement, the cost could range from several hundred to several thousand dollars depending on the extent of the damage.
Don’t Let Your Deck Become a Disaster
A deck joist pulling away from the ledger is one of the most serious structural issues a homeowner can face. It is a clear and present danger that signals the risk of deck collapse. By understanding the causes, performing a thorough inspection, and implementing a robust repair using the correct, modern hardware, you can restore the safety and integrity of your outdoor living space.
Take the time to check your deck’s connections today. A few minutes of inspection can protect your investment and, more importantly, ensure a safe environment for your family and friends for years to come. If you have any doubts, do not hesitate to contact a licensed and insured contractor for a professional assessment.