Deck Gap Filler: Your Ultimate Guide to a Flawless & Safe Deck
A deck should feel solid, safe, and beautiful—but wide or uneven gaps between boards can ruin both the look and the experience. Deck gap fillers solve this problem by sealing unwanted spaces, blocking debris, stopping pests, and reducing trip hazards, all while preserving proper drainage and airflow.
Whether your gaps formed from wood shrinkage, aging materials, or installation issues, the right filler can restore your deck’s clean, finished appearance without a full rebuild. In this guide, you’ll discover exactly which deck gap fillers work best, how to choose the right one for your deck material, and how to apply it for long-lasting, professional-grade results.
You'll Learn About
Stop Tripping & Losing Valuables: The Hidden Dangers of Deck Gaps
That beautiful deck, your outdoor sanctuary, has a nagging problem. The gaps between the boards, once uniform and neat, now seem like tiny chasms. They snatch dropped screws, swallow credit cards, and pose a constant threat to high heels.
These gaps are more than just an annoyance. They can be a genuine safety hazard, a haven for weeds, and an open invitation for moisture to sit against the substructure, potentially leading to rot.
Why Do Deck Gaps Widen Over Time?
Understanding the cause is the first step toward a lasting solution. Deck board gaps primarily result from the natural behavior of wood. Freshly installed, pressure-treated lumber is often high in moisture content.
As this wood dries and acclimates to the environment, it shrinks. This natural shrinkage is the most common reason perfectly installed boards eventually develop wider-than-desired gaps.
Additionally, the constant cycle of swelling in wet weather and shrinking in dry, hot conditions can exacerbate the issue. Over time, this seasonal wood movement can widen the gaps further, making a deck gap filler not just a cosmetic fix, but a necessary maintenance task.
The Great Debate: Should You Even Fill Deck Gaps?
A crucial point of discussion is whether filling deck gaps is the right move. Gaps are an intentional part of deck design, serving two critical functions: drainage and ventilation. Blocking them improperly can lead to disaster.
Water needs a path to escape. Solid fillers that create a dam between boards can cause pooling water, which is the number one enemy of a wooden deck. This trapped moisture accelerates rot, encourages mold growth, and can compromise the entire structure from the deck boards down to the joists.
Furthermore, air circulation is vital for keeping the underside of the deck dry. Sealing gaps completely can inhibit this airflow, creating a damp environment perfect for decay. The key is not to eliminate the gap, but to manage it with the right materials.
The Smart Solution: Flexible and Breathable Fillers
The modern approach to managing deck gaps focuses on using materials that solve the problems without creating new ones. The ideal deck gap filler is not a hard, impermeable substance. It is a flexible, breathable solution that moves with the wood and still allows for adequate drainage.
These advanced fillers prevent debris buildup and weed growth while accommodating the natural expansion and contraction of the deck boards. This ensures the structural integrity of your deck remains intact for years to come.
Choosing Your Weapon: A Deep Dive into Deck Gap Filler Options
When it comes to filling the spaces between your deck boards, there are several methods, each with its own set of pros and cons. Selecting the right one depends on your gap size, budget, aesthetic goals, and the type of wood your deck is made from.
Option 1: Deck Gap Sealants & Caulk
Modern elastomeric and polyurethane sealants are a popular choice. These are not your average indoor caulks; they are specifically formulated for exterior use, offering extreme flexibility and durability against harsh weather and UV rays.
Application involves using a caulk gun to apply a bead of sealant into the gap, often in conjunction with a foam backer rod for wider spaces. This method creates a clean, seamless look that effectively blocks weeds and debris. It’s crucial to select a high-quality sealant designed for permanent elasticity.
Before applying any sealant, the deck must be impeccably clean and dry. Any lingering dirt or moisture will prevent proper adhesion, leading to premature failure of the sealant. This is a meticulous but highly effective solution for creating a uniform surface.
Option 2: Backer Rods & Foam Fillers
For gaps that are moderately wide (typically 1/4 inch or more), a foam backer rod is an essential component. These flexible foam ropes are pressed into the gaps, sitting just below the surface of the boards.
Their primary purpose is twofold. First, they reduce the amount of expensive sealant needed to fill the gap. Second, they create the ideal shape for the sealant bead, allowing it to stretch and compress effectively with wood movement.
In some cases, a high-density foam filler strip designed specifically for decks can be used on its own. These are often friction-fit, requiring no adhesive, and can be a quick and easy solution for standard-sized gaps.
Option 3: Solid Wood Strips or “Slivers”
For a more traditional, all-wood aesthetic, filling gaps with thin strips of wood is an excellent option. This method is best suited for decks with large, irregular gaps where a sealant might look out of place. It requires a bit more woodworking skill.
You can rip thin strips from a matching deck board using a table saw. These strips are then coated with a high-quality exterior wood glue and gently tapped into the gaps. Once the glue has cured, the strips are sanded flush with the deck surface for a completely seamless appearance before staining.
This approach is fantastic for restoring an older deck and maintaining a consistent wood look. However, it’s critical to remember wood’s natural movement. The strips should fit snugly but not be forced in so tightly that they cause boards to buckle during periods of high humidity when the wood expands.
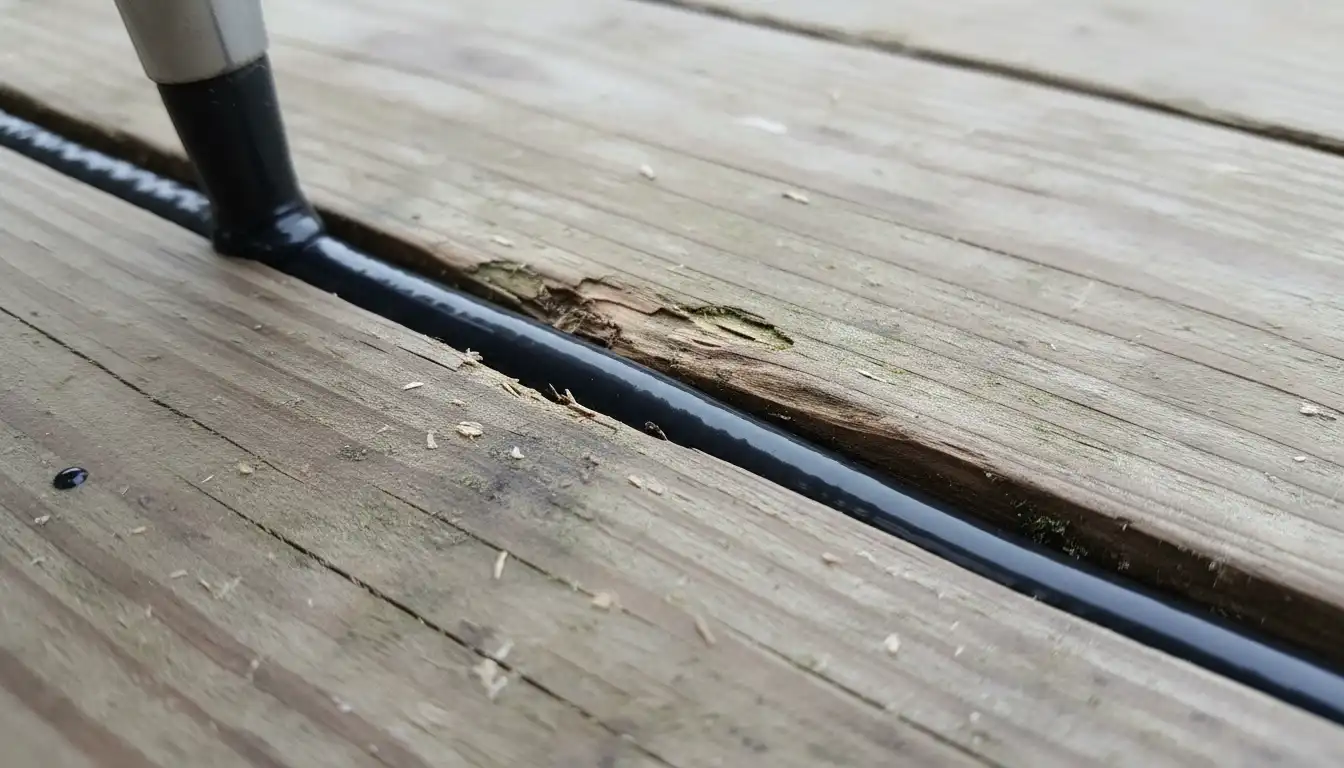
Option 4: Deck Gap Filler Ropes and Tapes
An innovative and increasingly popular solution is the use of specialized deck gap filler ropes. These are typically made from a durable, weather-resistant polymer or rubber blend. They are designed to be pressed into the gaps, where they stay in place through friction.
This method is exceptionally user-friendly and requires no messy sealants or glues. The material is pliable, accommodates wood movement, and effectively blocks debris and weeds while still allowing for some water drainage around the edges. It offers a clean, finished look and can be easily removed if a board needs to be replaced.
Comparison of Deck Gap Filler Methods
Choosing the best deck gap filler can be daunting. The table below breaks down the key characteristics of each primary method to help you make an informed decision based on your specific needs.
| Filler Type | Best For | Ease of Installation | Durability | Flexibility |
|---|---|---|---|---|
| Elastomeric Sealant | Small to medium gaps (up to 1/2″); creating a seamless, waterproof surface. | Moderate (Requires clean surface & backer rod) | High | Very High |
| Foam Backer Rod | Used in conjunction with sealant for wider gaps to reduce cost. | Easy | N/A (Sub-component) | Very High |
| Solid Wood Strips | Large or irregular gaps; maintaining a 100% wood aesthetic. | Difficult (Requires woodworking skills) | Very High | Low (Moves with boards) |
| Polymer Filler Rope/Tape | Standardized gaps; easy, mess-free installation. | Very Easy | High | High |
Your Step-by-Step Guide to a Flawless Application
Once you’ve chosen your filler, proper preparation and application are paramount to achieving a professional and long-lasting result. Rushing this process is the most common cause of failure.
Step 1: Thorough Cleaning and Inspection
Begin with a complete deck overhaul. Remove all furniture and planters. Use a putty knife or a gap cleaning tool to scrape out all compacted dirt, leaves, and other debris from between the boards. A powerful shop vacuum is invaluable for this task.
After clearing the gaps, give the entire deck a thorough washing with a deck cleaner appropriate for your wood type. A pressure washer on a low setting can be effective, but be careful not to damage the wood fibers. Allow the deck to dry completely, which may take 24-48 hours depending on the weather.
This is also the time to inspect for any other damage. If you find signs of pests, such as the perfectly round holes left by carpenter bees, it’s essential to address that problem first. You can find detailed guidance on dealing with such issues, including what size dowel for carpenter bee holes is most effective for repairs, before proceeding.
Step 2: Sanding for a Perfect Finish
For sealants and wood strips, sanding the edges of the boards is a non-negotiable step. A light sanding removes any loose wood fibers, old stain, or sealant, creating a clean surface for the new filler to adhere to. This dramatically increases the longevity of your application.
After sanding, be sure to vacuum or blow away all the dust. Any remaining dust will compromise the bond. A clean surface is the foundation of a durable fix.
Step 3: The Application Process
Follow the manufacturer’s instructions for your chosen product precisely. If using a sealant and backer rod, first press the backer rod into the gap to the recommended depth. Then, apply a consistent bead of sealant over it, using a caulking tool or your finger to smooth the bead for a clean finish.
If using wood strips, apply a thin layer of exterior wood glue to the sides of the strip and gently tap it into place with a rubber mallet. Ensure it sits slightly proud of the surface to allow for sanding it down flush once the glue has cured.
For filler ropes, simply cut the rope to length and use a putty knife or similar tool to press it firmly and evenly into the gap. This is by far the quickest and cleanest method.
Step 4: Curing and Finishing
Patience is key. Most sealants and glues require a specific curing time, during which the deck should not be walked on and must be protected from rain. Refer to the product’s technical data sheet for this information.
Once cured, if you used wood strips, you will need to sand them flush. Afterwards, you can proceed with staining or sealing the entire deck. This final step protects your work and creates a beautiful, uniform appearance. The color of your filler can even play into your overall design scheme, complementing hardware choices much like one might consider when mixing black and oil rubbed bronze finishes indoors.
Beyond the Filler: Long-Term Deck Health and Maintenance
Filling deck gaps is a significant step, but it’s part of a larger picture of deck maintenance. A healthy deck requires a holistic approach. The principles of proper construction and material care are universal, from your outdoor deck to your indoor flooring.
Just as the careful installation of a shiplap subfloor is fundamental to a stable interior floor, the initial construction of your deck’s substructure is vital for its longevity. Ensure the joists are properly protected with flashing tape and that there is adequate ventilation beneath the deck to prevent moisture buildup.
The Unspoken Rule of Deck Protection
A frequently overlooked aspect of using deck gap fillers is their impact on your staining and sealing schedule. When you apply a sealant, you create an impermeable barrier. This is great for blocking debris, but it also changes how you re-apply protective stains to your deck boards.
With filled gaps, you can no longer coat all four sides of the board edges as you might have during construction. Therefore, it becomes even more critical to maintain the top surface and exposed edges with a high-quality water-repellent sealer or stain. Do not skip your regular maintenance schedule, as the top surface is now the board’s primary line of defense against the elements.
By transforming your gapped deck into a solid-surface one, you’ve taken control of its appearance and safety. Embrace this new phase with a commitment to surface protection, and your flawless, gap-free deck will reward you with years of beauty and service.