Daisy Chaining Sprinklers: The Secret to Perfect Lawn Hydration
Watering a large or unusually shaped lawn can feel like a losing battle. You drag a single sprinkler from one dry patch to another, wasting time and water while struggling to achieve even coverage. This constant shuffle often results in some areas being flooded while others remain stubbornly brown and parched.
The core of this frustration lies in a simple, yet significant, problem: a single sprinkler just can’t handle the demands of a complex landscape. Achieving consistent hydration without creating a swampy mess or spending your entire weekend moving hoses seems nearly impossible. But what if there was a way to create a custom, above-ground irrigation system with minimal effort and maximum efficiency?
You'll Learn About
Unlocking Lawn Perfection: The Power of Daisy Chaining
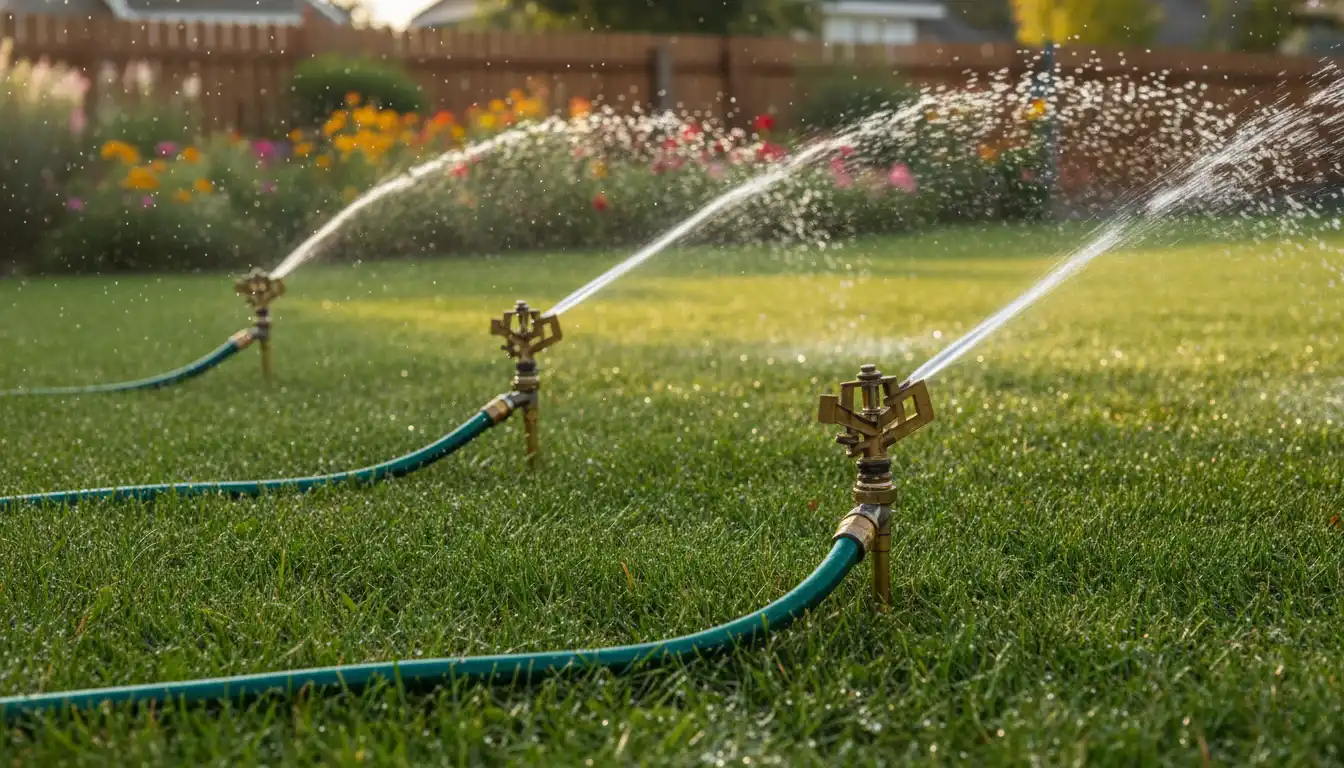
The solution is a technique known as daisy chaining sprinklers. This method involves connecting multiple sprinklers in a series using short lengths of garden hose, allowing you to create a customized watering network that perfectly matches the unique contours of your yard. It’s a simple concept that transforms lawn care from a chore into a streamlined, effective process.
By strategically placing several connected sprinklers, you can ensure every corner of your lawn receives the precise amount of water it needs. This eliminates dry spots, prevents overwatering, and saves you the time and hassle of constantly repositioning a single sprinkler. It’s the key to achieving that lush, uniformly green lawn you’ve been striving for.
Why Water Pressure is the Key to Success
Before you start connecting sprinklers, it’s crucial to understand the two most important factors for success: water pressure (PSI) and flow rate (GPM). Water pressure is the force that pushes water through the hoses and out of the sprinkler heads, while the flow rate is the volume of water your system can deliver in a minute.
Connecting too many sprinklers to a system with inadequate pressure will result in a weak spray from each head, especially the last one in the line. The water might just bubble out, failing to cover the intended area. Understanding and managing your home’s water pressure is the foundational step to building an effective daisy chain.
Getting Started: Your Step-by-Step Guide to Daisy Chaining
Creating your own daisy-chained sprinkler system is a straightforward project that can be completed in an afternoon. Follow these steps to design and implement a system tailored to your lawn’s specific needs.
Step 1: Measure Your Water Pressure and Flow Rate
First, determine your home’s water pressure. You can easily measure this by attaching a simple pressure gauge to an outdoor spigot. Most residential sprinkler systems operate best between 30 and 50 PSI. Knowing your starting pressure helps you determine how many sprinklers you can effectively run at once.
Next, calculate your flow rate in gallons per minute (GPM). To do this, take a 5-gallon bucket, turn your spigot on full, and time how long it takes to fill the bucket. Divide 300 (5 gallons x 60 seconds) by the number of seconds it took to fill. This number is your GPM, which tells you the total water volume available for your sprinklers.
Step 2: Plan Your Sprinkler Layout
Sketch a rough map of your lawn, noting its shape and any obstacles like trees, patios, or garden beds. Plan where you will place each sprinkler to achieve head-to-head coverage. This means the spray from one sprinkler should reach the base of the next one in the line, ensuring there are no dry spots in between.
For irregularly shaped areas, you may need to adjust the spacing or use sprinklers with different spray patterns. The goal is to create overlapping zones of water that cover the entire lawn evenly. This planning phase is crucial for efficiency and prevents wasted water on sidewalks or driveways.
Step 3: Choose the Right Sprinklers and Hoses
Not all sprinklers are created equal, especially for daisy chaining. Look for sprinklers with a flow-through base, which has both an inlet to connect to the water source and an outlet to attach the next hose in the series. Impact and some oscillating sprinklers are excellent choices for this setup.
The diameter of your garden hose also plays a critical role. A standard 5/8-inch hose is suitable for most setups, but for longer chains or if you have lower water pressure, upgrading to a 3/4-inch hose can significantly reduce pressure loss and improve performance. Use shorter hoses (10-25 feet) to link the sprinklers together for easier management.
Step 4: Assemble and Test Your System
Once you have your parts, it’s time to assemble the system. Connect your main hose to the spigot and then to the first sprinkler. Use a short hose to connect the first sprinkler’s outlet to the second sprinkler’s inlet, and continue this process for all your sprinklers.
Before leaving it to run, turn the water on and observe the performance. Check that each sprinkler head is spraying correctly and covering its designated area. You may need to make small adjustments to the sprinkler positions or their spray patterns to achieve perfect coverage. This is also a good time to check for leaks at the connections.
Selecting the Perfect Sprinkler for Your Daisy Chain
The type of sprinkler you choose will greatly impact the effectiveness of your daisy chain. Different sprinklers are designed for different lawn sizes, shapes, and watering needs. Understanding their unique characteristics will help you build a more efficient and reliable system.
Comparing Sprinkler Types
Making the right choice depends on your lawn’s specific requirements. An impact sprinkler might be perfect for a large, open area, while a rotary or oscillating sprinkler could be better for more targeted watering in garden beds or along pathways. Consider a hybrid approach for complex lawns, using different types within the same chain.
| Sprinkler Type | Best For | Pros | Cons |
|---|---|---|---|
| Impact Sprinklers | Large, open lawn areas | Excellent range and coverage; durable; works well with lower pressure. | Can be noisy; the powerful stream may damage delicate plants. |
| Oscillating Sprinklers | Rectangular or square lawns | Provides even, rain-like coverage; adjustable width and range. | Can be prone to clogging; less effective in windy conditions. |
| Rotary Sprinklers | Medium to large lawns with varied shapes | Multiple streams provide uniform coverage; highly efficient. | Requires higher water pressure; more complex to adjust. |
| Wobbler Sprinklers | Uneven terrain and delicate gardens | Gentle, rain-like droplets; excellent water distribution. | Shorter range than impact sprinklers; may require more units. |
Troubleshooting Common Daisy Chaining Issues
Even with careful planning, you might encounter some issues. Most problems are easy to fix with a few simple adjustments. Here’s how to address the most common challenges you may face when daisy chaining sprinklers.
Problem: Low Pressure at the End of the Line
This is the most frequent issue and typically means you have too many sprinklers for your available GPM and PSI. The first solution is to remove one or two sprinklers from the chain. Alternatively, ensure your spigot is fully open and check for any kinks in the hoses that could be restricting water flow.
You can also try closing the flow control valve on the first few sprinklers slightly. This will force more water down the line to the subsequent sprinklers, helping to balance the pressure across the entire chain. Upgrading to a wider diameter hose can also make a significant difference.
Problem: Leaky Connections
Leaks at the connections between hoses and sprinklers waste water and reduce pressure. The most common cause is a missing or worn-out rubber washer inside the hose fitting. Ensure each connection has a properly seated washer.
If the leak persists, wrapping the male threads of the sprinkler connection with plumber’s tape before attaching the hose can create a more secure, watertight seal. A little maintenance can go a long way, especially for outdoor fixtures like the ones supporting a structure. For those interested in improving their outdoor spaces, learning how to add pitch to a flat pergola can be a valuable skill.
Problem: Uneven Water Coverage
If you notice dry patches after watering, it’s a sign of poor sprinkler placement or adjustment. Revisit your layout plan and ensure you have proper head-to-head coverage. You might need to move the sprinklers closer together or adjust their spray patterns.
Also, check that each sprinkler head is clean and free of debris. Clogged nozzles can disrupt the spray pattern and lead to uneven watering. Sometimes, a project’s success depends on understanding the fine details, much like when you need to how to read paint formulas for a perfect finish.
Advanced Techniques for the Ultimate Lawn
Once you’ve mastered the basics, you can explore more advanced strategies to further optimize your watering routine. These techniques can enhance water efficiency, improve lawn health, and make your system even more convenient.
Creating Watering Zones
For very large or complex properties, you can create separate daisy chains, or “zones,” for different areas of your yard. For example, you can have one zone for the sunny front lawn and another for the shady backyard. This allows you to tailor watering schedules to the specific needs of each area.
Using a multi-outlet hose splitter at your spigot, you can run multiple chains simultaneously or alternate between them with a timer. This approach is highly efficient and ensures that plants with different water requirements receive the perfect amount of hydration. Proper sun protection is also key for a healthy garden, and options like a Shaderunner can provide adjustable shade where needed.
Integrating a Smart Timer
Take your daisy-chained system to the next level by adding a smart timer. These devices connect to your spigot and can be programmed to run your sprinklers automatically. Many smart timers can even connect to Wi-Fi and adjust watering schedules based on local weather forecasts, saving water and money.
By automating your watering, you ensure your lawn gets consistent moisture without you ever having to lift a finger. It’s the ultimate combination of DIY ingenuity and modern technology, giving you a professional-grade irrigation system at a fraction of the cost.