Crown Molding for Cabinets Not Reaching the Ceiling: The Ultimate Fix
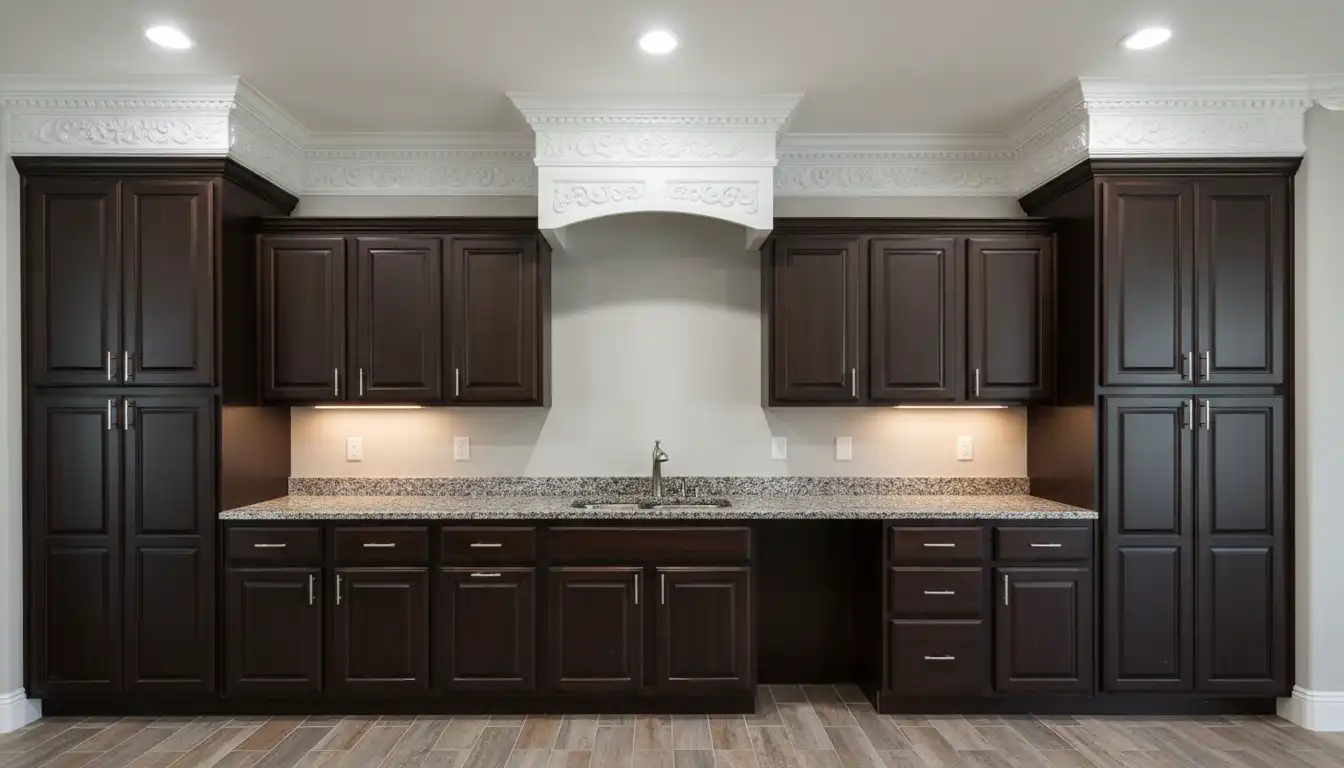
There it is. That awkward, empty space between the top of your kitchen cabinets and the ceiling. It’s a common design challenge that can make an otherwise beautiful kitchen look unfinished, dated, and incomplete. This gap often becomes a dusty, forgotten zone that detracts from the room’s vertical potential.
Many homeowners believe that crown molding is only for cabinets that extend all the way to the ceiling. This is a costly misconception. With the right technique, you can use crown molding to create a high-end, custom look that elevates your entire kitchen, even with a significant gap above.
This guide will show you the definitive method for installing crown molding on cabinets that don’t go to the ceiling, transforming that awkward gap into a deliberate and sophisticated design feature. Say goodbye to that “something’s missing” feeling and hello to a polished, professionally-finished kitchen.
You'll Learn About
Why That Awkward Gap Exists (and Why You Should Fix It)
The space above cabinets is often a result of using standard-sized cabinetry in rooms with ceilings taller than the typical eight feet. While functional, this leaves a visual disconnect. Without a proper finishing touch, the cabinets can appear to be “floating” rather than being an integrated part of the kitchen’s architecture.
Adding crown molding is the single most effective way to solve this problem. It provides a visual bridge, making the cabinets look taller, more substantial, and intentionally designed. This small detail can dramatically increase the perceived value of your kitchen, giving it the custom-built feel that defines luxury spaces. When considering upgrades, this offers a significant return on investment compared to how much more expensive custom cabinets can be.
The Secret to a Professional Installation: The Riser
Simply gluing or nailing crown molding directly to the top edge of your cabinets is a huge mistake. The result often looks thin, tacked-on, and amateurish. The key to a professional-grade installation is building a foundation for the molding to sit on. This foundation is known as a riser, a starter strip, or a filler piece.
A riser is a piece of wood, typically a 1×2 or 1×4 board, that you mount flat on top of the cabinet boxes. This simple addition serves two critical purposes: it provides a solid, vertical surface to securely attach the crown molding, and it adds height and substance. This makes the final assembly look like a single, cohesive unit rather than a cabinet with trim stuck on top.
This technique is what separates DIY results from professional craftsmanship. It ensures the molding has the proper angle and support, creating clean lines and a robust, integrated appearance that completely transforms the look of your cabinetry.
Choosing the Right Crown Molding: A Matter of Scale
The success of your project hinges on selecting crown molding that is properly proportioned to your kitchen. The size of the molding should be balanced with the height of your cabinets and the size of the gap between the cabinets and the ceiling. A common mistake is choosing molding that is too small, which can look underwhelming and lost.
For standard 8-foot ceilings, a crown molding between 2.5 to 6 inches tall is generally appropriate. If you have taller ceilings and a larger gap, you can opt for a more substantial molding. Consider the style of your cabinets as well. Simple, clean-lined shaker cabinets pair well with a simpler cove or angled molding, while traditional cabinets can support more ornate designs.
Your Step-by-Step Installation Guide
With the right preparation and attention to detail, this is a manageable project that yields stunning results. Follow these steps for a flawless installation that looks like it was done by a seasoned professional.
1. Prepare and Install the Riser: Cut your riser boards (e.g., 1×2 pine boards) to match the length of your cabinet runs. Secure these boards flat on top of the cabinets, setting them back slightly from the front edge of the cabinet box. Use wood glue and a brad nailer for a secure attachment.
2. Master the Miter Cut: Cutting crown molding is the most challenging part of the process. A compound miter saw is essential for getting the precise angles needed for clean inside and outside corners. Remember the golden rule: measure twice, cut once. It’s always better to cut a piece slightly too long and trim it down than to cut it too short.
3. Attach the Crown Molding: Apply a bead of wood glue to the back of the crown molding where it will contact the riser. Position the molding and secure it to the riser using a brad nailer. Place nails every 12 inches or so to ensure a tight fit.
4. Finish Like a Pro: The finishing touches are what create a seamless look. Use a paintable caulk to fill the seam where the molding meets the riser and to fill any small gaps at the corners. Fill all nail holes with wood filler, sand them smooth once dry, and then prime and paint the molding to perfectly match your cabinets.
Design Choices for the Space Above
Once your crown molding is installed, you have a beautifully framed space above your cabinets. This now looks like a deliberate design choice, not an awkward void. You can choose to leave this space empty for a clean, minimalist look that draws the eye upward.
Alternatively, you can paint the wall area between the top of the molding and the ceiling. Painting it the same color as the ceiling makes the room feel taller. Painting it the same color as your walls can create a cohesive look, while a contrasting color can add a bold design element.
| Molding Style | Best For | Design Tip |
|---|---|---|
| Simple Cove | Modern or Shaker Cabinets | Creates a gentle, curved transition that is clean and unobtrusive. |
| Stepped/Angled | Transitional or Craftsman Cabinets | Offers clean, geometric lines that add definition without being overly ornate. |
| Traditional Dentil | Classic or Formal Cabinets | Adds intricate detail and a sense of architectural history. Best for larger kitchens. |
| Beaded or Rope | Country or Farmhouse Cabinets | Introduces texture and a handcrafted feel, enhancing a rustic or charming aesthetic. |
Common Mistakes and How to Avoid Them
Even the most carefully planned project can go wrong. Being aware of common pitfalls is the first step to avoiding them and ensuring a successful outcome.
The Wrong Scale: Don’t choose a tiny molding for tall cabinets or a massive molding for shorter ones. Take a few samples home and hold them up to see what looks best in your space. The proportion is everything.
Skipping the Riser: This is the most critical error. Attaching molding directly to the cabinet face compromises the cabinet doors’ function and results in a flimsy, unprofessional look. Always build the riser foundation first.
Imprecise Cuts: Gaps in your corners are a dead giveaway of a DIY job. Take your time with the miter saw, and if a corner isn’t perfect, a small amount of caulk can be your best friend for hiding minor imperfections. Even the height of your cabinets, such as taller 48-inch-tall upper kitchen cabinets, requires precise cuts to look seamless.
Neglecting Finishing Work: Skipping the caulking, filling, and final coat of paint will leave your project looking unfinished. These final steps are what blend the new molding into the existing cabinetry for a truly integrated and custom look.
Frequently Asked Questions
What is the purpose of crown molding on cabinets?
Crown molding is a decorative trim that adds a finished, polished look to the top of cabinets. It enhances the aesthetic appeal, can make cabinets appear taller, and creates a more cohesive and integrated design in the kitchen.
Can you put crown molding on cabinets that don’t reach the ceiling?
Yes, adding crown molding to cabinets that don’t extend to the ceiling is a very common design practice. It provides a finished look to the cabinetry itself, regardless of the space above. This approach can draw the eye upward and add an element of elegance to your kitchen.
How is crown molding attached when there isn’t a ceiling to nail it to?
A nailing cleat or filler strip, often a simple piece of wood, is attached to the top of the cabinets first. This provides a solid surface to then attach the crown molding to, ensuring a secure installation and giving the cabinets a completed look.
What should I do with the space between the cabinet molding and the ceiling?
The space is often left open, which can be used for display. However, if you wish to close the gap, you can add a riser or filler molding to extend the cabinet height before the crown molding is applied. For smaller, uneven gaps, caulk can be used to create a seamless transition.
Will it look strange to have a gap between the crown molding and the ceiling?
No, it does not look strange and is a popular design choice, especially in kitchens without soffits. The crown molding serves to finish the top of the cabinets themselves. Leaving a gap is a standard practice and is often preferred to having a small, awkward space filled.
Final Words
Crown molding is the “secret sauce” of kitchen design, but when your cabinets stop a few inches short of the ceiling, it often feels like an unfinished mistake. The ultimate fix is to stop trying to bridge the gap with air and instead use a riser board (also called a frieze or starter board). By attaching a flat trim piece to the top of your cabinets first, you create a solid “wall” that extends upward, giving your crown molding a stable surface to nail into at any height you choose.
Whether you decide to take the trim all the way to the ceiling for a high-end built-in look or prefer a “floating” crown that leaves a deliberate shadow line, the key is consistency. A well-installed riser board hides the cabinet tops and makes the molding appear as a custom architectural feature rather than an afterthought. This simple build-out not only eliminates the dreaded “dust shelf” but also draws the eye upward, making your kitchen feel taller, cleaner, and professionally designed.