Crown Molding Cracking at the Seams? Here’s the Pro Fix
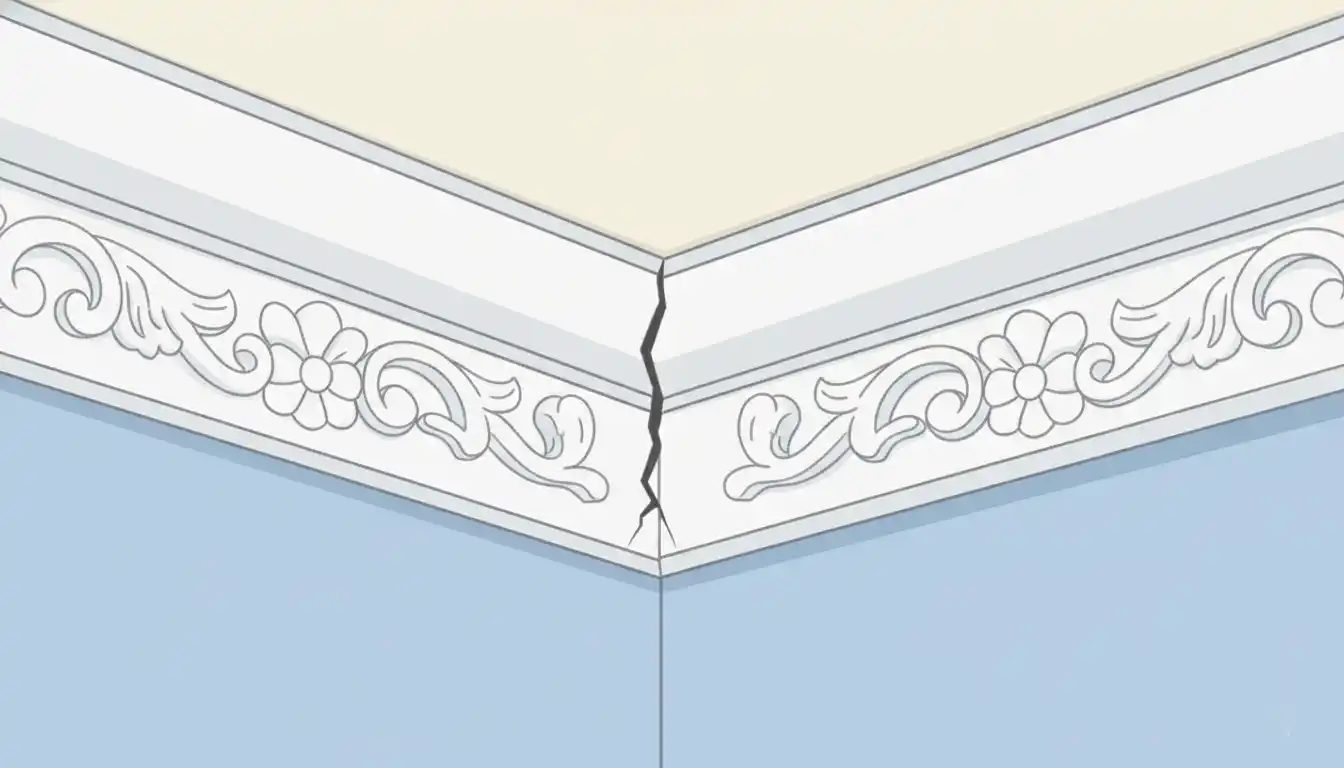
There is nothing more frustrating than stepping back to admire your elegant crown molding, only to see ugly, hairline cracks spiderwebbing across the seams. You invested time and money to create a flawless finish, yet those persistent cracks ruin the entire effect. They can make a beautiful room look shabby and poorly maintained.
This is a surprisingly common problem, but the good news is that there are permanent solutions. This comprehensive guide will walk you through not only how to fix cracked crown molding seams for good but also how to understand the powerful forces causing them in the first place. Armed with this knowledge, you can ensure your molding looks pristine for years to come.
You'll Learn About
Why Do Crown Molding Seams Insist on Cracking?
Before you can fix the problem, you need to understand the root causes. Those cracks are symptoms of larger issues at play within your home’s structure and environment. Simply caulking over them year after year is a temporary fix for a problem that demands a more robust solution.
The Invisible Force: Expansion and Contraction
The primary culprit behind most cracked seams is the natural movement of building materials. Wood and MDF (Medium-Density Fiberboard) are hygroscopic, meaning they absorb and release moisture from the air. As humidity levels rise and fall with the seasons, your crown molding swells and shrinks.
This constant, subtle movement puts immense stress on the weakest points: the seams where two pieces of molding meet. Over time, this stress causes inflexible fillers like cheap painter’s caulk and paint to crack and separate.
The Hidden Structural Shift: Truss Uplift
One of the most significant and least-discussed causes of cracks is “truss uplift.” This phenomenon occurs in homes with roof trusses, which are engineered triangular frames that support your roof. During colder months, the bottom chord of the truss, which is buried in warm ceiling insulation, stays dry and warm, while the top chords get cold and absorb moisture from the attic air.
This difference in temperature and moisture causes the truss to bow upwards, lifting the ceiling slightly away from the interior walls. This upward movement can create a noticeable gap between the ceiling and the top of your crown molding, and it puts immense strain on mitered corner joints, pulling them apart.
Common Installation Mistakes That Lead to Failure
Even with perfect environmental conditions, poor installation techniques can doom your crown molding from the start. A flawless installation is your first line of defense against future cracks.
Common errors include failing to properly acclimate the molding to the room’s temperature and humidity before installation, not using a strong wood glue in addition to nails at every joint, and improper nailing. A bad crown molding job will almost always reveal itself through failing seams.
The Permanent Fix: A Step-by-Step Guide to Flawless Seams
Fixing cracked seams involves more than just smearing on a new line of caulk. To achieve a lasting repair, you must clean out the old failure, reinforce the joint itself, and use the right materials for the job.
Step 1: Excavate the Failed Joint
Your first step is to completely remove the old, cracked caulk and any loose paint or wood fibers. Use a sharp utility knife or a caulk removal tool to carefully cut and scrape away all the old material. The goal is to get back to a clean, stable surface so the new filler has something solid to adhere to.
Once the bulk of the material is removed, use a vacuum with a brush attachment to clean out any remaining dust and debris. A clean joint is critical for a successful, long-lasting repair.
Step 2: Reinforce the Seam from Within
This is the step that most quick fixes miss, and it is the key to preventing the crack from returning. Simply filling the gap does not address the underlying movement. Before you fill, you should reinforce the joint to minimize its ability to move in the future.
For miter or scarf joints that have opened up, you can often force high-quality wood glue deep into the crack. For outside corners, some professionals will pre-assemble the corners, gluing and pinning them from the back for maximum strength before they are ever installed on the wall.
Step 3: Choose the Right Filler for the Job
Not all fillers are created equal. The product you choose must be able to withstand the movement of the crown molding. Standard painter’s caulk often dries too hard and brittle, leading to repeat failures.
For the initial fill of a wider gap, a flexible spackling compound or wood filler is often a better choice than caulk. Filler provides a solid base that can be sanded perfectly smooth. Caulk is best used for the final, thin seam between the molding and the wall or ceiling.
| Filler Type | Flexibility | Best Use Case | Paintable? | Sandable? |
|---|---|---|---|---|
| Standard Acrylic Latex Caulk | Low | Small gaps with minimal movement. | Yes | No |
| Siliconized Acrylic Caulk | Medium | Gaps between molding and wall/ceiling. | Yes | No |
| Elastomeric Sealant (e.g., “Big Stretch”) | High | Seams prone to significant movement and cracking. | Yes | No |
| Flexible Spackling/Wood Filler | Low-Medium | Filling larger gaps in joints before caulking. | Yes | Yes |
Step 4: Application and Finishing
When applying your chosen filler, press it firmly into the joint to ensure a solid fill. If using a sandable filler, slightly overfill the gap. Once it’s fully cured, you can sand it flush with the surrounding molding, starting with medium-grit sandpaper and finishing with a fine grit until the seam is invisible to the touch.
For the final bead of caulk between the molding and the wall, use a high-quality, flexible sealant. Cut the tip of the caulk tube at a 45-degree angle to create a small opening. Apply a steady, continuous bead and then immediately smooth it with a wet finger or a caulk finishing tool for a clean, professional line.
Prevention: The Ultimate Strategy for Crack-Free Crown Molding
Once your seams are repaired, the work isn’t over. The best way to deal with cracked crown molding is to create an environment and use installation techniques that prevent it from happening in the first place.
Control Your Home’s Climate
The single most effective way to prevent wood movement is to maintain a stable indoor humidity level. Homes should ideally be kept between 30% and 50% relative humidity. Using a whole-house humidifier in the winter and a dehumidifier in the summer can dramatically reduce the expansion and contraction cycles that tear your molding seams apart.
Advanced Installation: The “Floating” Molding Technique
To combat the powerful forces of truss uplift, a professional installation technique involves “floating” the crown molding. In this method, the molding is fastened securely to the ceiling joists but is not nailed to the wall studs. This allows the entire ceiling and molding assembly to move up and down slightly as the trusses shift, without creating a visible gap or stressing the corner joints.
This method is particularly effective for dealing with the issue of crown molding separating from the ceiling. By allowing for movement, you prevent the stress that leads to separation and cracking.
Material Choice Makes a Difference
The material your crown molding is made from plays a significant role in its stability. While natural wood offers classic beauty, it is the most susceptible to movement. MDF is more stable than wood, but it can still be affected by major humidity swings.
For the ultimate in stability, consider polyurethane crown molding. This synthetic material is completely waterproof and inert, meaning it will not expand, contract, or warp due to changes in temperature or humidity, making it virtually immune to cracking at the seams.
Achieving Flawless Crown Molding for Good
Cracked crown molding seams are more than just a cosmetic annoyance; they are a sign of powerful forces at work in your home. By understanding the roles of humidity, structural movement, and proper installation, you can move beyond temporary fixes.
By reinforcing your joints, choosing highly flexible fillers, and controlling your indoor climate, you can achieve a truly permanent repair. Whether you are fixing an existing issue or planning a new installation, these principles will help you create beautiful, seamless crown molding that stands the test of time, free from any distracting vertical cracks or separations.