Crepe Myrtle Air Layering: Unlock New Plants From Any Branch
That stunning crepe myrtle in your yard, with its vibrant, crinkly blossoms, is a true centerpiece. Many gardeners wish they could replicate that exact plant, but find themselves facing a common problem: traditional propagation methods are often unreliable and slow.
Taking cuttings can be a game of chance, with many failing to root, while growing from seed won’t produce a genetic clone of your prized tree. This guide introduces a powerful, ancient technique that solves this problem with a remarkably high success rate: air layering.
You'll Learn About
What is Air Layering and Why Is It Perfect for Crepe Myrtles?
Air layering is a method of propagation that encourages a branch to develop its own root system while it is still attached to the parent plant. Unlike taking a cutting, which severs the branch from its life support, air layering provides a continuous supply of water and nutrients during the rooting process.
This technique is exceptionally well-suited for woody plants like the crepe myrtle. Their vigorous growth and natural tendency to root make them prime candidates for this almost foolproof method, allowing you to create a mature, healthy clone of your favorite tree.
The Science Behind the Magic: How Air Layering Actually Works
The success of air layering isn’t magic; it’s plant biology. To understand it, you need to know about the layers within a branch. Just under the outer bark lies the phloem, which transports sugars produced during photosynthesis down to the rest of the plant, and the xylem, which carries water and nutrients up from the roots.
The process begins by carefully removing a ring of bark and the phloem layer. This action, known as girdling, creates a dam. Sugars flowing down from the leaves accumulate at the wound, unable to travel further. This concentration of energy, combined with plant hormones called auxins that also gather there, creates the perfect environment to stimulate root production.
By wrapping this wounded area in a moist medium, you trick the branch into thinking it’s underground. In response to the moisture, darkness, and abundance of fuel, it has no choice but to generate a new set of roots. The branch remains supported by the parent plant’s xylem, receiving water the entire time, which is why the success rate is so incredibly high.
Gathering Your Toolkit: Essential Supplies for Success
You don’t need a laboratory to successfully air layer a crepe myrtle. The required tools are simple, but using the right ones and keeping them clean is crucial for preventing infection and ensuring a healthy new plant.
Your essential toolkit includes a sharp, sterile knife or box cutter for making clean cuts, a good supply of sphagnum moss to retain moisture, and a rooting hormone (powder or gel) to accelerate the process. You will also need clear plastic wrap and twist ties or electrical tape to secure the moss ball around the branch.
Sterilizing your cutting tool with rubbing alcohol before you begin is a non-negotiable step. A clean cut prevents introducing diseases that could cause the entire project to fail. Proper preparation is foundational to many home and garden projects, as even a small oversight, like an incorrect garage door arm angle, can lead to significant operational failures.
Timing is Everything: The Best Time to Air Layer Crepe Myrtles
Timing is perhaps the most critical factor in the success of your air layering project. Attempting this process during the wrong season will almost certainly lead to failure. The ideal window is during the plant’s period of active growth.
For crepe myrtles, this means starting in late spring or early summer. During this time, the tree is full of energy, hormones are flowing, and it is actively producing new leaves and wood. This physiological state provides the perfect conditions for generating new roots quickly and efficiently.
Avoid air layering in the fall or winter. The plant is entering or is in a state of dormancy, and it will not have the metabolic energy required to produce a new root system.
Step-by-Step Guide to Flawless Crepe Myrtle Air Layering
With your tools gathered and the season right, you are ready to create a new crepe myrtle. Follow these steps carefully for the best results. This process is methodical and rewarding.
Step 1: Select the Right Branch
First, choose a healthy, vigorous branch from the previous year’s growth. The ideal candidate will be straight, free of disease or pests, and roughly the diameter of a pencil to a marker. A branch with some healthy leaves will ensure it is actively photosynthesizing.
Step 2: The Critical Cut – Girdling the Branch
This is the most technical part of the process. Measure a spot about 12 to 18 inches from the tip of the branch. Using your sterile knife, make two parallel cuts completely around the circumference of the branch, about 1 to 1.5 inches apart.
Next, make a vertical cut connecting the two parallel rings. Carefully peel off the ring of bark. The goal is to expose the whitish-green wood underneath. Crucially, you must then gently scrape this exposed surface to remove the cambium and phloem layers, which prevents the wound from healing over and reconnecting.
Step 3: Apply the Rooting Hormone
Dip a small, clean brush or cotton swab into your rooting hormone powder or gel. Apply a thorough coating to the top edge of the cut you made—the edge closer to the leafy tip of the branch. This is where the new roots will emerge from.
Step 4: Prepare and Apply the Sphagnum Moss
Soak a generous handful of sphagnum moss in water until it is fully saturated. Then, squeeze it out firmly until it is damp like a wrung-out sponge, but not dripping wet. Excess water can lead to rot.
Carefully pack this damp moss into a ball shape completely around the wounded section of the branch. Ensure it makes good contact on all sides, especially with the top cut where you applied the rooting hormone.
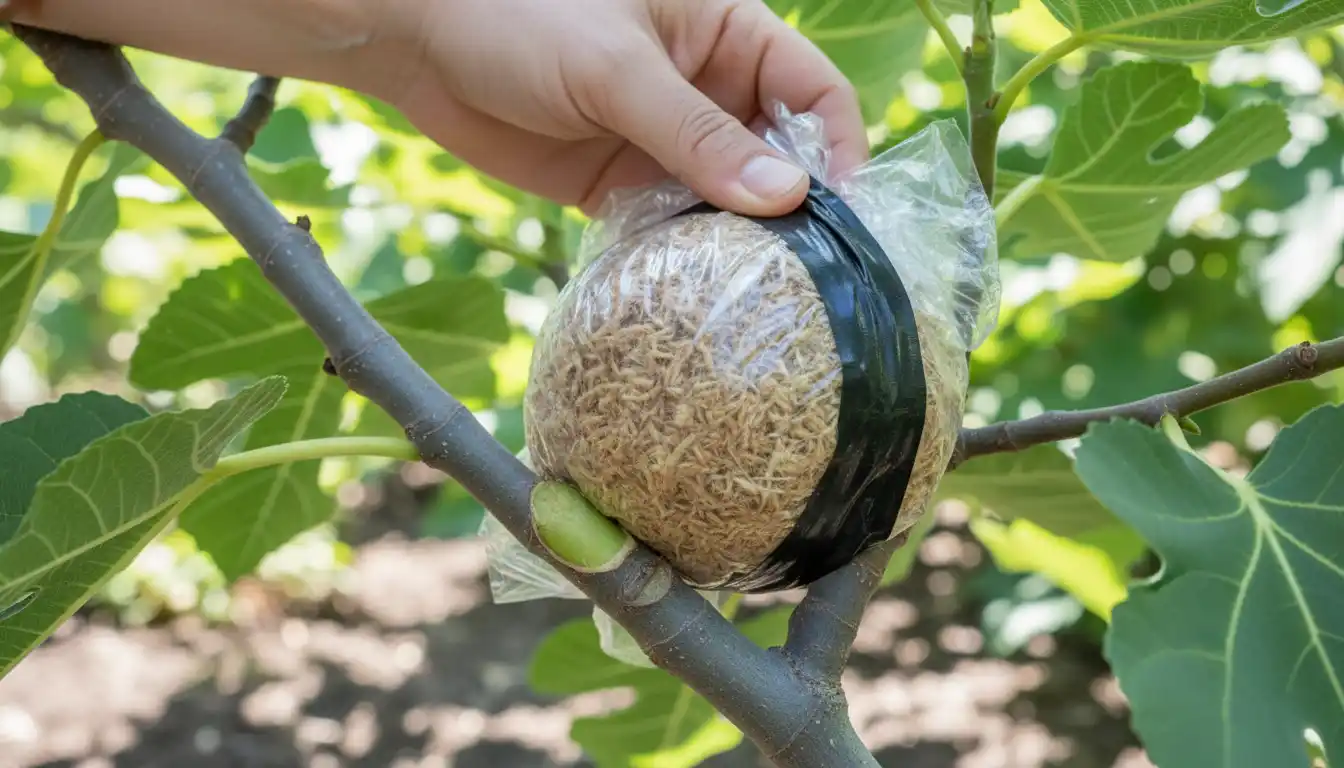
Step 5: Wrap it Up
Take a piece of clear plastic wrap and envelop the entire moss ball. The plastic acts as a miniature greenhouse, trapping humidity. Secure the top and bottom of the plastic snugly against the branch using twist ties or electrical tape. A tight seal is important to keep moisture in.
For an added pro-tip, you can wrap a piece of aluminum foil over the plastic. This will block sunlight, protecting the new, tender roots and preventing the moss from overheating on hot days.
Step 6: Patience is a Virtue – Waiting for Roots
Now, you wait. The rooting process can take anywhere from 6 to 12 weeks, depending on the health of the plant and the weather. The clear plastic allows you to monitor progress without disturbing the process. You will eventually see white roots growing throughout the moss.
Step 7: The Big Snip – Separating Your New Plant
Once the moss ball is filled with a healthy network of roots, it’s time to separate your new plant. Use a clean, sharp pair of pruning shears or a saw to cut the branch from the parent tree just below the newly formed root ball.
Step 8: Potting and Aftercare
Carefully remove the plastic wrap and foil, being cautious not to damage the delicate new roots. Do not try to remove the moss; the roots have grown into it, and it will now be part of the root ball. Plant the new tree in a pot with high-quality potting mix.
Water it thoroughly and place it in a shaded, protected area for several weeks to allow it to acclimate before gradually introducing it to more sunlight. Keep the soil consistently moist as it establishes itself.
Common Air Layering Problems and How to Troubleshoot Them
While air layering is highly reliable, issues can sometimes arise. Understanding how to identify and solve these problems can save your project. Below is a table outlining common challenges and their solutions.
| Problem | Potential Cause | Solution |
|---|---|---|
| No roots have formed after 12 weeks. | The wound healed over (cambium not fully removed), the moss dried out, or it was attempted in the wrong season. | Ensure you scrape the wood clean after removing the bark. Check moss moisture periodically and add water with a syringe if needed. Only attempt air layering in late spring or summer. |
| The moss looks moldy or smells rotten. | The sphagnum moss was too wet when applied, creating an anaerobic environment. | Remove the wrapping, gently pull away any rotted moss, and allow the area to air out briefly. Re-wrap with new moss that is only slightly damp. |
| The branch above the air layer is wilting or dying. | The initial cut was too deep and damaged the xylem, cutting off the water supply to the branch. | Unfortunately, this branch is likely lost. The xylem is the plant’s plumbing for water, and if severed, the branch cannot survive. Select a new branch and be more careful not to cut past the bark and cambium layers. |
| Ants or insects have infested the moss ball. | The sugary sap at the wound site can attract pests. | A small amount of insect activity is usually harmless. If it becomes a major infestation, you may need to unwrap, remove the pests, and re-wrap the layer. |
Advanced Techniques and Pro-Tips
Once you master the basic technique, you can explore more advanced methods. Commercial air layering pods or balls are available, which are reusable plastic spheres that clamp around the branch and can be filled with moss. These offer a cleaner and often more secure alternative to plastic wrap.
This attention to detail and willingness to use the right tool for the job translates to many areas of home improvement. Just as an air layering pod can simplify propagation, careful planning is essential when considering a major kitchen upgrade, like how to best integrate two dishwashers for maximum efficiency.
Another technique for multi-stemmed or shrubby crepe myrtles is mound layering. This involves mounding soil up around the base of the plant, wounding the low-lying stems, and allowing them to root directly into the mound. It’s an effective way to propagate several new plants at once from a single specimen.
Beyond Crepe Myrtles: What Else Can You Air Layer?
The skill you’ve learned is not limited to just one plant. Air layering is a highly effective method for a wide range of woody and semi-woody plants that are often difficult to propagate from cuttings.
Consider applying this technique to magnolias, Japanese maples, roses, ficus trees, fruit trees like citrus and figs, and many other ornamental shrubs. Each successful project will build your confidence and expand your garden.
Conclusion: Your Garden’s Future is on a Branch
Air layering transforms a seemingly complex botanical process into a simple and accessible project for any gardener. It demystifies plant propagation and empowers you to fill your garden with exact copies of the plants you love most, all for the cost of a few basic supplies.
By following these steps, you can move beyond the uncertainty of cuttings and the genetic lottery of seeds. You are directly cloning your prized crepe myrtle, ensuring that every desirable trait—from flower color to growth habit—is perfectly preserved in the next generation.
This season, don’t just admire your crepe myrtle. Take a closer look, select a healthy branch, and unlock the incredible potential to create a new, beautiful tree from thin air.