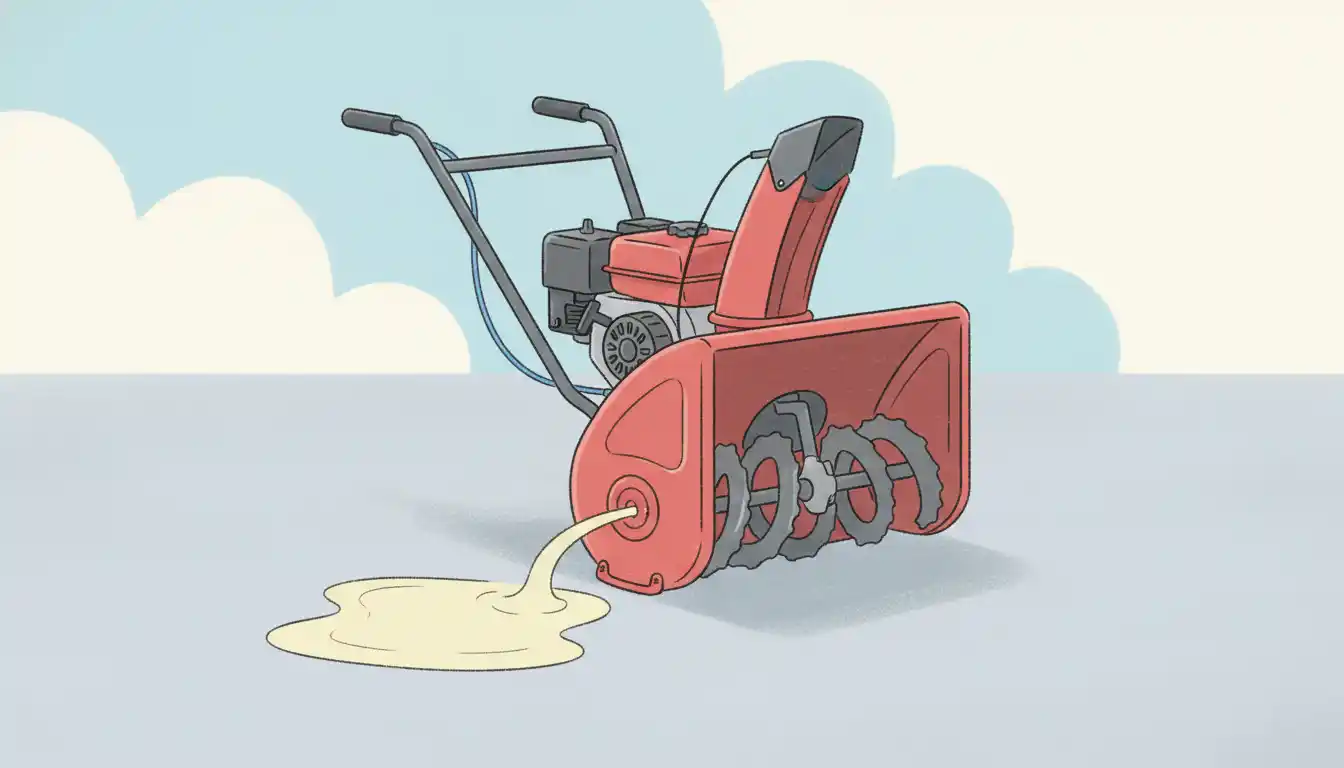
Craftsman Snowblower Leaking Gas? Don’t Panic! Here’s Your Fix
Discovering a puddle of gasoline under your Craftsman snowblower is more than just an inconvenience; it’s a serious safety hazard. A gas leak not only wastes fuel but also poses a significant fire risk, demanding your immediate attention. Fortunately, most leaks originate from a few common areas and can often be repaired with basic tools and a little patience.
This guide will walk you through diagnosing the source of the leak on your Craftsman snowblower and provide detailed, step-by-step instructions for a safe and effective repair. By tackling this issue head-on, you can ensure your machine is ready and reliable for the next big snowstorm.
You'll Learn About
Safety First: Critical Precautions Before You Begin
Before you even think about diagnostics or repairs, safety must be your top priority. Gasoline is highly flammable, and its vapors can ignite from a single spark. Taking the proper precautions is non-negotiable.
Always work in a well-ventilated area, preferably outdoors or in a garage with the door wide open. Ensure there are no open flames, pilot lights, or sources of sparks nearby. It is also crucial to disconnect the spark plug wire to prevent any chance of the engine accidentally starting while you work.
Pinpointing the Source: Common Culprits of a Gas Leak
The first step in any repair is identifying exactly where the fuel is escaping. A leak can originate from several points in the fuel system. To find the source, it’s helpful to clean any existing gasoline and grime off the engine, which will allow you to spot the fresh trail of a leak more easily.
The Carburetor Bowl and Gasket
One of the most frequent leak sources is the carburetor. Specifically, the gasket that seals the carburetor’s float bowl can dry out, crack, or become compressed over time, allowing fuel to seep out. The nut that holds the bowl in place can also have a faulty seal or may have simply become loose from vibration.
Modern gasoline blends that contain ethanol can accelerate the deterioration of older rubber and plastic components. This is a significant factor in fuel system leaks on equipment that sits for long periods, as the ethanol can be corrosive to these parts.
Cracked or Deteriorated Fuel Lines
The flexible rubber or plastic fuel lines that carry gasoline from the tank to the carburetor are constantly exposed to fuel, heat, and vibration. Over time, they can become brittle, crack, or develop soft spots. Carefully inspect every inch of the fuel lines, including the areas hidden under shrouds or clamps.
Pay close attention to the connection points where the lines attach to the fuel tank, fuel filter, and carburetor. The clamps used to secure these lines can also lose tension or corrode, leading to a loose fit and a subsequent leak.
The Fuel Filter
The in-line fuel filter, designed to trap debris before it reaches the carburetor, is another potential failure point. The plastic housing of the filter can develop cracks, or the connections where the fuel lines attach can become loose. This is often an easy and inexpensive part to inspect and replace.
The Primer Bulb
If your Craftsman snowblower is equipped with a primer bulb, this component or its associated fuel lines can be a source of leaks. The bulb is made of soft, flexible rubber that can become brittle and crack with age and exposure to the elements. Pushing the primer bulb forces fuel through the system, and any crack will become immediately apparent.
The Fuel Tank and Shut-off Valve
While less common, the fuel tank itself can be the culprit. Plastic tanks can develop stress cracks, particularly around the mounting points where vibration is concentrated. Similarly, the fuel shut-off valve, where the fuel line connects to the tank, has seals that can wear out and begin to leak.
Your Step-by-Step Repair Guide
Once you have identified the source of the leak, you can proceed with the repair. It is essential to have the correct replacement parts on hand before you begin. You can typically find parts for your specific Craftsman model online or at a local small engine repair shop.
Fixing a Leaky Carburetor
If the leak is coming from the carburetor bowl, replacing the bowl gasket and the sealing washer on the bowl nut is the most common solution. This is a straightforward job that can solve the problem quickly.
First, ensure the fuel tank is empty or that the fuel line is clamped off. Place a rag under the carburetor to catch any residual fuel. Use a wrench to carefully remove the nut at the bottom of the carburetor bowl, then gently lower the bowl. Take care not to spill the gasoline inside. Remove the old gasket from the rim of the carburetor body and the sealing ring from the bowl nut, clean the surfaces thoroughly, and install the new parts before reassembling. Do not over-tighten the bowl nut, as this can damage the new seals.
Replacing Cracked Fuel Lines
Replacing a fuel line is another common and relatively simple repair. When purchasing a new fuel line, ensure it is the correct diameter and, more importantly, that it is rated for use with ethanol-blended fuels. This simple upgrade can prevent premature failure in the future.
Use pliers to squeeze and slide the old clamps off the fittings. Carefully twist and pull the old, brittle line from the fittings. Cut the new fuel line to the exact same length as the original, slide the clamps onto the new line, and then push the line firmly onto the fittings. Finally, position the clamps securely over the fittings to ensure a tight seal.
| Symptom | Possible Cause | Recommended Solution |
|---|---|---|
| Gas dripping from the bottom of the carburetor. | Worn or cracked carburetor bowl gasket. | Replace the bowl gasket and bowl nut seal. |
| Visible cracks or wet spots on the rubber hoses. | Deteriorated fuel lines. | Replace fuel lines with new, ethanol-rated tubing. |
| Fuel leaking from the primer bulb when pressed. | Cracked or brittle primer bulb. | Replace the entire primer bulb assembly. |
| Fuel seeping from the in-line plastic filter. | Cracked fuel filter housing. | Install a new in-line fuel filter. |
| Gas smell and wetness around the air filter. | Stuck carburetor float or faulty needle valve. | Clean or rebuild the carburetor. Check for dirt in the needle/seat. |
Installing a New Fuel Filter and Primer Bulb
Both the fuel filter and primer bulb are typically easy to replace. The fuel filter is an in-line component; simply remove the fuel lines from either side, noting the direction of the arrow indicating fuel flow, and install the new filter in the same orientation.
A primer bulb assembly is often held in place by tabs. Squeezing these tabs allows you to push the old bulb out of its housing. The new one simply snaps into place, and the fuel lines can then be reconnected.
Beyond the Basics: When the Leak Persists
Sometimes, a leak from the carburetor area isn’t from a gasket but from an overflow condition. This often happens if the machine has been stored improperly or if debris has entered the carburetor. Inside the carburetor bowl is a float that rises with the fuel level, pushing a tiny needle into a seat to shut off the flow of gas. If a small piece of dirt gets lodged between the needle and its seat, or if the float itself is damaged and fills with gas, it cannot shut off the fuel supply. The result is a continuous flow of gasoline that overflows from the carburetor, typically out of the air intake or venturi.
This type of leak often requires a more thorough carburetor cleaning or rebuilding. While a persistent leak might seem daunting, and some issues like a cracked fuel tank may require a professional, many common gas leaks are manageable for the average homeowner. If you’re experiencing starting problems with a different machine, you might find our ultimate repair guide for Spirit snowblowers helpful.
Preventative Maintenance: Stop Leaks Before They Start
The best way to fix a leak is to prevent it from ever happening. Proper fuel management and regular inspections are key. Using a fuel stabilizer in your gasoline is one of the most effective preventative measures you can take.
Stabilizer prevents the fuel from breaking down and forming gummy deposits that can clog carburetor passages and cause float needles to stick. For off-season storage, either drain the fuel system completely or fill the tank with stabilized fuel and run the engine for a few minutes to ensure the treated gas circulates through the entire system.