Craftsman Drive Belt Problems? The #1 Reason Your Tractor Fails
The sudden, deafening silence of a lawn tractor engine running without movement is a frustrating experience for any homeowner. One moment you’re cruising across the lawn, and the next, you’re stranded. Often, the culprit behind this abrupt failure is a simple, yet vital, component: the drive belt.
Your Craftsman lawn tractor’s drive belt is the unsung hero that transfers power from the engine to the wheels and mower blades. When it fails, your entire operation grinds to a halt. Understanding the warning signs and causes of drive belt problems is the first step toward a quick and lasting solution.
You'll Learn About
Is Your Craftsman Drive Belt Failing? Telltale Signs to Watch For
A failing drive belt rarely just snaps without warning. It usually sends out distress signals beforehand. Recognizing these signs allows you to address the issue before you’re left with a dead tractor in the middle of your yard.
Loss of Power or Sluggish Movement
The most common symptom of a failing ground drive belt is a noticeable loss of power. Your tractor may struggle to go up slight inclines or move much slower than usual at full throttle. This happens because the worn or loose belt is slipping on the pulleys instead of gripping them firmly.
Mower Blades Won’t Engage or Spin Slowly
If your engine is running fine but the mower blades refuse to spin when you engage the PTO (Power Take-Off), the issue points directly to the deck belt. This belt, also known as the blade belt, may be stretched, broken, or has simply slipped off a pulley.
Squealing, Chirping, or Grinding Noises
Strange noises are your tractor’s way of crying for help. A high-pitched squeal upon acceleration or when engaging the blades often indicates a slipping belt. A consistent chirping or grinding sound can point to a misaligned belt or a failing pulley bearing that will soon destroy the belt.
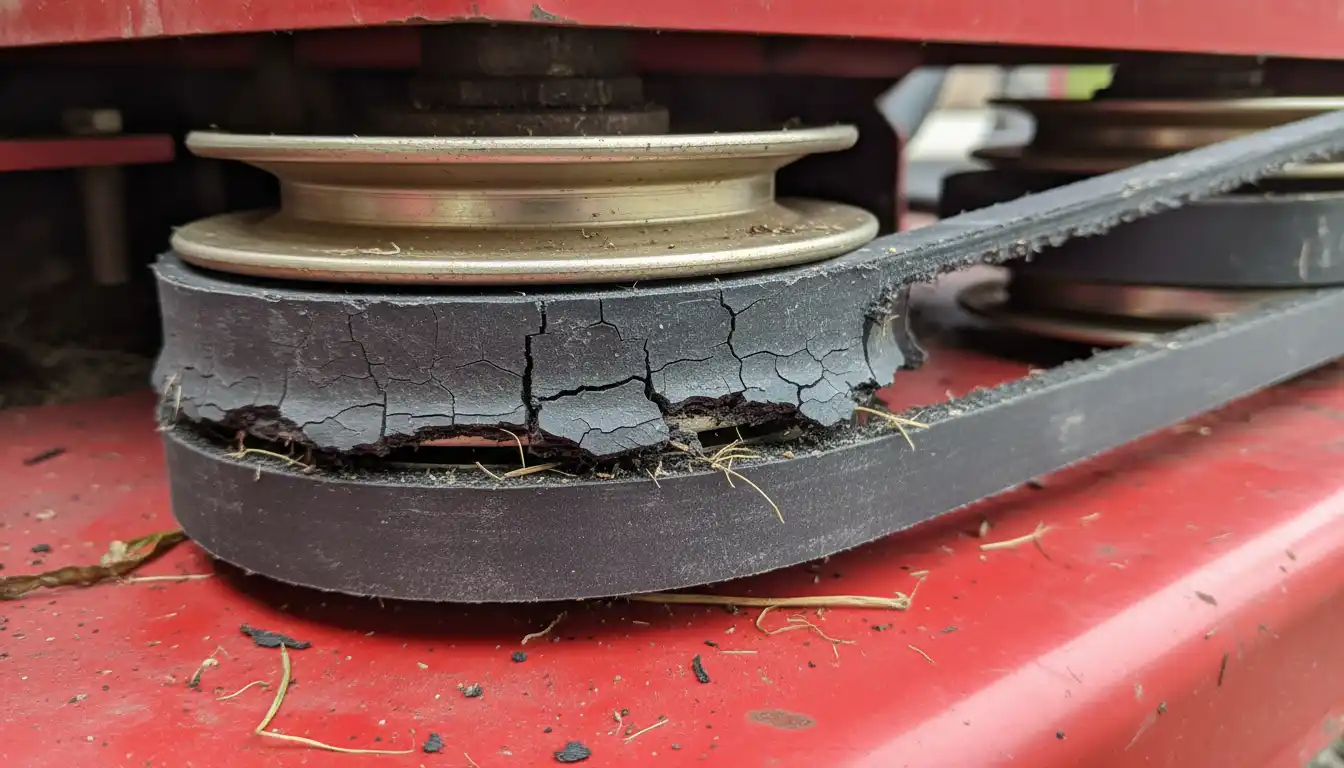
Visible Wear and Tear
A physical inspection can reveal a lot about the health of your drive belt. Look for deep cracks, frayed edges, or sections where the rubber has become smooth and shiny (a condition known as glazing). Any visible damage means the belt’s integrity is compromised and it’s living on borrowed time.
Smell of Burning Rubber
The distinct, acrid smell of burning rubber is an unmistakable sign of a serious problem. It means the belt is slipping so severely that the friction is generating intense heat, or it’s stuck against a seized pulley. Shut down the tractor immediately if you smell this, as it can cause further damage.
The Root Causes: Why Craftsman Drive Belts Fail Prematurely
Replacing a belt only to have it fail again a month later is incredibly frustrating. To truly fix the problem, you must understand the underlying cause of the failure. Simply putting on a new belt without investigating is treating the symptom, not the disease.
Simple Old Age and Wear
Let’s start with the obvious: drive belts are consumable parts. Made of reinforced rubber, they are designed to stretch, flex, and endure incredible tension, but not forever. Over hundreds of hours, the material degrades, becomes brittle, and will eventually fail even under perfect conditions.
Incorrect Belt Tension: The Silent Killer
Belt tension is a delicate balance and the single most critical factor in a belt’s lifespan. If the belt is too loose, it will slip, generating excess heat that cooks the rubber and polishes the pulleys. If it’s too tight, it puts immense stress on the pulley bearings and the engine’s crankshaft, leading to catastrophic failure of more expensive parts.
Damaged or Seized Pulleys
The pulleys are the track that the belt runs on. A bent, wobbly, or rusted pulley will act like a saw, shredding the edges of a brand-new belt in minutes. Likewise, a pulley with a seized bearing won’t spin, forcing the belt to drag across its stationary surface, which burns through it almost instantly.
Debris and Obstructions
The undercarriage of a lawn tractor is a harsh environment. Sticks, pinecones, packed grass clippings, and mud can get wedged into the pulley system. This debris can force a belt off its track or create a pinch point that causes it to snap under tension.
Using the Wrong Belt (A Costly Mistake)
A drive belt might look like a simple loop of rubber, but it’s an engineered part. Using a belt that is even a half-inch too long or short, or has a slightly different V-angle, can lead to failure. An incorrect belt will either not tension properly or will sit incorrectly in the pulley grooves, leading to slipping and rapid wear. Always use the OEM part number for your specific Craftsman model.
Oil and Fluid Contamination
If your tractor has a small engine or transmission oil leak, the fluid can drip onto the belts. Oil and other petroleum products cause the rubber to soften, swell, and lose its grip. This contamination will cause the belt to slip and quickly disintegrate.
Step-by-Step Guide: Replacing Your Craftsman Tractor’s Drive Belt
Replacing a drive belt is a very manageable DIY task for most homeowners. With basic tools and a bit of patience, you can save yourself a costly trip to the repair shop. This process is generally similar across models, including workhorses like the Craftsman MTS 5500.
Safety First: Essential Precautions
Before you begin any work, your safety is paramount. Park the tractor on a flat, level surface, engage the parking brake, and remove the ignition key. For good measure, disconnect the negative terminal from the battery and pull the wire off the spark plug to prevent any chance of an accidental startup.
Gathering Your Tools and the Right Part
You will typically need a basic socket and wrench set, a pair of pliers, and sturdy work gloves. The most crucial part is having the correct replacement belt. Find the model number on the sticker under your tractor’s seat and look up the exact part number in your owner’s manual or online.
Accessing and Removing the Old Belt
For the deck belt, you will first need to remove the entire mower deck from underneath the tractor. For the ground drive belt, access is typically from below. Carefully study the path of the old belt, paying close attention to the tensioner pulley. Use a wrench or socket to release the tension, which will allow you to slip the old belt off the pulleys. Taking a quick photo with your phone before removal is a great tip.
Inspect the Pulleys and Tensioner
This is the most important step for preventing a repeat failure. With the old belt off, spin each pulley by hand. They should spin smoothly and silently. If you feel any grinding, resistance, or see any wobble, that pulley or its bearing must be replaced along with the belt.
Installing the New Drive Belt
Referencing your photo or the routing diagram in your manual, thread the new belt around the pulleys. Ensure the “V” side of the belt is seated correctly in the groove of each pulley. Double-check that there are no twists in the belt and that it is clear of all belt guides and guards.
Re-tensioning and Final Checks
Once the belt is correctly routed, slowly re-engage the tensioner spring or pulley. The belt should become taut. Re-install the mower deck if you removed it. Before starting the engine, turn the main pulleys by hand a few times to ensure the belt tracks correctly and doesn’t rub against anything.
Proactive Maintenance: Preventing Future Drive Belt Headaches
The best repair is the one you never have to make. A simple, proactive maintenance routine can dramatically extend the life of your drive belts and help you spot trouble before it starts. A little prevention saves a lot of time, money, and frustration.
A regular schedule is the key to longevity. Sticking to a simple checklist can make all the difference in the world for your equipment’s health.
| Maintenance Task | Frequency | Why It’s Important |
|---|---|---|
| Visual Belt Inspection | Before Each Use | Catches cracks, fraying, and glazing before the belt snaps unexpectedly. |
| Check Belt Tension | Monthly | Ensures the belt has proper grip without stressing bearings. Prevents slipping and heat buildup. |
| Clean Deck & Undercarriage | After Each Use | Removes grass, sticks, and mud that can derail the belt or get caught in pulleys. |
| Listen for New Noises | During Operation | Squealing or grinding sounds are early warnings of belt or pulley problems. |
| Check Pulleys | Annually | Confirms bearings are smooth and pulleys are not bent or damaged. |
The Importance of Correct Tensioning
Proper tension is the lifeblood of your drive system. Most Craftsman tractors use a spring-loaded idler pulley to create automatic tension. Your job is to ensure this mechanism moves freely and isn’t seized with rust or packed with debris, which would prevent it from applying the correct pressure.
Keep It Clean: The Enemy is Debris
After each mowing session, take a moment to use a leaf blower or compressed air to blow out clippings from the top of the mower deck and the undercarriage. This simple five-minute task prevents the buildup that leads to overheating and belt obstructions.
When to Call a Professional
While a belt replacement is a great DIY project, some issues are best left to an experienced mechanic. Knowing your limits is just as important as knowing how to use a wrench. It’s better to be safe than sorry.
Complex Transmission Issues
If you’ve replaced the ground drive belt and the tractor is still sluggish or won’t move, the problem may lie within the hydrostatic transmission itself. These are sealed, complex units that require specialized knowledge, similar to troubleshooting advanced systems on other brands, which sometimes presents unique Husqvarna LGT2654 problems.
Bent Pulleys or Damaged Mounts
If you discover a pulley is bent or its mounting bracket is cracked, it’s time to pause. These repairs may require parts to be pressed on or off, or even welding to fix properly. A professional will have the right tools to ensure everything is perfectly aligned.
If You’re Not Confident
There is no shame in calling for help. If you’ve read the guide and feel the job is beyond your comfort level or toolset, making a service call is the right choice. A good mechanic can get the job done quickly and correctly, ensuring your machine is safe to operate, which is a principle that applies to any large equipment, even an Estate snowblower.
By understanding the signs, causes, and solutions for Craftsman lawn tractor drive belt problems, you are empowered to take control of your machine’s maintenance. A healthy drive belt means a reliable tractor, a perfectly cut lawn, and more time enjoying your weekend.