Countertop for Slide-In Range: Your Guide to a Perfect Fit
Upgrading to a slide-in range is an exciting step toward achieving a high-end, integrated kitchen. Unlike freestanding models, these ranges are designed to sit flush with your cabinetry, creating a seamless, custom look. However, this beautiful design introduces a critical challenge that many homeowners overlook: the countertop.
Choosing and installing the right countertop is not just a matter of aesthetics; it’s a technical necessity. An improper fit can lead to unsightly gaps, stability issues, and even damage to your new appliance or cabinets. This guide will walk you through everything you need to know to ensure your countertop and slide-in range come together perfectly.
You'll Learn About
Why Slide-In Ranges Demand Countertop Perfection
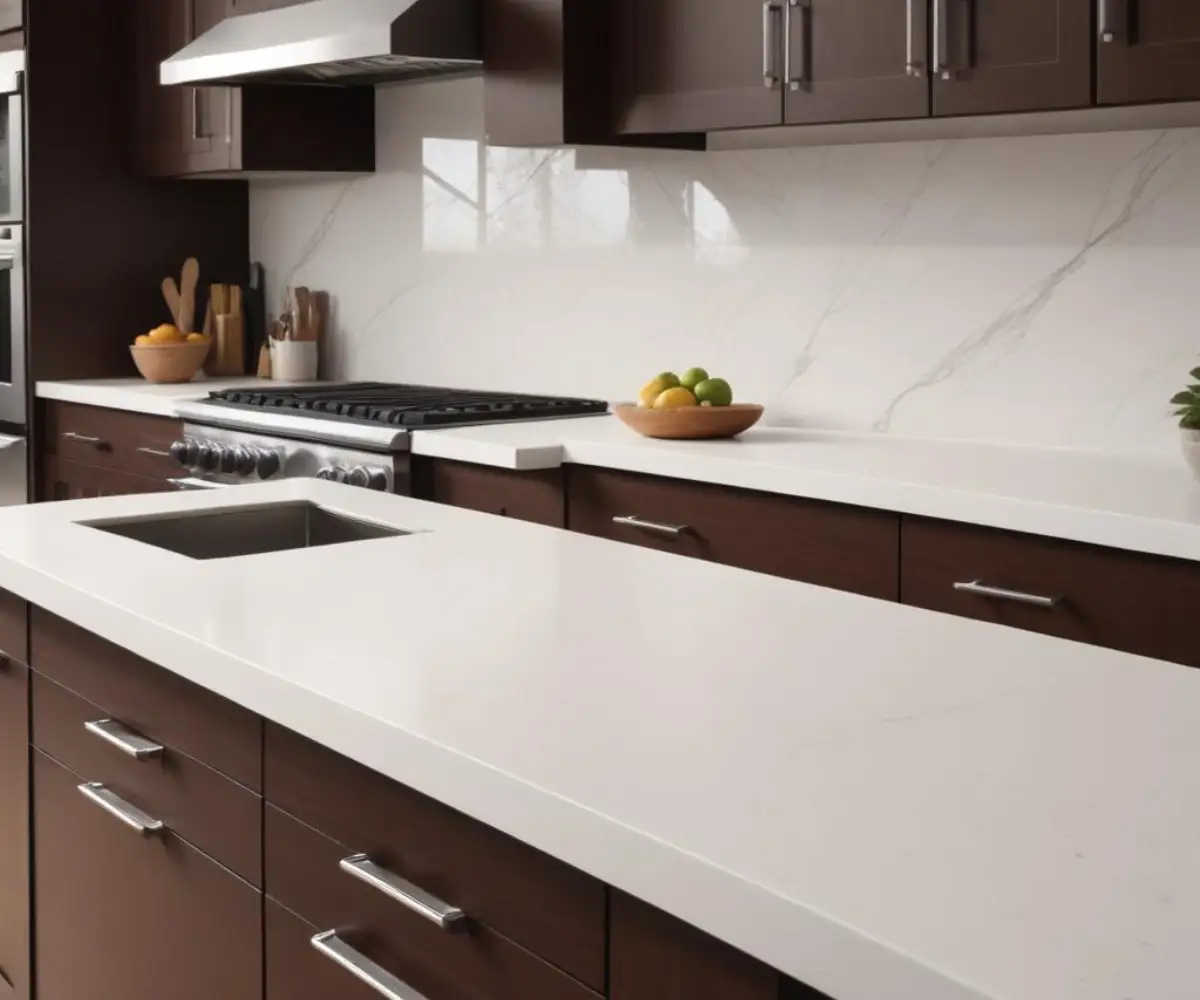
The core of the issue lies in the design of a slide-in range. The cooktop surface has a subtle lip or flange on the sides that is engineered to overlap and rest on top of the countertop. This creates that desirable built-in appearance and prevents crumbs and spills from falling into the gap between the appliance and the cabinet.
This design means there is no room for error. The countertop cutout must be executed with absolute precision according to the manufacturer’s specifications. Furthermore, because slide-in ranges lack the built-in backguard of freestanding models, you must also plan for the wall area and countertop behind the appliance.
The Unseen Challenge: The Rear Gap
Perhaps the most common frustration homeowners face is the gap left behind the range. Since the appliance is designed to slide between two runs of countertop, a space is created between the back of the range and the wall. Filling this space is essential for both looks and function.
A properly installed piece of countertop material in this gap provides a continuous, easy-to-clean surface. Without it, you are left with an awkward gap that traps food and grease. Some appliance manufacturers offer thin metal filler kits, but for a truly professional and durable finish, extending the countertop material is the superior solution.
Choosing the Right Countertop Material
The material you choose for your countertops will have a significant impact on both the look and the long-term durability of your installation. Heat resistance is a major factor to consider, as the area directly adjacent to the cooktop will be exposed to high temperatures.
It’s crucial to select a material that can withstand the heat generated by your range without scorching, cracking, or discoloring. Always review the warranty information for your chosen countertop material, as some manufacturers have specific restrictions regarding installation next to high-heat appliances.
Material Breakdown: Pros and Cons
Quartz: An engineered stone made from ground quartz and resins, this material is incredibly durable and non-porous. It offers a consistent, uniform appearance but can be susceptible to damage from extreme, direct heat. Always use trivets for hot pans.
Granite: This natural stone is highly resistant to heat, making it an excellent choice for placement next to a range. As a porous material, it requires periodic sealing to prevent staining. If you’re considering this option, understanding the nuances of placing granite behind a slide-in range is crucial for a lasting installation.
Solid Surface: Materials like Corian offer a seamless appearance and can be repaired if scratched. However, they have lower heat resistance compared to natural stone and can be scorched by hot cookware placed directly on the surface.
Laminate: The most budget-friendly option, laminate comes in a vast array of colors and patterns. It is the least heat-resistant choice and can be easily damaged by hot pots and pans, making it a less-than-ideal partner for a high-performance slide-in range.
Countertop Material Comparison
To simplify your decision, consider the key attributes of each popular material in the context of a slide-in range installation.
| Material | Heat Resistance | Durability & Scratch Resistance | Maintenance | Cost ($-$$$$) |
|---|---|---|---|---|
| Granite | Excellent | Very Good | Requires periodic sealing | $$$ |
| Quartz | Good (but vulnerable to thermal shock) | Excellent | Low (non-porous) | $$$ |
| Solid Surface | Fair | Good (can be sanded/repaired) | Low | $$ |
| Laminate | Poor | Fair (can scratch and chip) | Low | $ |
The Perfect Cutout: Precision is Non-Negotiable
The success of your slide-in range installation hinges on the accuracy of the countertop cutout. This is not a task for casual measurement. Always use the manufacturer’s installation manual for the precise cutout dimensions required for your specific range model.
Professional countertop fabricators create a physical or digital template of your cabinet layout to ensure a perfect fit. This process accounts for any irregularities in your walls or cabinets, ensuring the final countertop sits level and the cutout is exact. The weight of the range should be supported by its feet, not by the countertop lip.
The Critical Rear Strip Solution
To address the gap behind the range, a filler strip of the same countertop material must be fabricated. This piece should be the exact same thickness as the main countertop to create a perfectly level surface. This strip requires dedicated support.
A common professional technique that ensures longevity is to install a wooden cleat directly onto the wall studs behind the range. This cleat acts as a solid shelf, providing robust support for the countertop strip and preventing it from cracking under the weight of heavy pots or pans over time. This is a critical detail that distinguishes a professional installation from a standard one.
Solving Common Fitment and Gap Issues
Even with careful planning, minor fitment issues can arise. The key is to know how to address them for a polished final look.
A very small space between the countertop edge and the range’s flange is normal. Learning about the acceptable gap between a stove and countertop can help you determine if your installation is within standard tolerances. A thin bead of high-heat silicone caulk can seal this space neatly.
When the Opening is Too Wide
If you find yourself with an opening that is significantly wider than your new range, you’re not alone. This is a frequent issue when replacing an older appliance with a new standard-sized one. Fortunately, there are effective solutions for dealing with a situation like a 30-inch range in a 36-inch space, which often involve custom filler strips or trim kits.
Accessory manufacturers and even some appliance brands offer trim kits designed to fill these gaps. These are typically thin strips of stainless steel or another matching material that mount to the countertop to provide a clean, finished edge and prevent debris from falling into the void.
Final Installation Steps for a Flawless Finish
With the countertop perfectly cut and installed, the final steps involve carefully placing and leveling the range. The cabinets must be perfectly level before the countertop is installed. This provides a stable and flat foundation.
Once the countertop is in place, the slide-in range can be moved into the opening. The adjustable feet on the bottom of the range must be used to raise or lower the appliance until its cooktop surface is perfectly flush with or just slightly above the countertop. This final leveling step is what achieves the truly integrated, seamless appearance that makes a slide-in range so desirable.
Frequently Asked Questions
What are the standard countertop cutout dimensions for a slide-in range?
Most standard slide-in ranges are designed to fit into a 30-inch wide cabinet opening. The typical depth of the countertop is around 25 to 27 inches, and the standard height of countertops is 36 inches, which slide-in ranges are designed to match. However, it’s always crucial to check the specific manufacturer’s dimensions for your chosen range before installation.
Does a slide-in range overlap the countertop?
Traditionally, slide-in ranges have a cooktop that slightly overhangs the countertop on the sides. This design helps prevent food and spills from falling into the gap between the range and the counter. However, many newer models are now designed with an edge-to-edge cooktop and no overlap for a more seamless installation.
What should I do if there’s a gap between my slide-in range and the countertop?
If there is a gap between your slide-in range and countertop, you can use a stove or counter gap cover. These are typically T-shaped strips made of silicone or metal that fit into the gap to create a seamless look and prevent spills from falling through. Some range manufacturers also offer optional filler kits to address these gaps.
Do I need a special type of countertop for a slide-in range?
While you don’t necessarily need a special type, it’s important to consider heat resistance, especially if you do a lot of cooking. Materials like granite, quartzite, and soapstone are excellent at withstanding high temperatures. It’s also important to ensure your countertop is level to allow for a proper and flush installation of the slide-in range.
Does the countertop need to go behind a slide-in range?
In most installations, the countertop does not extend behind the slide-in range as the range is designed to be the same depth as the countertop. A slide-in range fits snugly between the cabinets, and often a small piece of countertop or a filler strip is placed behind the range to bridge any gap to the wall. This provides a clean, built-in appearance.